In this article and its accompanying video, we’ll describe a workflow for importing metadata, thumbnails and proxies into an existing archive index. Data already archived by P5 Archive and represented in an archive index, can have these additional items added, by providing data and jpeg/mp4 files from an external source. This feature requires P5 version 7.1.6 and later.
For the purposes of this worked example, it is assumed that you have P5 setup and have already archived some assets, but these assets are not accompanied by metadata, thumbnails or proxies in the archive index. In some cases, LTO tapes in the LTFS format, written by another software product, have been imported into P5. Additional metadata maybe available for these assets and this data can be exported into a CSV format that P5 can import using the methods described below. In many cases, MAM systems already hold such information and this can be exported in CSV format for merging – see below.
The basis of importing this information into the P5 archive index is the creating of a CSV file (comma separated values) that references each asset in the archive index via it’s full path and filename, followed by metadata values and full path and filename to thumbnail JPEG files and proxy MP4 files.
Exporting the index
In order to create a text file that can form the basis of this CSV file, it’s useful to use a P5 CLI command that will dump out the entire contents of an archive index. On Linux and macOS systems, in a terminal/shell, the following commands will change the working directory to the P5 installation, and then use the nsdchat utility to interact with P5 and dump out the named index ‘Default-Archive’ to a file in the same director named ‘inventory.txt’.
cd /usr/local/aw

bin/nsdchat -c ArchiveIndex Default-Archive inventory inventory.txt
On Windows systems, in a Command Prompt window, use the following two commands to change directory and issue the CLI command.
cd "\Program Files\ARCHIWARE\Data_Lifecycle_Management_Suite"

.\bin\nsdchat.exe -s awsock:/admin:admin@127.0.0.1:9001 -c ArchiveIndex Default-Archive inventory inventory.txt
In both cases, the result will be a file in the current directory named ‘inventory.txt’ that contains one line per file or directory in the archive index. In our example, the top of our file looks like this:
/
/data
/data/metadata-ingest-test
/data/metadata-ingest-test/010bike.jpg
/data/metadata-ingest-test/011bike.jpg
/data/metadata-ingest-test/013bike.jpg
/data/metadata-ingest-test/022runner.jpg
/data/metadata-ingest-test/023runner.jpg
/data/metadata-ingest-test/025runner.jpg
/data/metadata-ingest-test/026runner.jpg
/data/Video
/data/Video/ForBiggerFun.mp4
Preparing the CSV file
Note that the inventory file includes entries for each folder in the index, in addition to entries for each file. Remove the entries that relate only to folders, not files. P5 can only attach metadata to files, not folders. This text file will form the basis of our CSV file that we’ll use to import metadata. An easy way to make a test import CSV is to import this text file into a spreadsheet so other values can be added to each row, and then the spreadsheet exported as a CSV file. Let’s see what this looks like using our example and Google Sheets web-based spreadsheet. Any spreadsheet tool is fine for this purpose.
In the example below, we’ve added a row to describe each column, and added three additional columns to hold our metadata and previews.
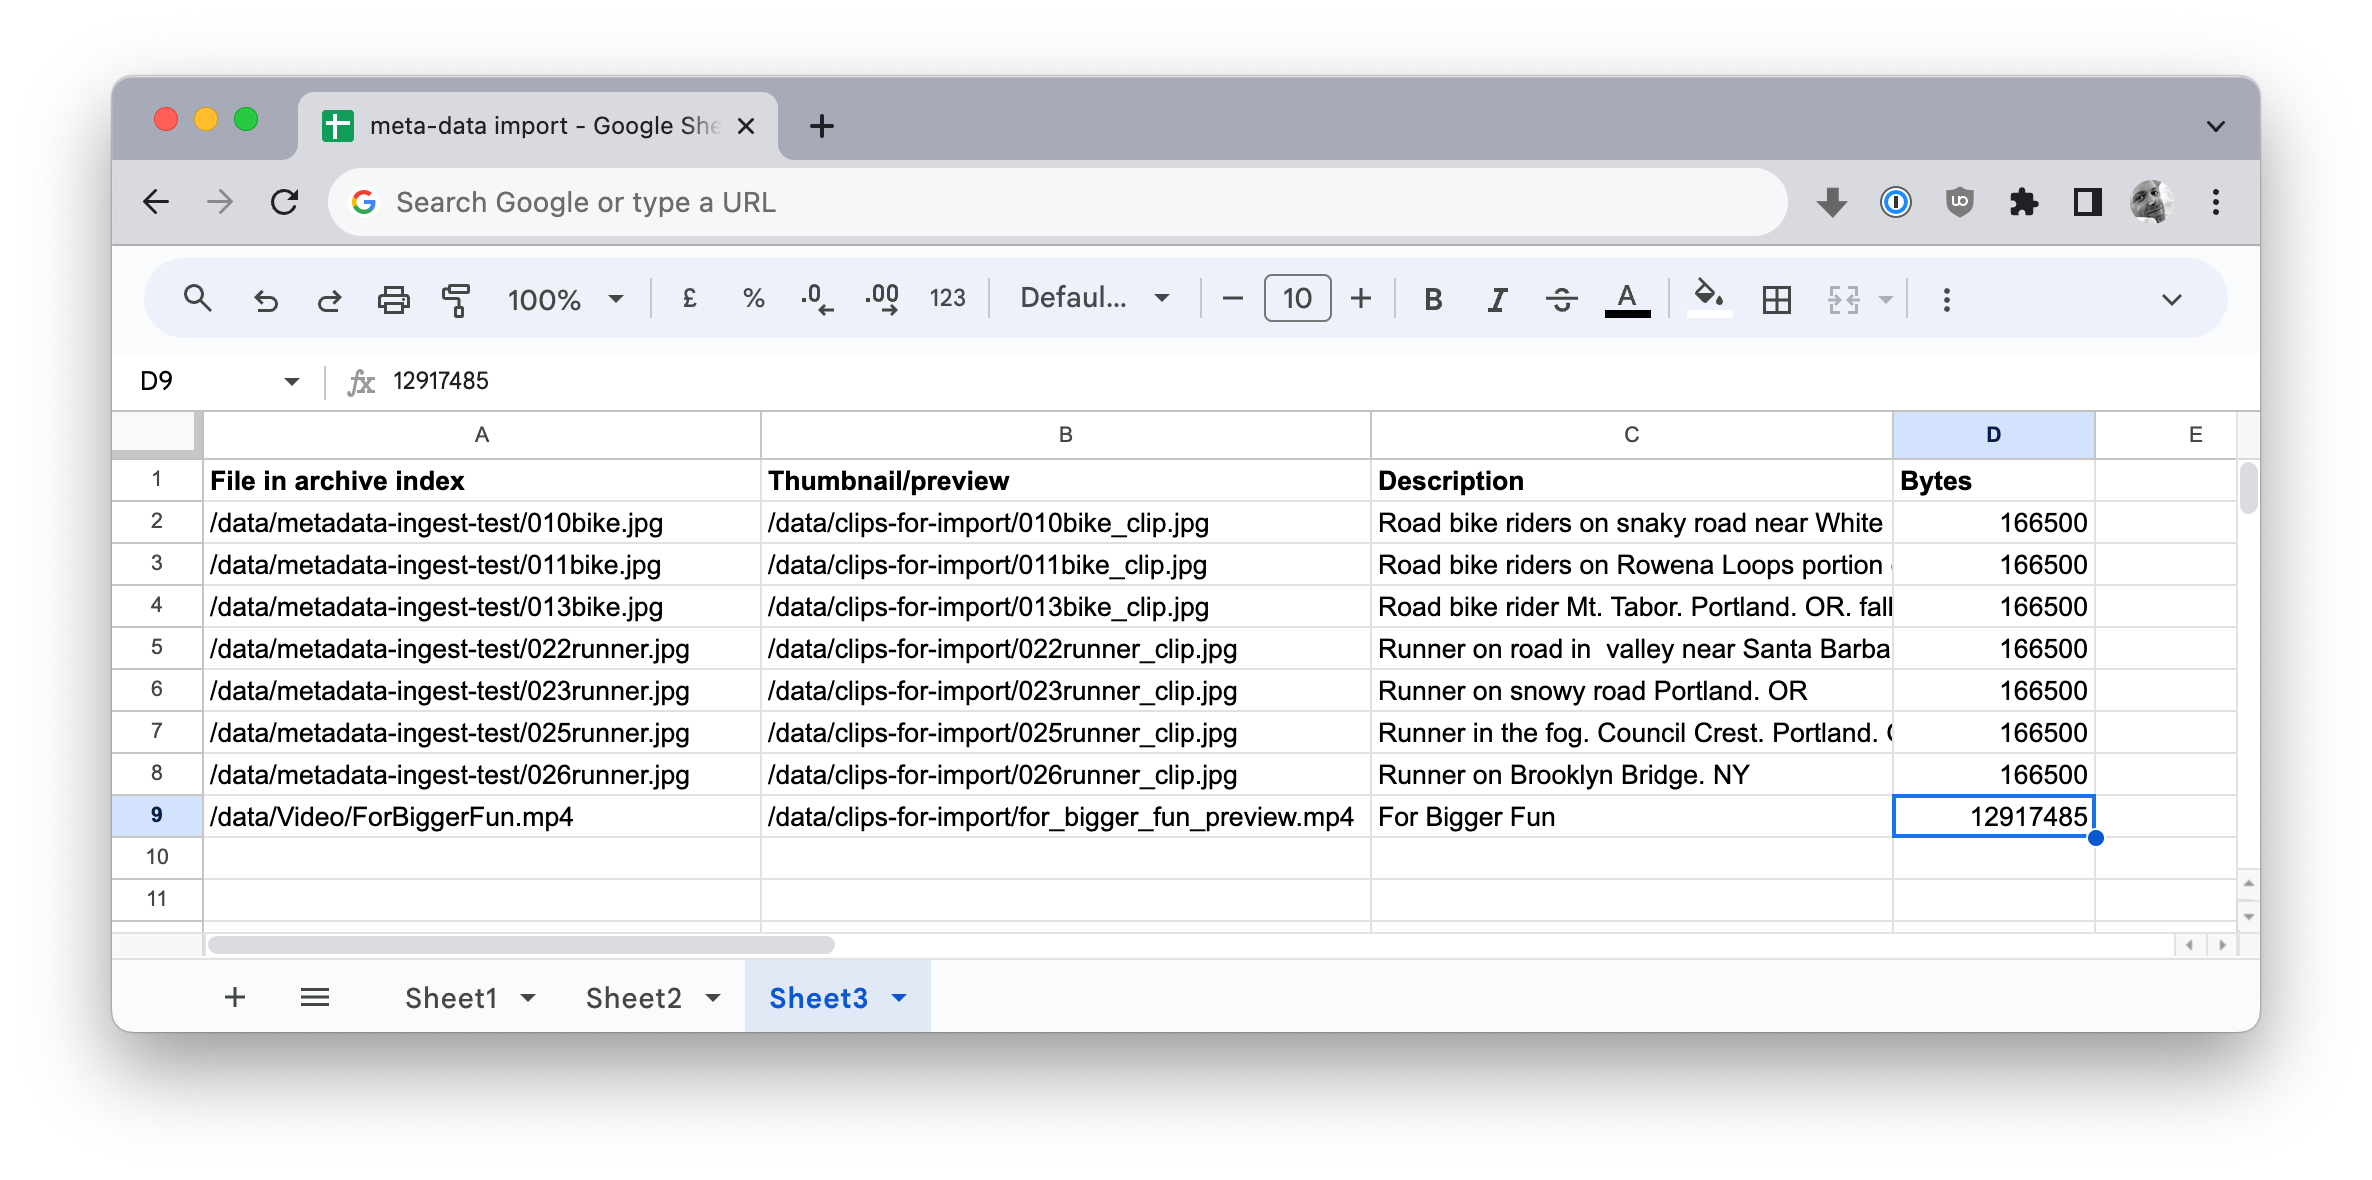
Note that the second (B) column contains the full path to a JPEG file thumbnail of the original asset whose full path and filename is in column A. These thumbnail files must exist at the specified location(s) so that the import script that we’ll run shortly is able to locate them, link them into the archive index and move them into the folder where P5 stores thumbnails. Note that the thumbnail files don’t have to have the same filename as the original asset, but they do in this example. Columns C and D in our example contain a text description of each of these media files and a filesize in bytes.
Use your spreadsheet tool to export this data in CSV format. If necessary, remove the first line of the file which will contain the column headings. The resulting CSV file will look like the example below. One line per row of the spreadsheet, values separated by commas. Note that our blog layout here will break up the lines.
/data/metadata-ingest-test/010bike.jpg,/data/clips-for-import/010bike_clip.jpg,Road bike riders on snaky road near White Salmon.WA,166500
/data/metadata-ingest-test/011bike.jpg,/data/clips-for-import/011bike_clip.jpg,Road bike riders on Rowena Loops portion of Columbia River Scenic Highway,166500
/data/metadata-ingest-test/013bike.jpg,/data/clips-for-import/013bike_clip.jpg,Road bike rider Mt. Tabor. Portland. OR. fall leaves,166500
/data/metadata-ingest-test/022runner.jpg,/data/clips-for-import/022runner_clip.jpg,Runner on road in  valley near Santa Barbara. CA,166500
/data/metadata-ingest-test/023runner.jpg,/data/clips-for-import/023runner_clip.jpg,Runner on snowy road Portland. OR,166500
/data/metadata-ingest-test/025runner.jpg,/data/clips-for-import/025runner_clip.jpg,Runner in the fog. Council Crest. Portland. OR,166500
/data/metadata-ingest-test/026runner.jpg,/data/clips-for-import/026runner_clip.jpg,Runner on Brooklyn Bridge. NY,166500
/data/Video/ForBiggerFun.mp4,/data/clips-for-import/for_bigger_fun_preview.mp4,For Bigger Fun,12917485
Adding fields to the P5 Archive Index
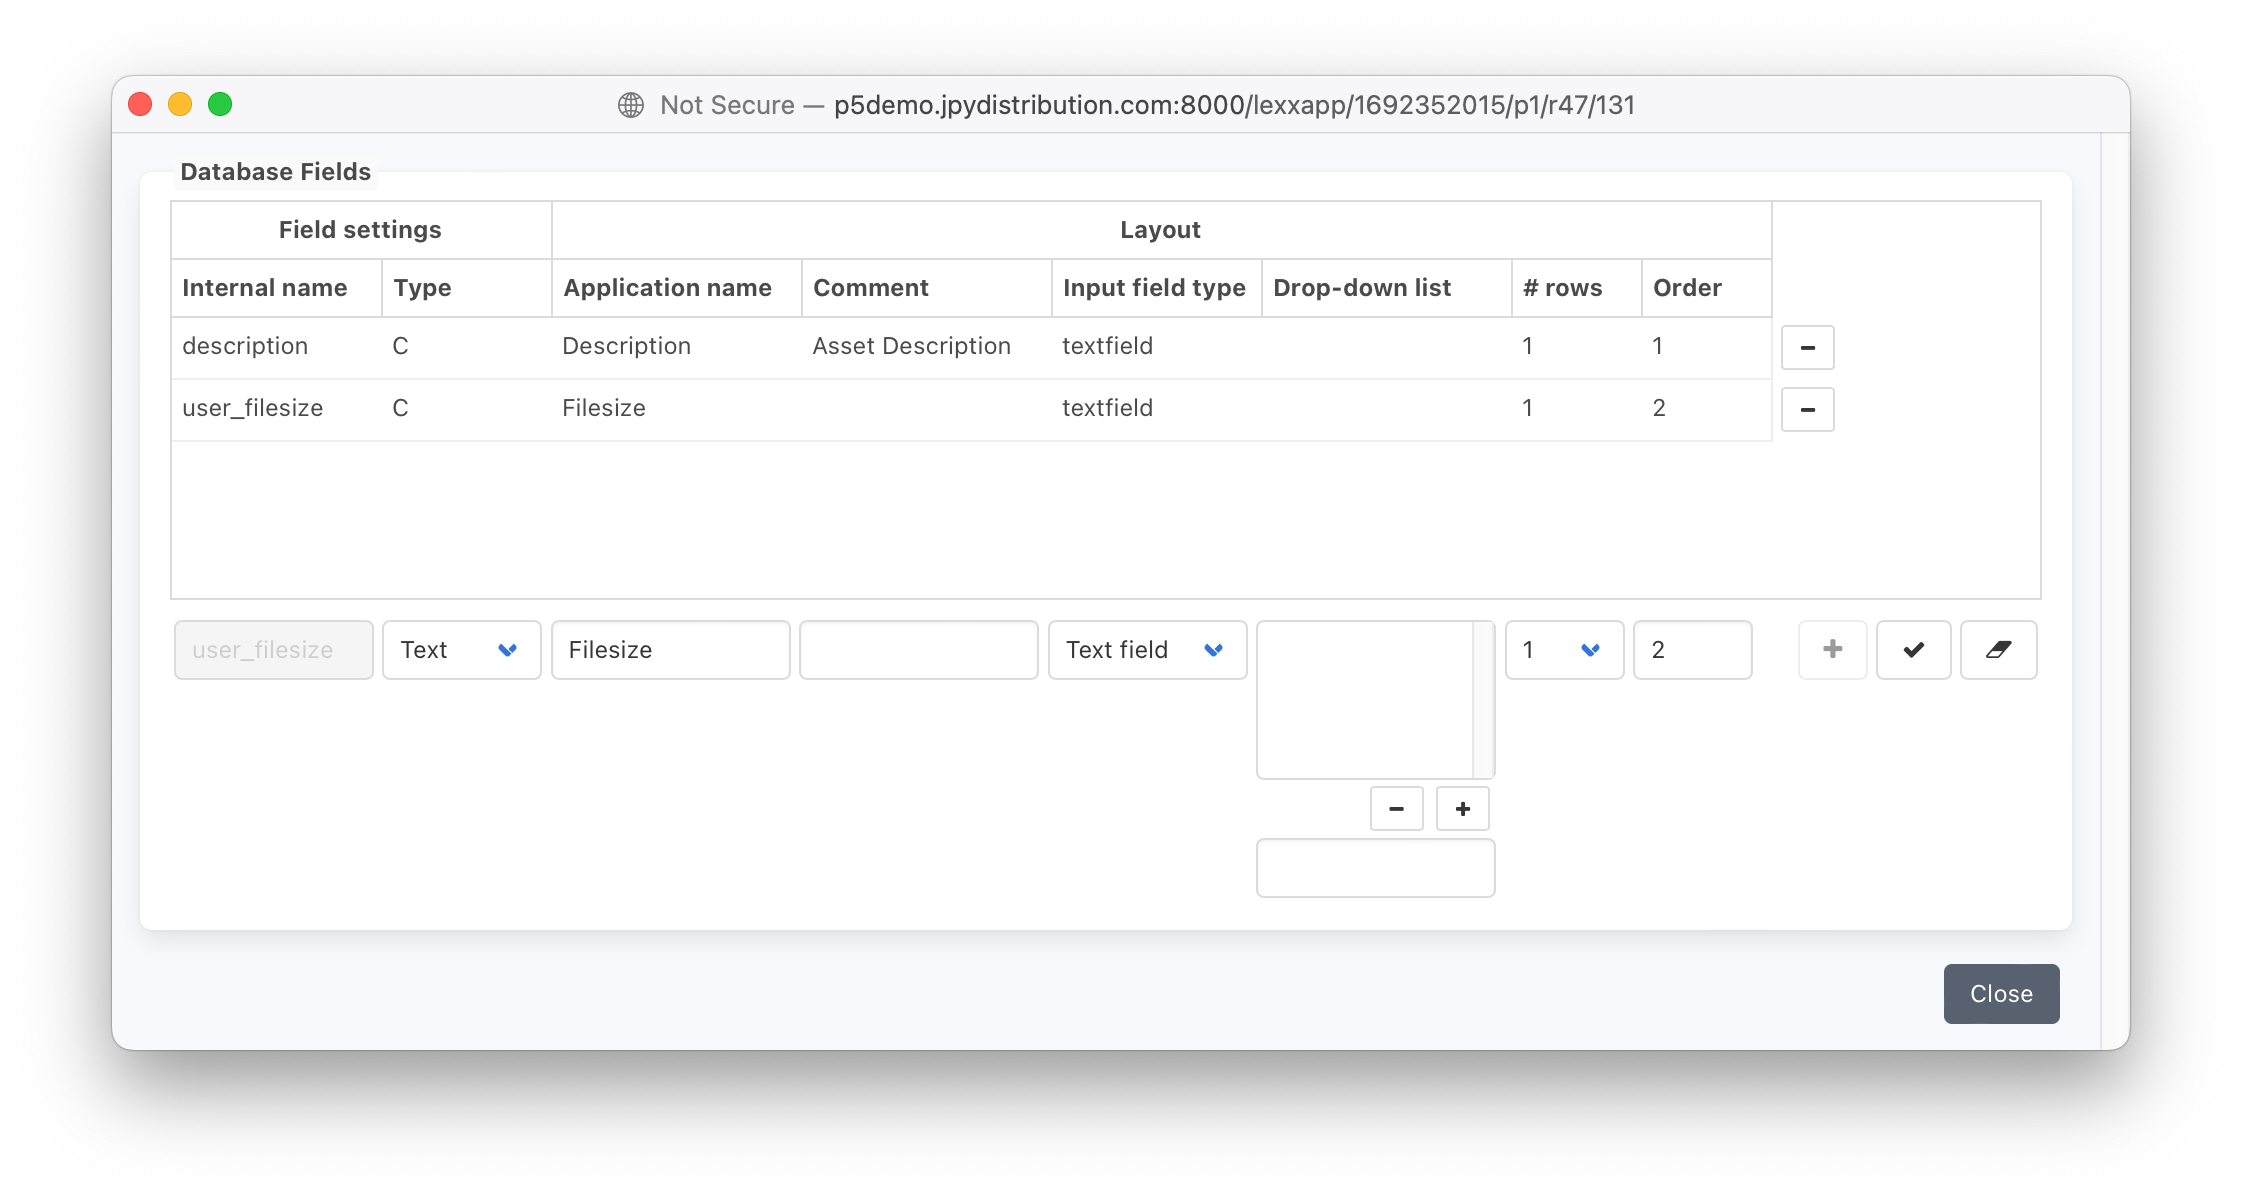
With our data for import now prepared, we need to create an additional field in our archive index to store the ‘bytes’ column which contains the size of the file in bytes. To do this use the field-editor window. This is accessed via P5 Archive tab -> Advanced Options -> Manage Indexes. Highlight the archive index you are adding fields to, right-click and select ‘Fields..’ to display the window below. Enter each new field at the bottom of the window and use the tick button to add it to the list at the top. Existing fields can be highlighted in the top table and edited at the bottom. Refer to the P5 documentation for full details on adding and editing archive index fields.
In our example below, a new field ‘user_filesize’ is added. The field named ‘description’ already exists in archive indexes by default.
Downloading and editing the scripts
We’re ready to use either a shell-script (Linux/macOS) or batch-file (Windows) to get the data imported into the archive index.
Download a ZIP file containing both shell-script and batch-file versions of the script here.
These script will require a little editing/tweaking so that they’re importing the correct fields for your particular workflow. The script you download will work as shown in the video linked above, expecting to find the fields we’ve shown in our CSV file above. Some understanding of shell scripting and batch files will be required to modify these scripts. A very brief description of how to add additional fields to the import follows:
The Linux/macOS shell script has a loop which iterates through each line of the CSV file:
while read fpath cpath descr fsize
The fpath, cpath, descr and fsize relate to the values being read from each line of the CSV. Add additional values as required using your own names that will be valid only within the script.
/usr/local/aw/bin/nsdchat -s awsock:/$user:$pass:311@$ipAddress:9001 -c ArchiveEntry $aEntry setmeta user_filesize {$fsize} > /dev/null 2>&1
This line above makes a call to the P5 CLI interface, and specifies the field name in the archive index (user_filesize) and places the value fsize into the field. Add additional lines like the one above to push your additional values from the CSV file into the archive index.
Things are different in the Windows batch-file version of the script. Here our loop iterating through the CSV file looks like this:
FOR /F "tokens=1-4 delims=," %%A in (%csvFile%) do (
The important part here is ‘tokens=1-4’ which specifies that we’re expecting 4 values in our CSV file. Edit the ‘4’ to represent the number of values you’ll provide in your CSV. Next we have:
SET cpath=%%B
SET descr=%%C
SET fsize=%%D
%%B, %%C and %%D represent the 2nd, 3rd and 4th values being read from the CSV. Add %%E to represent your 5th value, and choose a variable name into which it’ll be stored. E.g. ‘SET caption=%%E’. Finally:
!command! ArchiveEntry %%i setmeta user_filesize {!fsize!}
Here we are taking the value in ‘fsize’ and placing it into the field in the archive index named ‘user_filesize’. Add additional lines here to store your own metadata value(s).
Running the scripts
We’re now ready to run our scripts, providing the CSV files as input. In these examples, we assume that you have placed the script in the P5 installation directory and made it executable on Linux/macOS. If you don’t know how to create and execute scripts, use Google and do some research before you let loose on your live P5 server.
Execute the script on Linux/macOS as follows. The script takes the user/pass for the admin account on the P5 server as arguments/parameters and finally the full path to the CSV file that contains the metadata information:
./metadata_import.sh admin admin 127.0.0.1 ./clips_linux.csv
On Windows systems, executing the bat file looks like this (running from P5 installation directory, providing full path to CSV):
.\metadata-import.bat admin admin 127.0.0.1 C: \Users\Administrator\Desktop\metadata_win.csv
In both cases, you’ll be presented without output from the script that shows each file being located in the index and the metadata being added. If things aren’t working, you may be able to add some additional debug statements to the scripts to get some insight into what isn’t working.
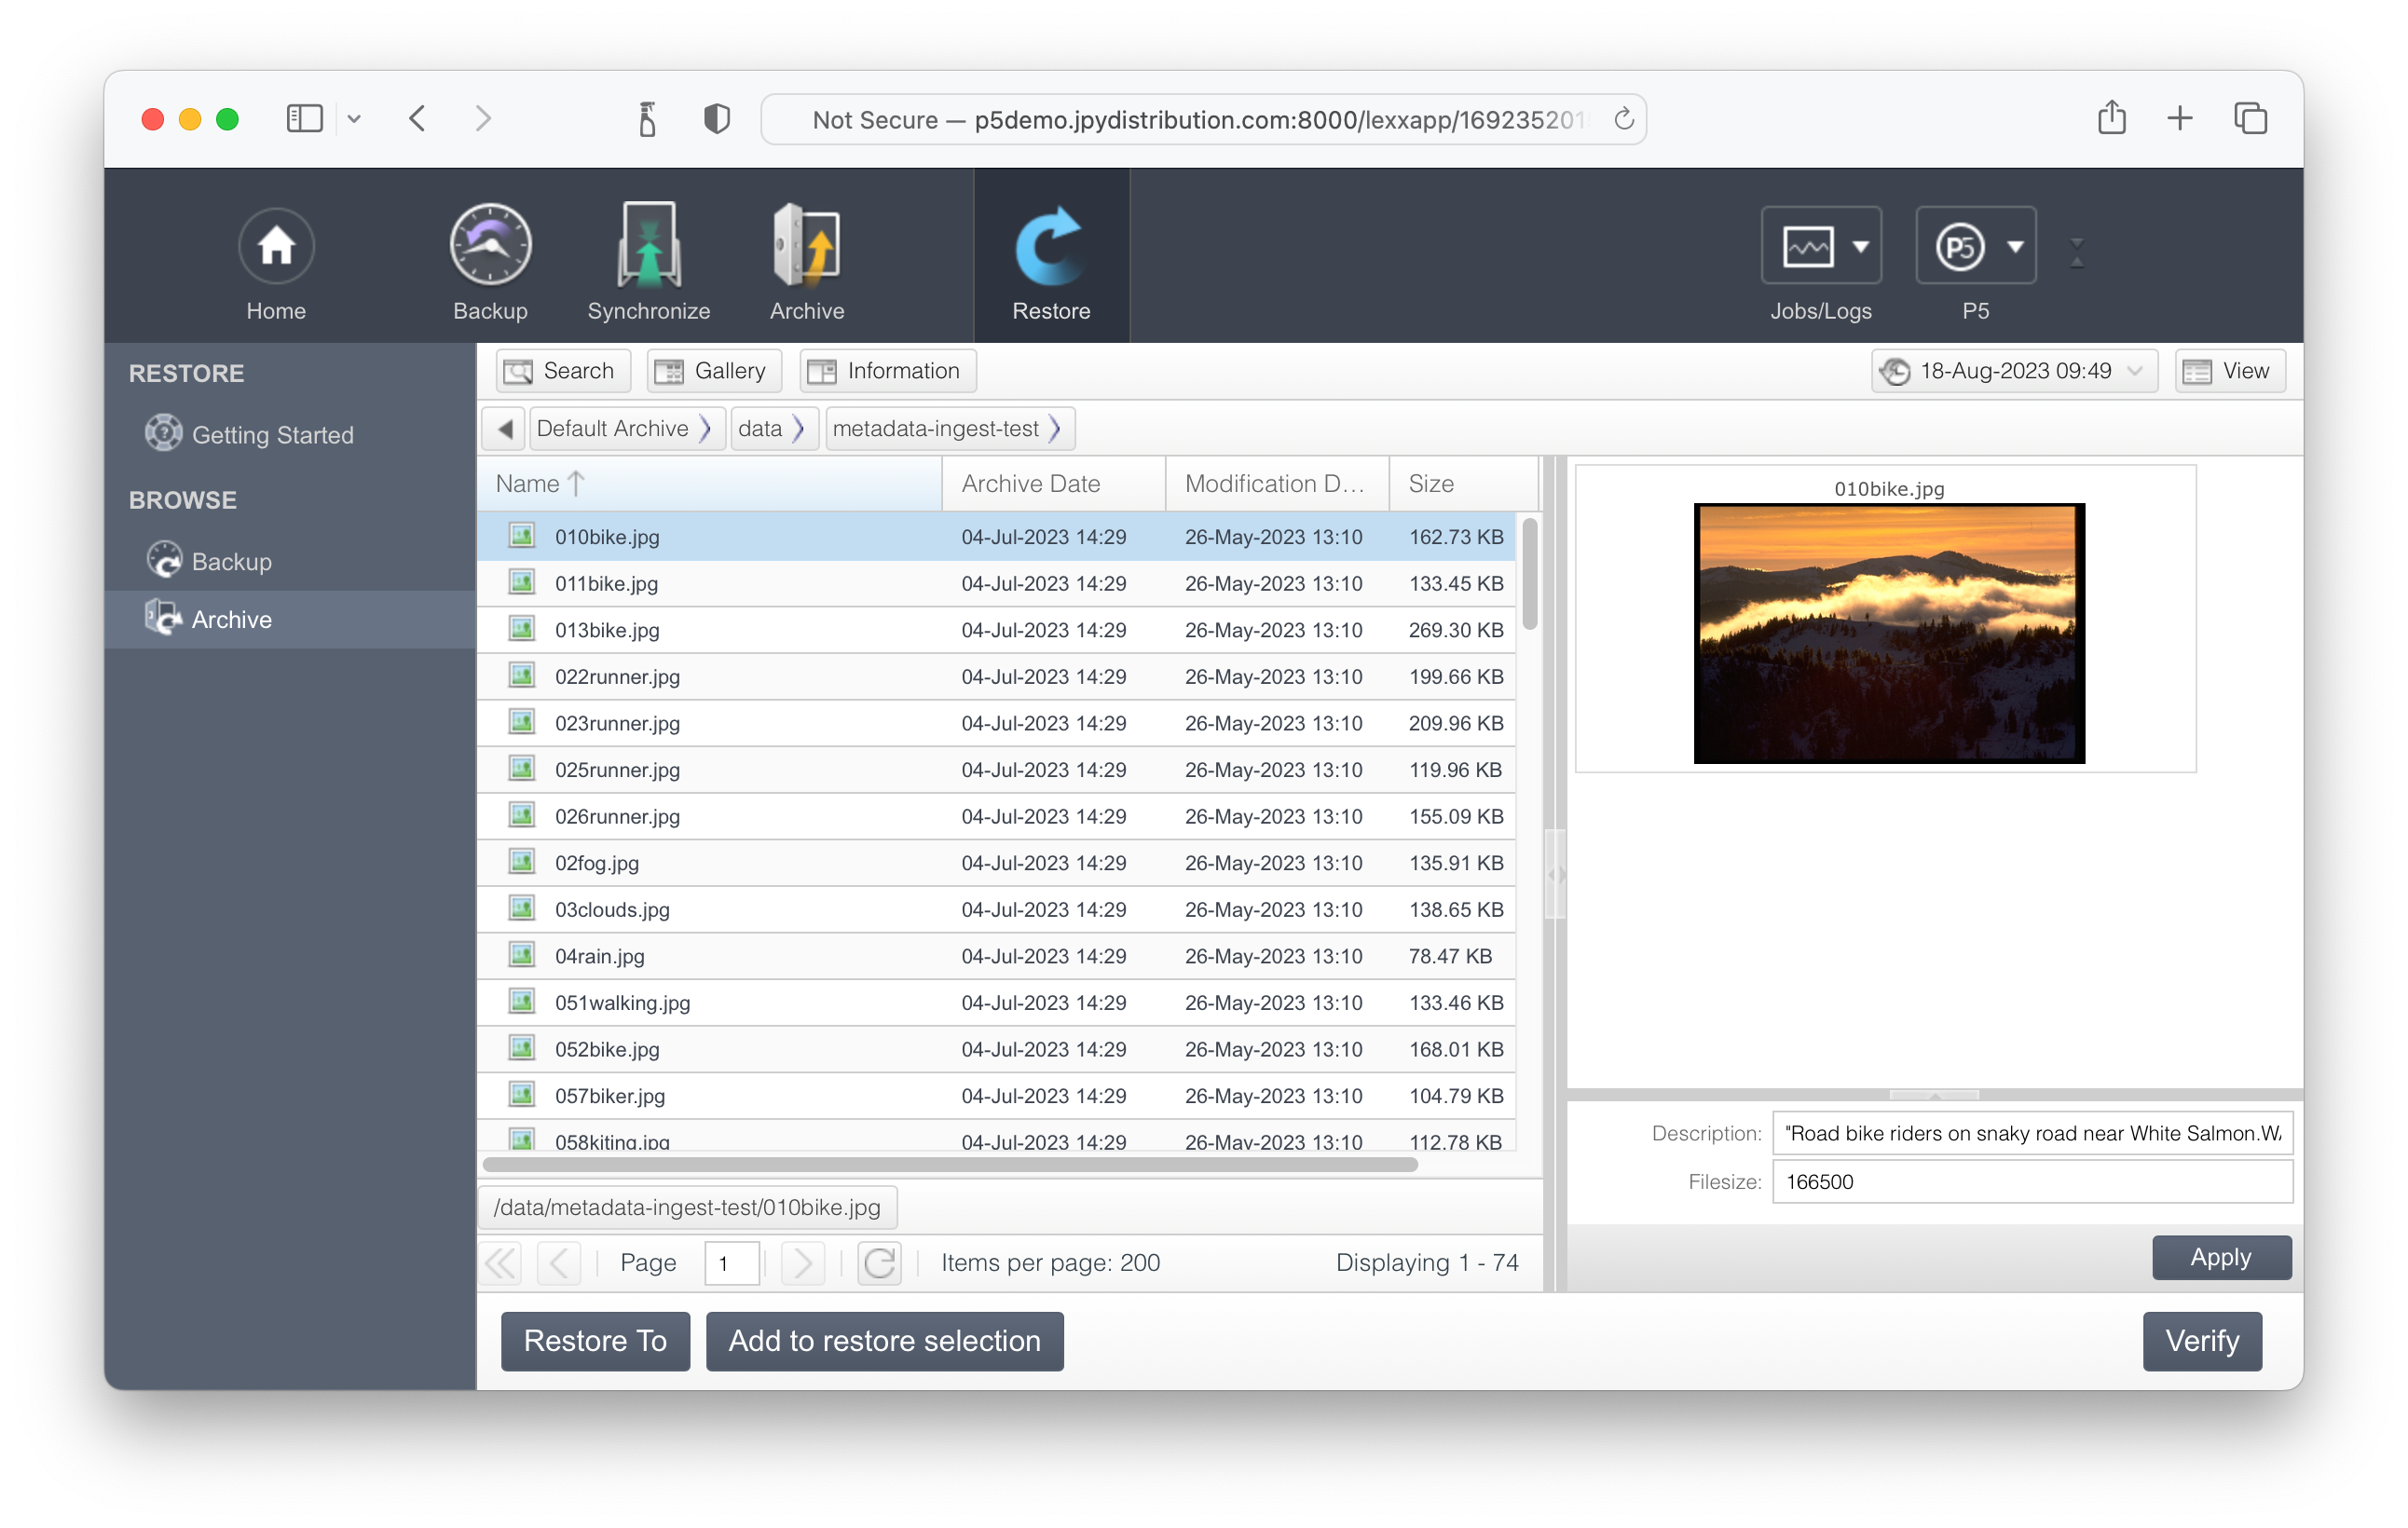
After a successful import, you’ll be able to visit the archive index and see your thumbnails/previews and imported metadata visible and searchable. It’s necessary to wait a couple of minutes in most cases for the thumbnails/proxies to be visible in the index, as P5 has to do some linking behind the scenes which is done periodically and frequently, but not instantly. Metadata should be immediately visible in the index however.