By David Fox
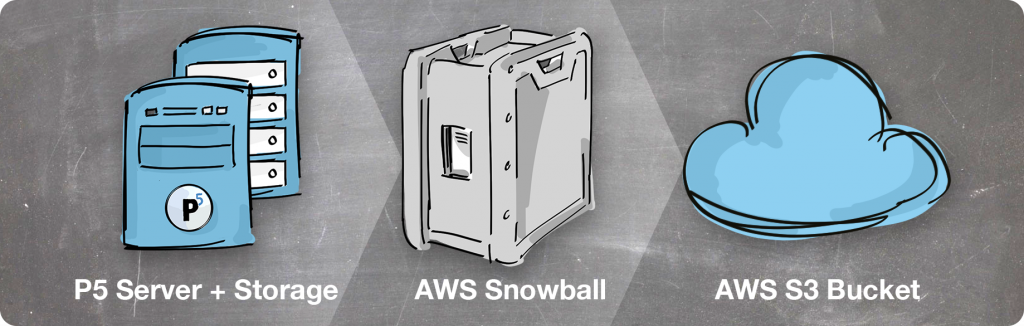
Executive Summary: Archiving and backing up data to the cloud is often slower than writing to local tape or disk, due to internet upload speeds limiting the data transfer rate available. By employing an AWS Snowball device, larger data-sets can more quickly be copied to Amazon S3 storage. This can facilitate the migration of an existing archive to the cloud, or simply accelerate the start of a new archive workflow.
In this document, we cover the steps needed to usefully employ the AWS Snowball device alongside Archiware P5 data management products.
Prerequisites: This document assumes the reader already has some familiarity with the setup and use of AWS services.
Step 1: Order your AWS Snowball, receive and connect to your network
Amazon provides excellent documentation on the process of ordering the Snowball device and how to configure the basic networking once it has arrived and been connected to your network.
Visit this page to access the detailed AWS documentation required.
https://docs.aws.amazon.com/snowball/latest/developer-guide/common-get-start.html
A few summary points below provide some indication of what is required during this process.
- You’ll login to your existing AWS account, and use the AWS console to begin the process.
- The ‘Snowball’ section within the AWS console is used to order the device. You’ll need to specify an S3 Bucket into which your uploaded data will be migrated later.
- The AWS Snowball, once received, has a touch-screen interface through which you can perform basic networking steps to make the device available to your network – in this example, using an Ethernet connection.
Step 2: Transferring data to the AWS Snowball
When locally transferring data between a Snowball and your on-premises storage, Amazon provides two options: the Amazon S3 Adapter for Snowball or the Snowball client. The latter must be used for transfer using Archiware.
https://docs.aws.amazon.com/snowball/latest/ug/snowball-transfer-adapter.html
Download: https://aws.amazon.com/snowball/resources/
Follow setup instructions for your operating system to install the tool.
The following refers to our example installation on Linux. First set the execute permission on the tool and then run to show the usage information with ‘-h’.
$ cd snowball-adapter-mac/bin
$ chmod +x snowball-adapter
$ ./snowball-adapter —h
Installing the adapter also adds the snowball subdirectory to your .aws directory. Within this snowball directory, you can find the logs and config subdirectories. Next we allow the Adapter to work without authentication header:
$ pwd
/home/davidfox/.aws/snowball/config
$ cat snowball-adapter.config
Default Properties
 Thu Mar 21 14:43:04 GMT 2019
 hostname=localhost
  worker.group.threads=10
  log.config.file=
  https.port=8443
  auth.enabled=true
  http.port=8080
  boss.group.threads=10
Disable ‘auto’ by editing the line above as follows:
auth.enabled=false
Now we start the adapter.
./snowball-adapter -i 192.168.0.100 -m manifest.bin -u a1234-a1234-a1234-a1234-a1234 -ssl
In the above example, 192.168.0.100 is the IP address of the Snowball. ‘manifest.bin’ is a file relating to the Snowball job, obtained via AWS management console, ‘a1234-a1234-a1234-a1234-a1234’ is the unlock code for the job – again obtained via the management console.
This will share the Snowball, via the host running the tool, such that it can be accessed using the S3 protocol on port 8443 (the default). We can now use P5 to write data to the Snowball using the S3 protocol, via the connection provided by the tool.
Step 3: Install Archiware P5 Archive software
If you not yet installed P5, now is the time to do so. This is not a temporary P5 installation for the purposes of transferring data to the Snowball. This will remain your P5 Archive installation after you’ve shipped the Snowball back to Amazon. Therefore the P5 host should have access to all the source storage from which you intend to archive.
You should also consider whether you wish to retain a local cache (copy) of the archived data. This is an option while setting up the cloud storage in P5. Keeping a local copy will consume additional storage space and should be carefully planned with knowledge of how much storage will be required in future.
If a local cache is not retained, then locally cached data will be deleted from disk once it has been uploaded to S3, regardless of whether the Snowball or a cloud S3 bucket is being written to.
The general setup and operation of the P5 Archive module are well documented elsewhere.
https://p5.archiware.com/manuals
https://p5.archiware.com/masterclass
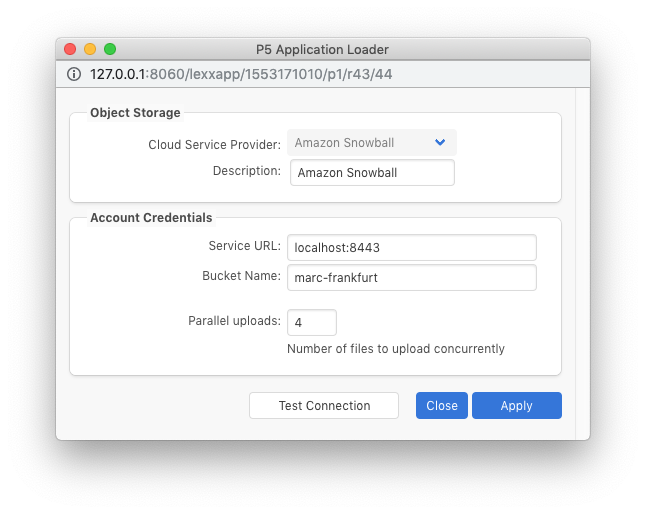
Step 4: Provision P5 storage on the Snowball
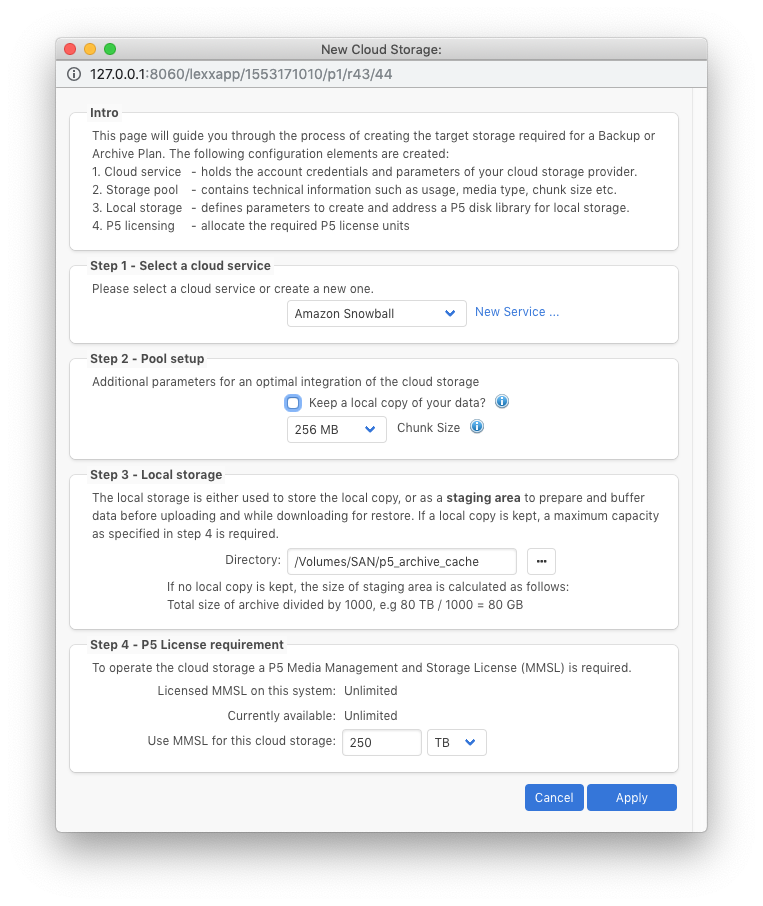
The first step towards being able to archive data onto the Snowball is to create a ‘Cloud Service’ within P5, available under ‘Cloud Service’ -> ‘New Service’ in the P5 user interface. You will select ‘Cloud Service Provider’ = ‘Amazon Snowball’ and use the IP address of the host machine that is running the Snowball Client software, configured in step 2. The port number 8443 is specified, as per the config file above.
You will also provide the name of the bucket that is being hosted by the Snowball. In the example screengrab below, we used 4 concurrent parallel upload streams to maximise throughput over the network. The optimal value here will depend upon network and disk speeds and can be arrived at by experimentation.
Use the ‘test’ button to cause P5 to connect to the Snowball Client. This tool will in turn connect to the Snowball and a successful test is confirmation that the complete chain is operating as it should.
Next we will click the ‘Add Cloud Storage’ button. Here we configure the local cache directory which will be used as a temporary store as the data is collected from the source, and uploaded to the S3 service provided by the Snowball. Provide the following configuration details:
1. Select the ‘cloud service’ defined in the previous step – in our example, named ‘Amazon Snowball’.
2. ‘Pool Setup’ – use the checkbox to decide whether a local copy of all archived data will be retained on the local disk – in the folder defined in the next step. Click the (i)nfo button to learn of the considerations for setting the ‘chunk size’. This is the size of object that will be uploaded to the S3 bucket. If in doubt, stick with the default.
3. ‘Local Storage’ – select the directory where the local cache will be written. Either temporarily or permanently, depending on whether a local copy is to be retained. Ensure this directory has ample storage for your requirements.
4. ‘P5 License Requirement’ – P5 uses storage licenses to limit the capacity of cloud storage that can be accessed. Choose here how many of your storage licenses you wish to devote to this cloud service. Remember, each unit of storage license provides 4TB of disk/cloud storage.
Once configured, click ‘Apply’ and P5 will begin to prepare the storage volumes, ready for archiving data. These volumes will exist on both the local disk and the cloud bucket on the Snowball.
Step 5: Archive data to the Snowball
Refer to the usual documentation (linked above) if you’re not familiar with the configuration of a P5 Archive plan. Your Archive plan should simply write to the Pool created in the previous step and your data will be written into the S3 bucket hosted by the Snowball.
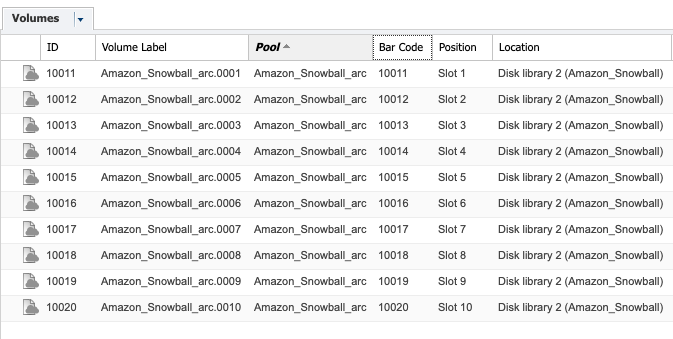
In our example, we can see the Pool named ‘Amazon_Snowball_arc’ was created and volumes in this pool are visible in the P5 volume list.
Step 6: Detach the P5 storage pool and ship the Snowball back to Amazon
Power off the Snowball and follow the AWS instructions for having the Snowball shipped back to Amazon. Upon receipt, the data you placed in the bucket on the Snowball will be copied to the corresponding bucket in S3. The Snowball ‘Job’ you created in the AWS console will complete and you’ll receive notification via email.
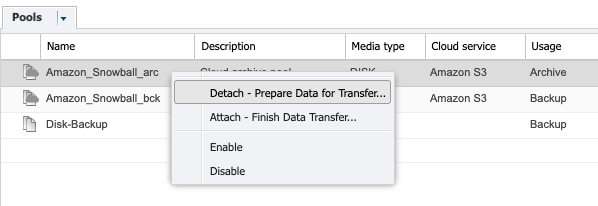
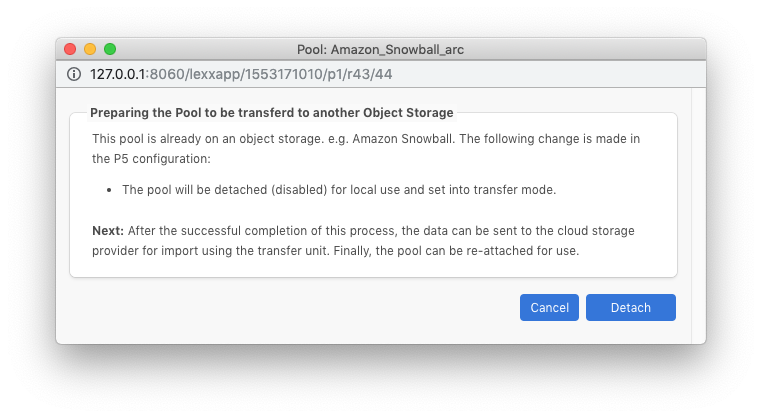
Once the Snowball is disconnected, the next step in P5 is to ‘Detach’ the Pool used to store the data on the Snowball. Do this by highlighting the pool in the P5 configuration and right-clicking. This causes the pool to no longer be connected to the S3 service provided by the snowball.
Step 7: Once the Snowball data has been copied to your ‘real’ S3 bucket, reattach the pool
Once notification has been received that your data now resides in the S3 bucket, first check that this is the case by using the S3 console to browse the bucket. You should see several folders named according to the ‘volume ID’s’ visible in the volume list screengrab above. If these folders are visible, then your data has been successfully and correctly transferred to the cloud.
We will now create a new ‘Cloud Service’ that points to the ‘real’ S3 bucket that your data has now been copied to. Under ‘Cloud Service’ -> ‘New Service’ in the P5 user interface, this time select ‘Amazon S3’ as the ‘Cloud Service Provider’. Use your AWS credentials providing access to the bucket.

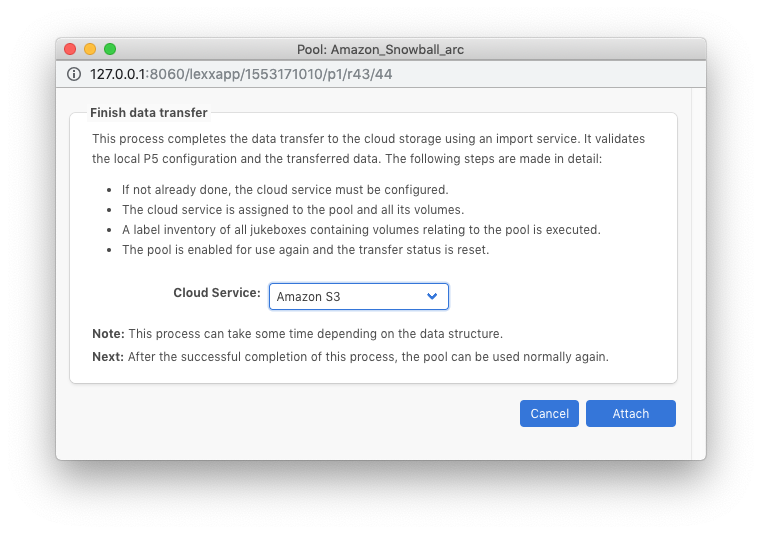
Next, visit ‘pools’ again in the P5 interface, highlight the pool and select ‘attach’ from the context menu.
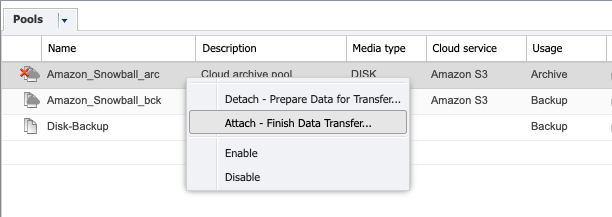
Here you’ll select the ‘cloud service’ that you just created. Clicking on the ‘attach’ button will run a job which will connect to the S3 cloud bucket and verify each volume folder exists. The volumes will be attached one-by-one as the volume is located in the cloud bucket.
Step 8: Complete – continue archiving/restoring
You’re finished! All that remains to do now is continue to archive as needed using the same archive plan that you used previously. Data will be restored from the cloud bucket as needed, depending on whether a local copy of data was retained.