
by Josef Doods
In this article, we are going to show you how easy it is to build your own Archiware P5 Appliance. To do this, we are using an HP ProLiant MicroServer and FreeNAS as an Open Source operating system. FreeNAS ist based on FreeBSD and is a free operating system for Network Attached Storage. Of course, its field of application is by no means limited to P5. Particularly as a file, print or media server, FreeNAS enjoys great popularity.
Our main criterion for choosing the hardware for the P5 Appliance was worldwide availability. The goal being to configure a P5 Appliance that can be built identically anywhere in the world.
The detailed requirements for the hardware are:
- global availability and service
- low sound and heat emissions to make it suitable for office environments
- straightforward assembly as well as fitting/replacement of hard drives
- at least one PCI slot for connecting a tape drive
Our choice fell on the HP MicroServer G8 hardware, the entry model of the HP ProLiant series. It fulfills all our requirements and offers a very good cost/performance ratio. We fitted the 4 provided hard drive slots with 4 x 4 TB hard drives. For a total of around 900 Euros, this delivers 10TB of RAID storage with very respectable server capabilities. Such low costs are a fortunate side-effect of using standard components while not impairing the quality of the materials used or the internal structure of the machine.
For the operating system supporting the P5 Appliance, we chose FreeNAS. FreeNAS is a derivative of FreeBSD optimized for file server operation. The decision to use FreeNAS is based on several factors:
- It is a free open source operating system that is also used commercially.
- FreeNAS is very easy to install.
- The configuration is done in a browser.
- It includes ZFS as a snapshot-enabled file system, including compression and de-duplication.
Naturally, our focus is to present a perfect platform for our Archiware P5 products, but this does not limit the field of its application.
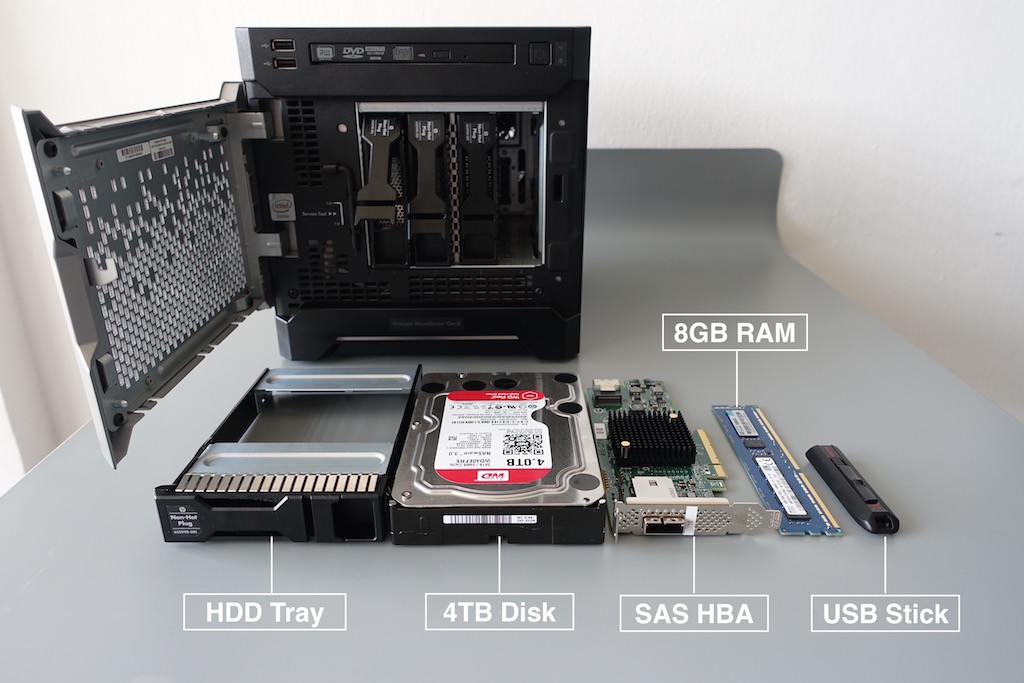
Let us start with the list of components for the NAS system.
- Hardware:
- HP ProLiant MicroServer G8 PC-Server System (724145-425)
- CPU: Intel Celeron G1610T, 2x 2.30GHz, RAM: 4GB
- Kingston KVR16E11/8 main memory 8GB (1600MHz, 240-pole, CL11) DDR3-RAM
- 4 x 4TB Western Digital WD40EFRX-68W hard drives, NAS certified
- a reliable USB flashdrive (e.g. SanDisk Cruzer Fit 16GB)
- Optional, for connection to a tape drive: HP H222 Host Bus Adapter (650926-B21)
- Software:
- FreeNAS 64Bit – http://www.freenas.org/download-freenas-release.html
- Archiware P5 – https://www.archiware.com/download
Assembling The Components
- Fitting the hard drives: The HP MicroServer has 4 hard drive slots and comes with a single 1TB drive. This 1TB drive is too small for our purposes. We populated all 4 slots with newly acquired 4TB Western Digital hard drives.
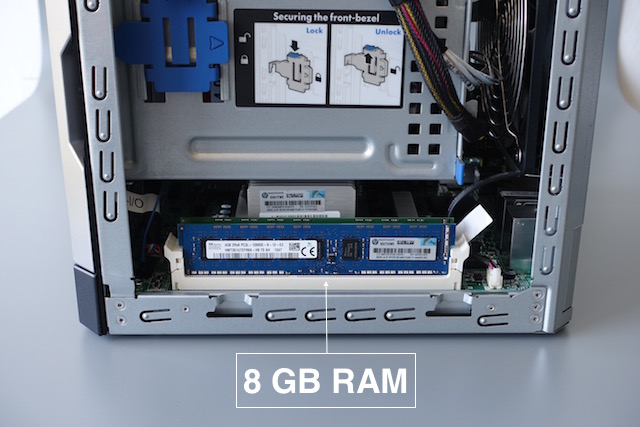
- Installing the memory expansion: Open the enclosure by removing the blue screws at the back. The face plate can then be pulled towards the top and put aside. The slot for the 8GB RAM module is located on the right-hand side.
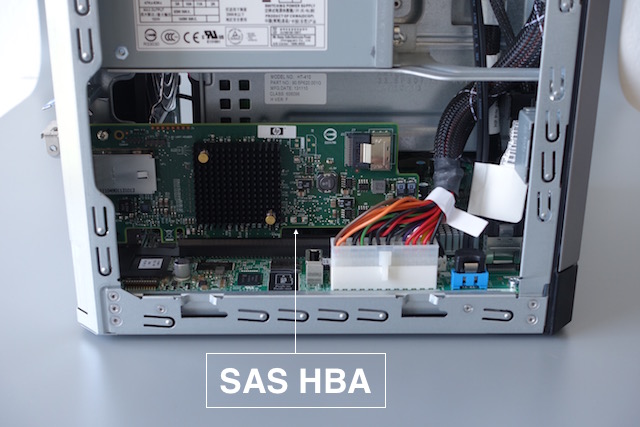
- Optional SAS Host Bus Adapter for connecting a tape drive: The PCIe slot for the SAS adapter is located on the left-hand side. Before fitting, the metal slot cover must be removed from the back panel.
Installing FreeNAS
As recommended, we installed the operating system on a USB flash drive and not on an internal hard drive. This separates the operating system from the user data. The 4 hard drives can thus be incorporated into a ZFS pool. Moreover, this simplifies the installation and future upgrades. We used a high quality USB flash drive with a minimum capacity of 16GB.
Step 1: Downloading FreeNAS
The FreeNAS download is free of charge and available from the official download page on freenas.org. After a successful download, burn the ISO file onto a CD.
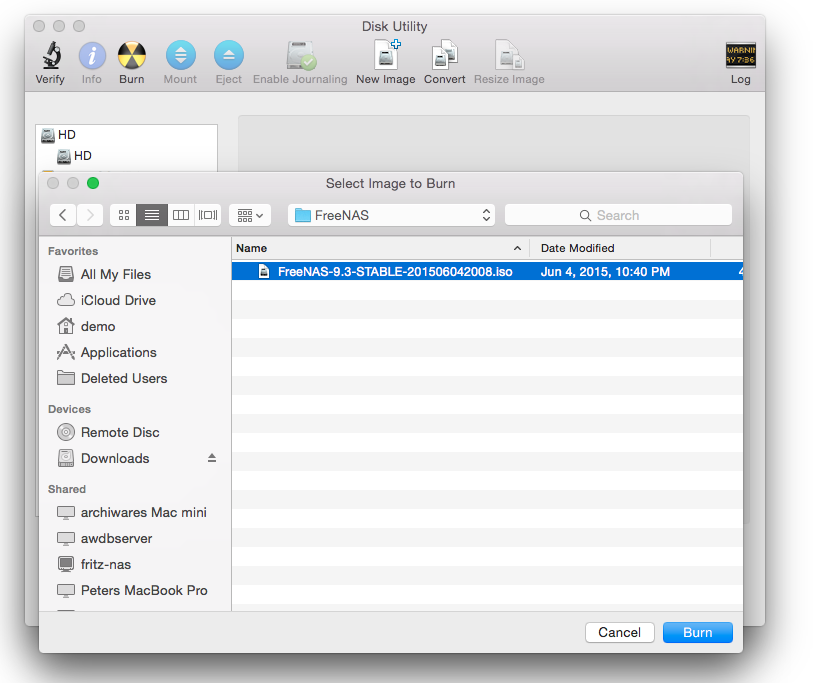
Step 2: Burning the CD (Mac OS X)
We used the Mac OS X Disk Utility to burn the ISO file onto a CD. Start the Disk Utility and select the „burn“ button from the tool bar. In the subsequent dialogue, select the downloaded ISO file and start the burning process.
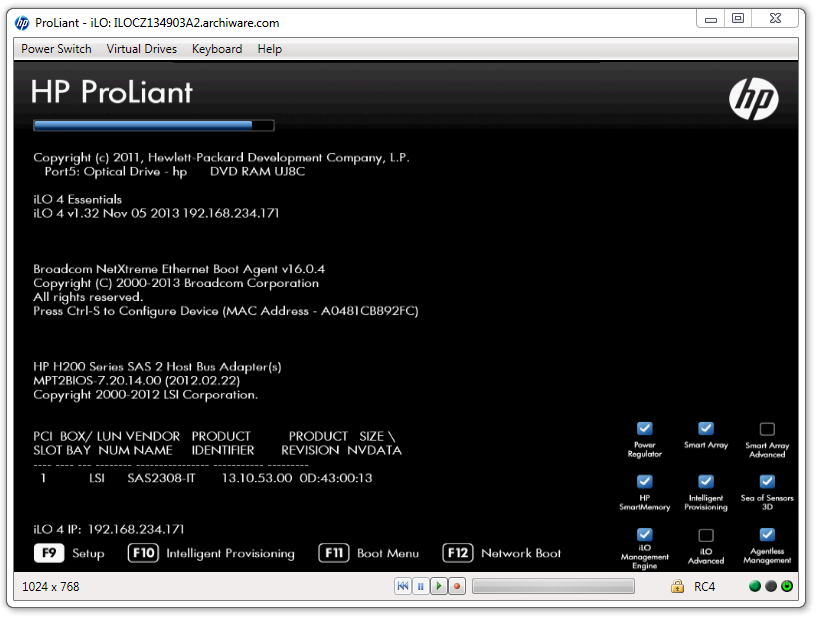
Step 3: Verifying the boot order
To make sure that the system starts from the USB flash drive after installation, set the correct boot order in the BIOS. Use the F9 key to enter the BIOS setup menu at the end of the hardware diagnostics. The default setting tells the system to start from a CD, followed by a USB flash drive.
Step 4: Installing FreeNAS
Even though configuring FreeNAS can be done comfortably in the web interface, the initial installation must be done directly on the server. Alternatively, one can use the HP iLO Management interface and do the installation via browser over the network. To us, however, the direct route on the machine seems simpler, as the iLO Management is quite Windows oriented.
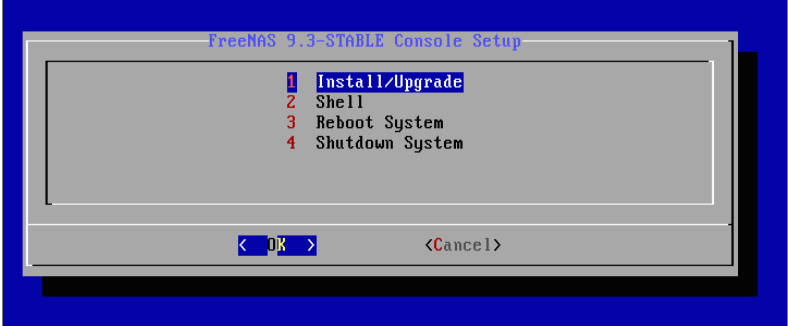
We started the installation by booting from the CD we burned earlier.
- The installation wizard guides you through the basic selection for FreeNAS. Confirm with „OK“.
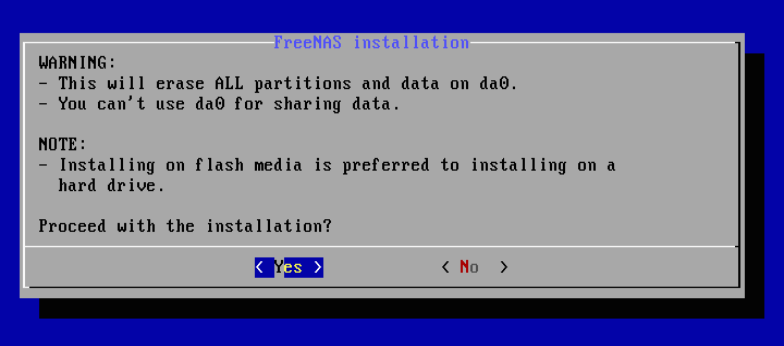
- Select the USB flash Drive for the installation and confirm with „OK“.

- The wizard warns that all data on the selected partition will be deleted. Confirm with „Yes“.
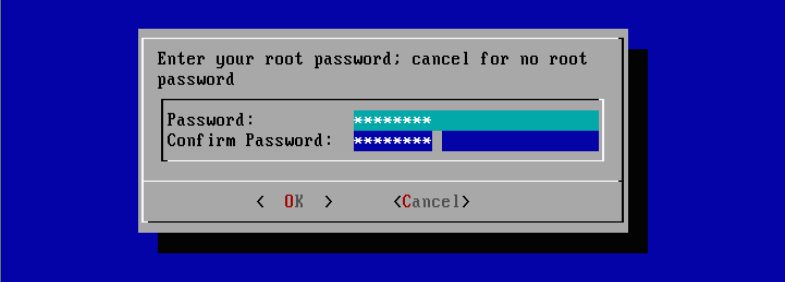
- Finally, enter the password for the administrator „root“ and confirm.
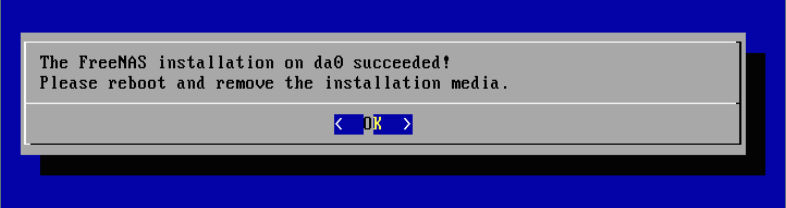
- Now, before starting the NAS for the first time, remove the CD from the drive.
Step 5: FreeNAS network settings
After successfully installing FreeNAS, the system starts for the first time.
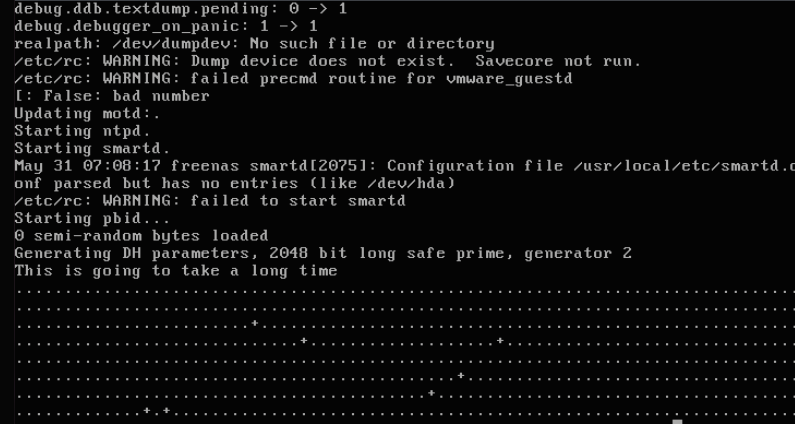
- During the boot process, the Diffie Hellman parameters are calculated. They are needed for the cryptography functions in VPNs, among others. The calculation can take quite some time! From our experience, this take anywhere between several seconds and 10 minutes.
- Following the boot process, the configuration menu of the FreeNAS installation is shown. With that, the basic configuration is completed. You can leave it at the network settings determined by DHCP and enter the displayed URL http://192.168.234.173 in the browser.

Step 6: Preparing FreeNAS for the P5 installation
You can now configure FreeNAS entirely in the Web GUI. From there:
- Set up the language and country.
- Configure the SMTP mail server.
- Set up the user accounts.
- Configure the hard drives.
- Create a P5 home directory.
- Activate SSH access.
The first login in the Web GUI
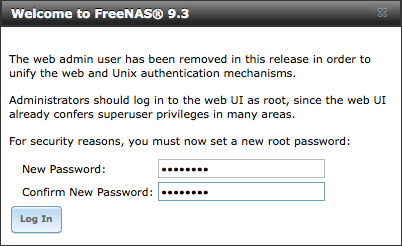
At the end of the network settings (see step 5), the URL for the Web GUI is displayed. Enter this URL in the address bar of the browser.
- First, choose a password for the super user „root“ and confirm it.
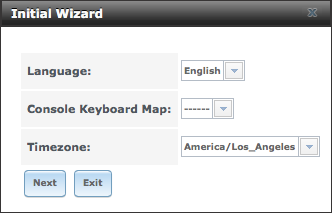
- Next, the Initial Wizard prompts for the basic configuration. We will now leave the Wizard in order to explain and clarify the necessary configuration steps in more detail.
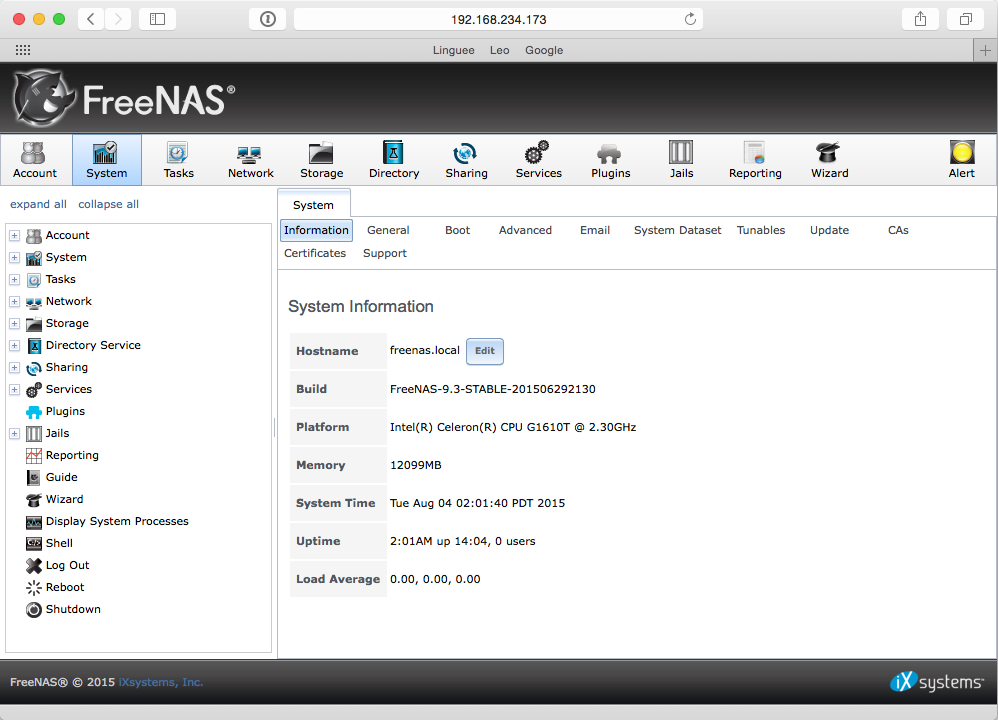
- After logging in to the Web GUI, FreeNAS displays some information about the system. The interface is divided into three panels: an upper and a left-hand side navigation bar and the right-hand side main frame in which all elements of the configuration are displayed and can be edited. It is not immediately obvious why there has to be both an upper and a left-hand side navigation bar here, and neither are designed in the most user-friendly way. To first explain the slightly better structured navigation bar, even though the left-hand side navigation offers more options to a power user later on.
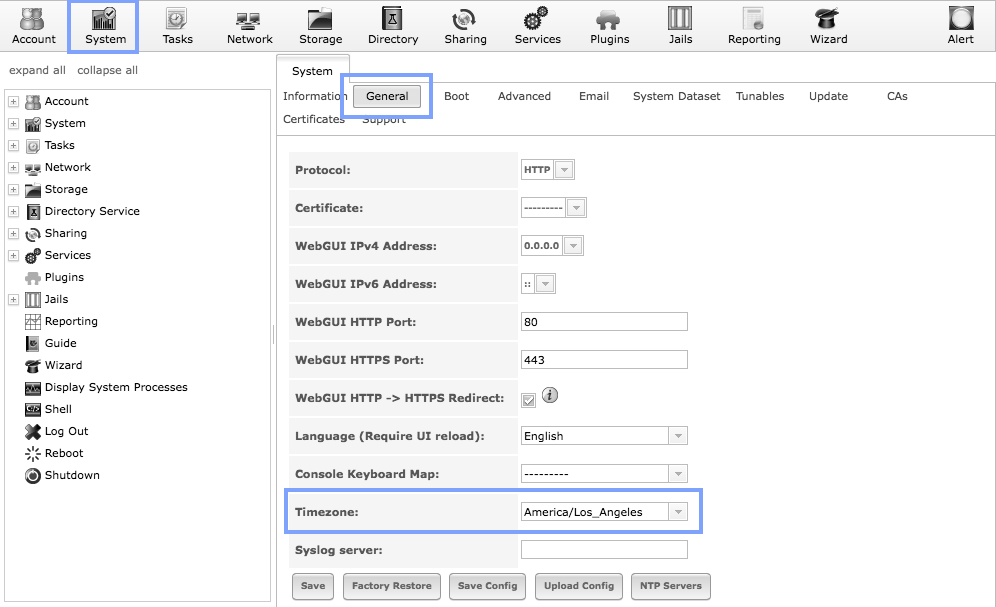
- Start by configuring the language and country settings. The respective parameters can be found in [System][General]. Change to your timezone and leave the GUI language set to English.
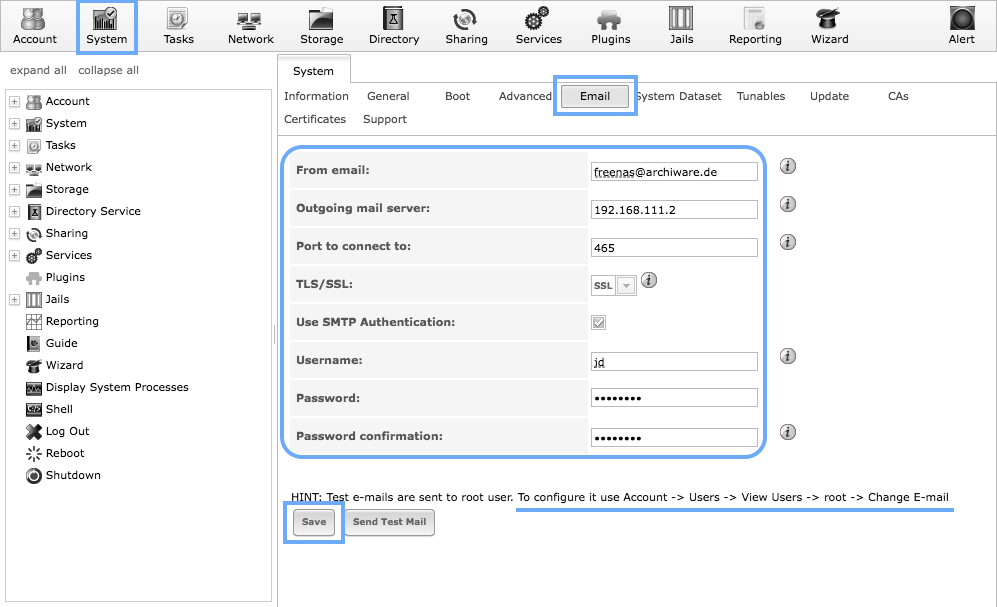
- Make sure the protocols and notifications sent by the NAS via e-mail will be sent to your e-mail account, set up the SMTP mail server accordingly. Please note that the e-mail address of the root user has to be set to the desired target address. Note: Only after entering the e-mail address, in the subsequent step, can the SMPT settings be tested using the „Send Test Mail“ function.
- Adjusting the e-mail address of the root user:
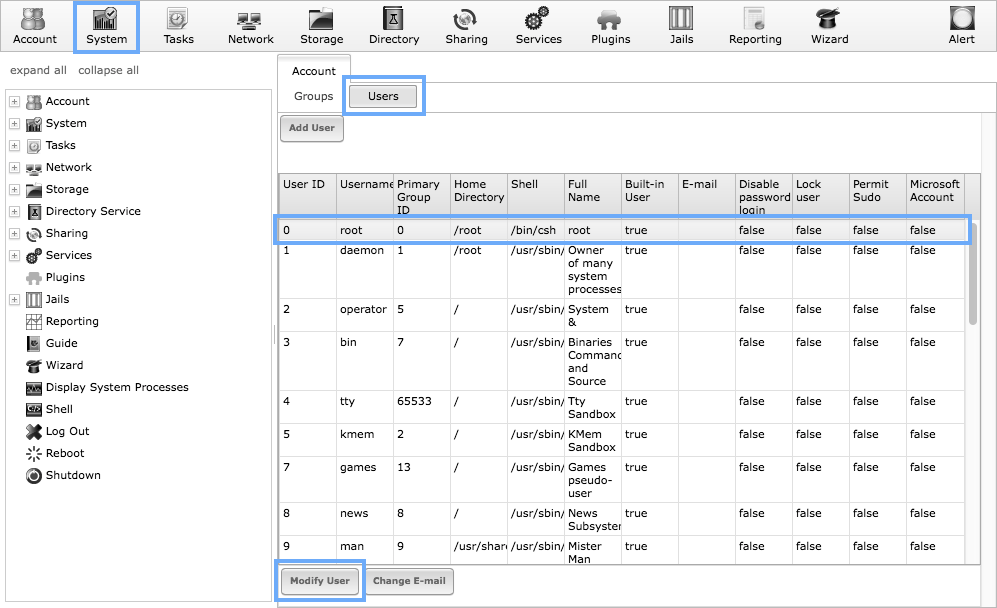

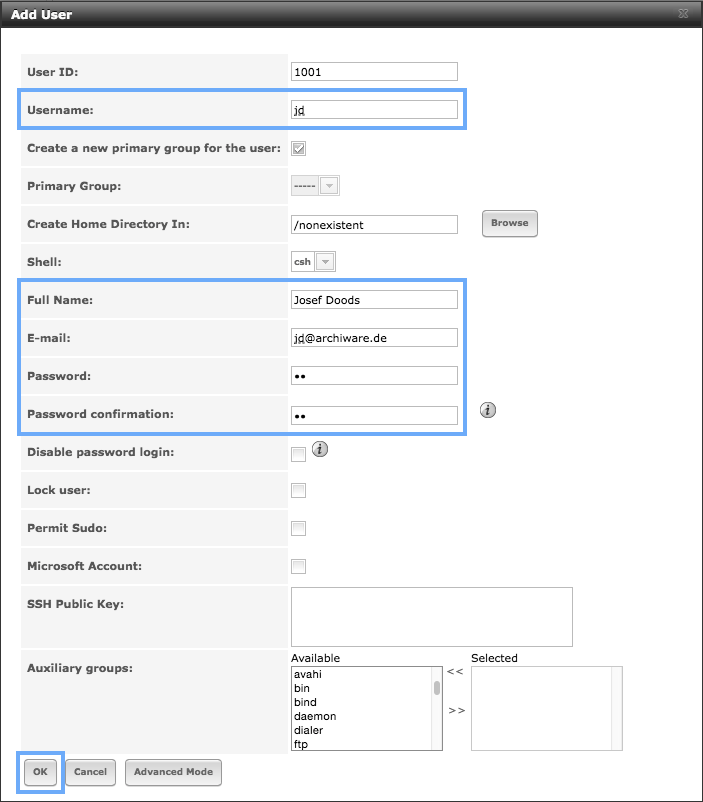
- As a next step, you can create a user account:
Switch to [Account][Users] and click [Add User].
- And now to the core task of a NAS system – the storage management.
The setup and administration of the hard drives is one of the central tasks when configuring FreeNAS. As the file system, you will be using ZFS. But ZFS is much more than „just“ a file system. So here is some background information before we move on:
Almost all file systems are installed on partitions of hard drives. An additional Volume manager allows to bundle several hard drives, which in turn result in partitions for file systems. However, these partitions are very static and inflexible when it comes to adjusting size.
To avoid the disadvantages of physical partitions, ZFS offers its own storage management. A central element in this is the ZFS storage pool. Simply put, it merges several storage areas into one storage pool. This storage pool is then allocated to all file systems without limiting them with regards to size. Naturally, there are quotas for organization and distribution, but as a matter of principle, all file systems share the empty storage space.
Another particularity of ZFS is the integrated Soft RAID. The storage pool forms so-called redundancy groups, each of which can consist of several physical volumes. ZFS offers a choice of different RAID levels:- RAID-0 (Striping) – Data is distributed to several drives. Be careful, this does not offer data protection!
- RAID-1 (Mirroring) – Two (or more) hard drives form a mirrored redundancy group.
- RAID-Z – comparable to RAID-5 -distributes parity information over all hard drives to compensate for a possibility of a single drive failure. This RAID level is used frequently as it offers a balanced relation between cost, capacity, speed and security.
- RAID-Z2 – comparable with RAID-6 – distributes parity information twice over all hard drives to compensate for a possibility of a double drive failure.
- Additionally, ZFS allows to combine different RAID levels, resulting in an increase in data security and performance. Spare drives can be added to the RAID and will be used immediately in case another drive fails.
- You will combine your 4 x 4TB hard drives into a RAID-Z pool. This setup achieves a satisfactory level of security and performance. Should one drive fail, FreeNAS will inform you via e-mail and you can swap the defective drive immediately (at least, that’s the intention).
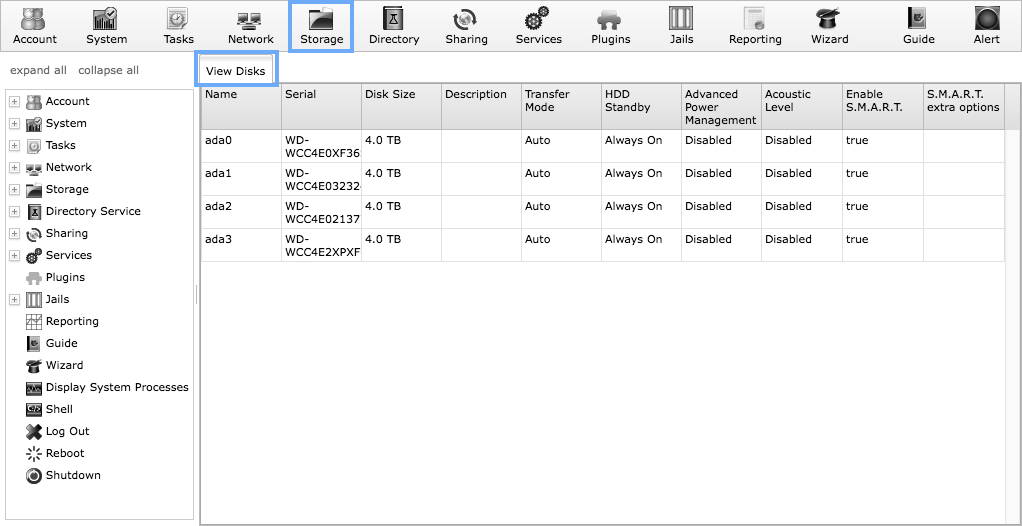
Firstly, verify that all 4 hard drives are seen by the hardware and FreeNAS:
Switch to the [Storage] section and select [View Disks].
- Once FreeNAS correctly detects all the drives, create a RAID-Z storage pool:
In the [Storage] section, click on the [Volume Manager] button.
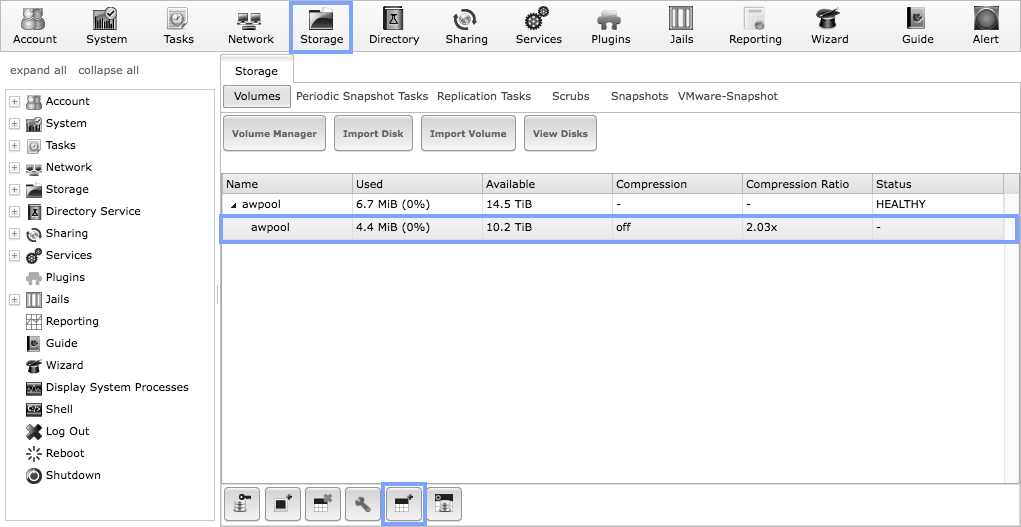
Name the first storage pool „awpool“. Allocate the maximum number of available drives to the pool by moving the slider to the far right until all four drives are selected. As a RAID level, select RAID-Z and then click the [Add Volume] button.

- The Volume Manager creates a RAID-Z pool and immediately generates the first dataset (file system). In FreeNAS, it is placed under “/mnt/awpool“. This first dataset corresponds with the top level directory of the pool in which all further datasets (file systems) are created and mounted. Before you create another data set, switch off the compression for „awpool“. It is easier to switch the compression back on for a specific dataset if required.
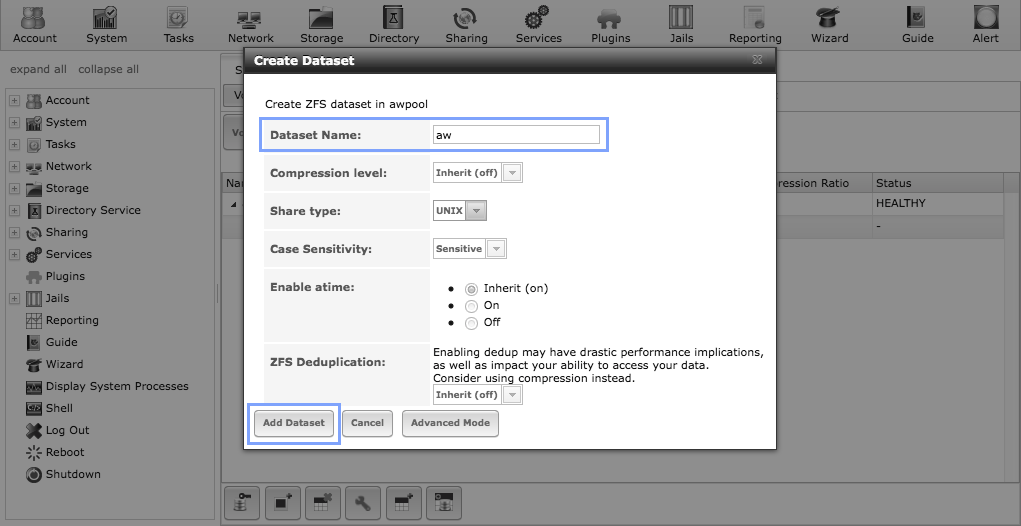
Next, create a home directory for P5. Select the „awpool“ dataset and click the [Create Dataset] button in the bottom navigation bar.
- Name of the dataset „aw“. Important: The compression should be switched off in this dataset as well, as it would negatively impact the indexing.
Finally, click the [Add Dataset] button. This process creates a dataset in “/mnt/awpool/aw“. This is where you will install P5, as described in the following paragraph.
- The last step of the basic configuration is activating SSH, which you will need for installing P5:
Switch to [Services] and start [SSH] by moving the on/off switch to [On]. Finally, SSH login must be authorized for the root user – open the administration by clicking the [Tool] symbol next to the on/off switch and check the corresponding box.

Step 7: Installing P5
After completing the basic configuration described in the previous paragraph, you can now install Archiware P5. In this example, the plan is to use the P5 Appliance to back up several workstations using P5 Backup2Go. On the attached LTO-6 tape drive, data from a Mac Pro Server will be saved.
For SSH access to the NAS-Server you require a corresponding SSH client. On Windows, you can use the application PuTTY, but it has to be installed separately. On Mac OS X, the SSH client is available by default as a Terminal application.
In the Terminal session that follows, complete the following steps:
In the Terminal session that follows, complete the following steps:
- Log in as administrator „root“ via SSH to FreeNAS.
- Verify that the P5 home directory has been created.
- Download and install P5.
- Start the first P5 Browser session.
- First, log in as administrator „root“ via SSH to FreeNAS:
$ ssh -l root 192.168.234.173
- Before the connection to the SSH server can be established for the first time, you are presented with the SSH fingerprint that you have to to confirm with a „yes“:
The authenticity of host '192.168.234.173 (192.168.234.173)' can't be established.
RSA key fingerprint is fc:08:bd:ef:23:ca:2f:00:38:b9:7f:cd:52:86:7b:4c.
Are you sure you want to continue connecting (yes/no)? yes
Warning: Permanently added '192.168.234.173' (RSA) to the list of known hosts.
root@192.168.234.173's password: *********
FreeBSD 9.3-RELEASE-p13 (FREENAS.amd64) #0 r281084+3df1120: Thu Jun  4 01:00:51 PDT 2015

	FreeNAS (c) 2009-2015, The FreeNAS Development Team
	All rights reserved.
	FreeNAS is released under the modified BSD license.

	For more information, documentation, help or support, go here:
 	http://freenas.org
Welcome to FreeNAS
- After a successful login, check that all file systems (datasets) are mounted as expected:
# df -k
- For the P5 installation, you should be able to see a dataset called “/mnt/awpool/aw“ that you created earlier.
There are other file systems too, but these are not important here.
Filesystem             1024-blocks   Used       Avail Capacity  Mounted on
freenas-boot/ROOT/default 30210449 520682    29689766     2%    /
devfs                            1      1           0   100%    /dev
tmpfs                        32768   5396       27372    16%    /etc
tmpfs                         4096      8        4088     0%    /mnt
tmpfs                      4130116  36304     4093812     1%    /var
freenas-boot/grub         29696714   6948    29689766     0%    /boot/grub
awpool                 10958491296    139 10958491157     0%    /mnt/awpool
awpool/aw              10958491296    139 10958491157     0%    /mnt/awpool/aw
- After switching to the installation directory, start downloading P5 from the internet:
# cd /mnt/awpool/aw
# wget http://awdist.archiware.com/awpst521.tgz
- The program „wget“ shows the download progress:
--2015-08-10 14:23:29--  http://awdist.archiware.com/awpst521.tgz
Connecting to awdist.archiware.com (awdist.archiware.com)|54.240.166.29|:80... connected.
HTTP request sent, awaiting response... 200 OK
Length: 142101618 (136M) [application/x-gzip]
Saving to: 'awpst521.tgz'
          100%[==========================================>] 135.52M   594KB/s   in 4m 7s

2015-08-10 14:27:37 (561 KB/s) - 'awpst521.tgz' saved [142101618/142101618]
- Upon completing the download, unpack the file using tar. Check the content using the „ls“ command:
# tar xzf awpst521.tgz
#
# ls
./              README*         lib/            restart-server*
../             awpst521.tgz    license.txt*    servers/
.preinstall*    binaries/       log/            start-server*
.prestart*      etc/            modules/        stop-server*
ChangeLog*      install.sh*     ping-server*    uninstall.sh*
- The last step in the P5 installation is to call the “./install.sh“ script:
# ./install.sh

        ArchiWare PresStore Installation Menu
        -------------------------------------

         1)      Install or configure the application server

        99)      Quit

Your choice: 1

Please enter free TCP port for the 'lexxsrv' server.
Note that you must enter a free and valid TCP port.
We will not check wether the port is ok to use or not.

TCP port for the 'lexxsrv' server [8000]:

Arranging for server to start/stop at power cycle
Added /etc/rc.d/lexx
Added lexx_enable="YES" to /etc/rc.conf

Use: "/mnt/awpool/aw/start-server" to start the software
Use: "/mnt/awpool/aw/stop-server" to stop the software


        ArchiWare PresStore Installation Menu
        -------------------------------------

         1)      Install or configure the application server

        99)      Quit

Your choice: 99
- Now you can start P5 manually and enter the automatic start/stop into FreeNAS. The required calls for this can be found in line 22 (23 respectively) of the previous shell output. Since you are still located in the aw-home directory after installation, you can start P5 with the “./start-server” command:
# ./start-server
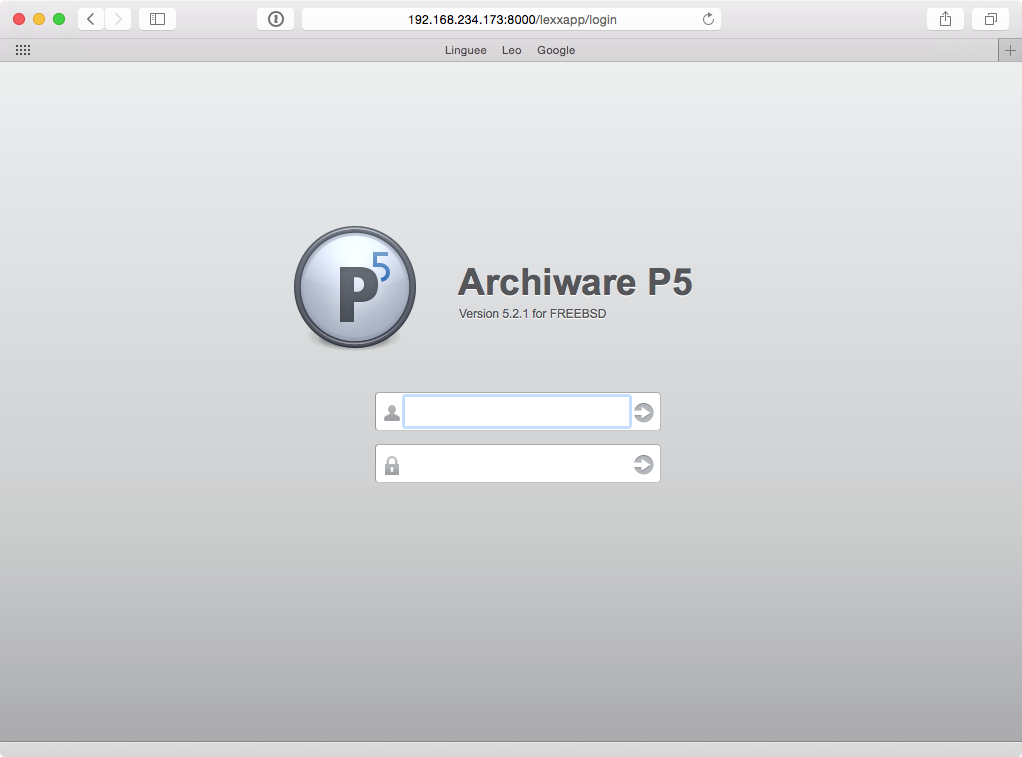
- After a successful P5 start, the system displays the URL through which you can now access the application. It may happen, however, that P5 does not find the primary network interface, but it will nevertheless register on all the available interfaces. In that case use the same address you used while configuring the FreeNAS GUI plus the port default P5 port number of 8000:
http://192.168.234.173:8000/login
Starting PresStore application servers, be patient...
  lexxsrv pid: 39027 (version "5.2.1" running)
  lexxsrv url: http://127.0.0.1:8000/login (use web-browser to connect)
Started 1 from 1 application servers.
- The first P5 browser session:
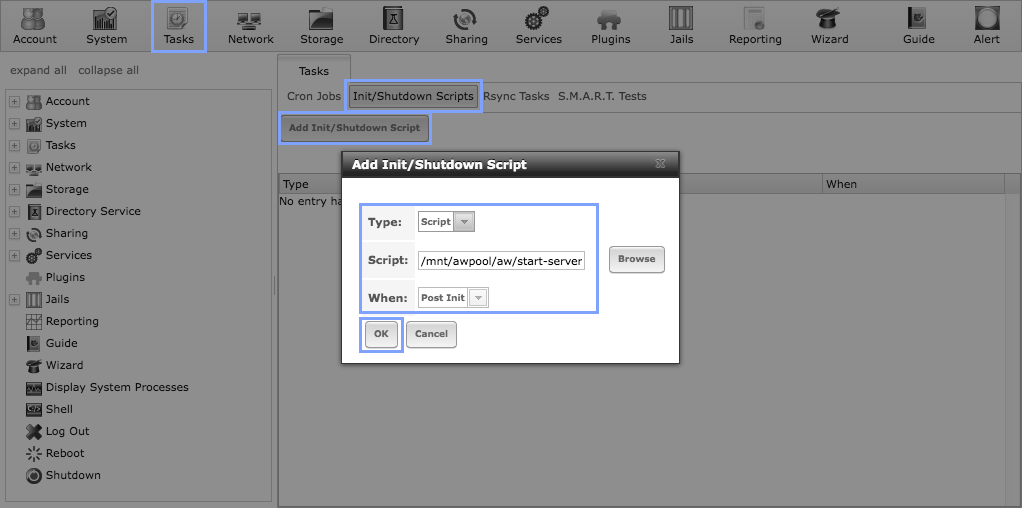
- Lastly, you have to make sure that P5 gets started when FreeNAS boots and stopped before the system is shut down:
Go to [Tasks][Init/Shutdown Scripts] and click the [Add Init/Shutdown Script] button.
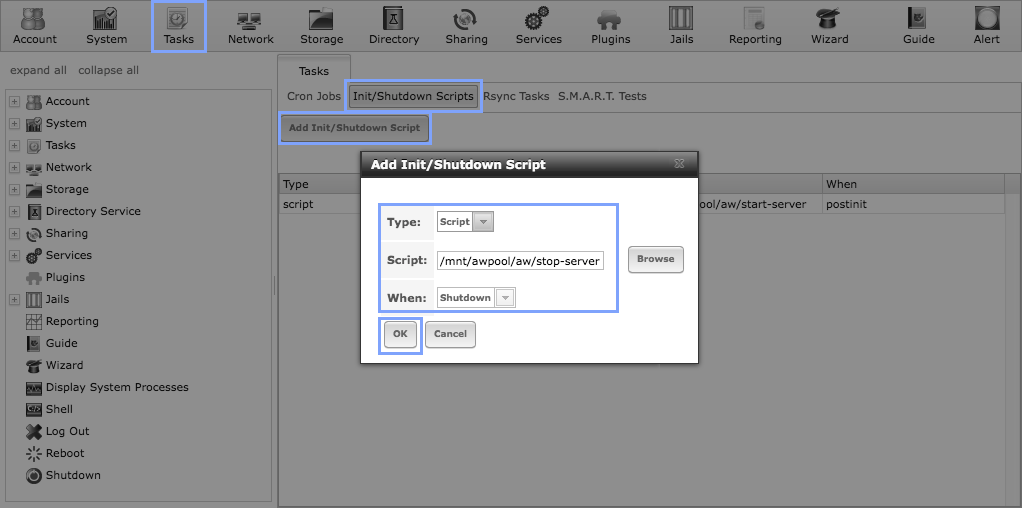
- The entry for stopping P5 on shutdown:
Conclusion
The Archiware P5 Appliance is a real all-rounder that can be used out of the box for all the P5 products. Moreover, when used with a FreeNAS based file server, the Appliance is superior to many of the off-the-shelf NAS systems. In ZFS, you do not only have a contemporary file system at your disposal, but also a powerful storage management system and an integrated Soft RAID.
We hope this Blog encourages you to build your own P5 Appliance and has shown you how simple this task is.
Build Your Own Archiware Appliance