Introduction
This guide will document how to deploy an Archiware P5 onto an EC2 Linux instance from the AWS Marketplace, configure the P5 software and then install the P5 agent on a remote host outside of AWS, such that data attached to this host can archived.
The guide is broken into three sections.
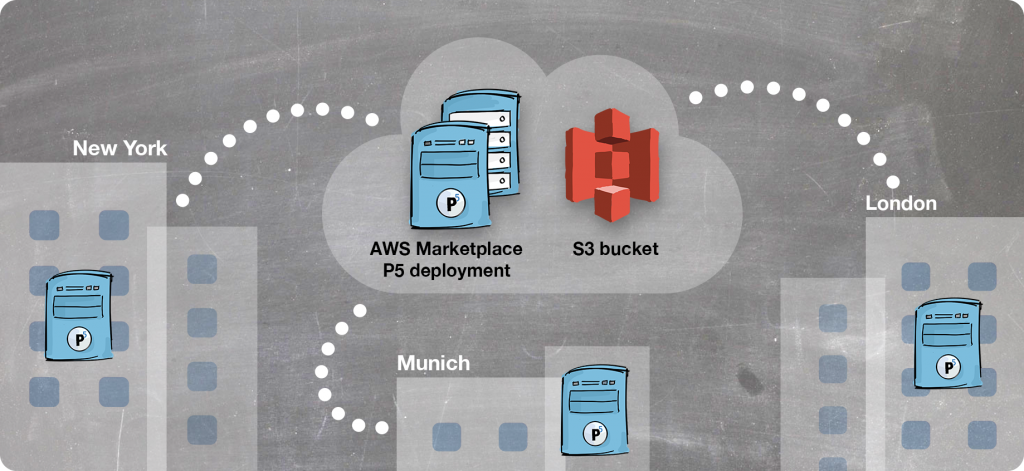
Section 1: We deploy a Linux host running P5 from the AWS Marketplace. We attach to this host using a web browser and configure an S3 bucket to be used for archive storage. The triggering and monitoring of archive jobs is also accomplished via the same web interface.
Section 2: We install P5 as an ‘agent’ on a remote host, for example at an office location. The remote host is able to act as a data source so connected storage can be archived to cloud storage, via the host running P5 that we configured in the previous step. This step can be repeated to allow archiving from many remote sites, via the same server.
Section 3: We configure and run both archive jobs, such that data from storage at the remote locations is archived to the cloud storage. Once archived, we also show how to browse archived data and restore it back to the remote location.
Section 1. Deploy and configure a P5Configuration of the P5 Server within the EC2 Instance
Archiware Licensing
Archiware on EC2 uses a bring-your-own-license (BYOL) model. Running P5 on an EC2 instance requires either an evaluation or purchased license. Evaluation licenses can be obtained either from an authorised Archiware sales partner, or directly from Archiware via the Portal website.
https://portal.archiware.com/
If you already own licenses for Archiware P5, these licenses can be registered or transferred via this portal website to run on the EC2 instance.
Deploying Archiware P5 from the AWS Marketplace
To launch Archiware P5 on a Linux instance in AWS EC2:
- Go to https://aws.amazon.com/marketplace/
- Search for ‘Archiware’.
- Select Archiware P5 Archive & Backup Free Trial & BYOL Edition.
- Click Continue to Subscribe.
- In the AWS login page, enter your AWS account information, and click Continue to Configuration.
- Under Configure this software, select the relevant version in the Software Version list.
- Click Continue to Launch.
- In the Choose Action list, select Launch through EC2
Note 1: that you’ll be charged by AWS for the resources that you use. The Archiware licensing is handled outside of AWS, and you’ll not be charged by Amazon for any Archiware licenses.
Note 2: During the setup of the instance, you will configure Security Groups where you can specify which TCP/IP ports are open for inbound connections from external hosts (e.g. your own machine). By default only port 22 (SSH) is open. To allow remote configuration of your P5 software on the instance, also open TCP ports 8000 and 8443.
Access P5 in your browser and begin configuration
All P5 administration and general use is performed using a web browser. Our default admin URL’s are:
 http://ec2-xxx.xxx.xxx.xxx.compute-1.amazonaws.com:8000/login
 https://ec2-xxx.xxx.xxx.xxx.compute-1.amazonaws.com:8443/login
Replace ec2-xxx.xxx.xxx.xxx.compute-1.amazonaws.com with the IP address or DNS name assigned to your instance, as obtained from the AWS console.
Note that the latter SSL https connection will require configuration of an SSL certificate within the P5 configuration. You’ll be greeted by the P5 login screen:
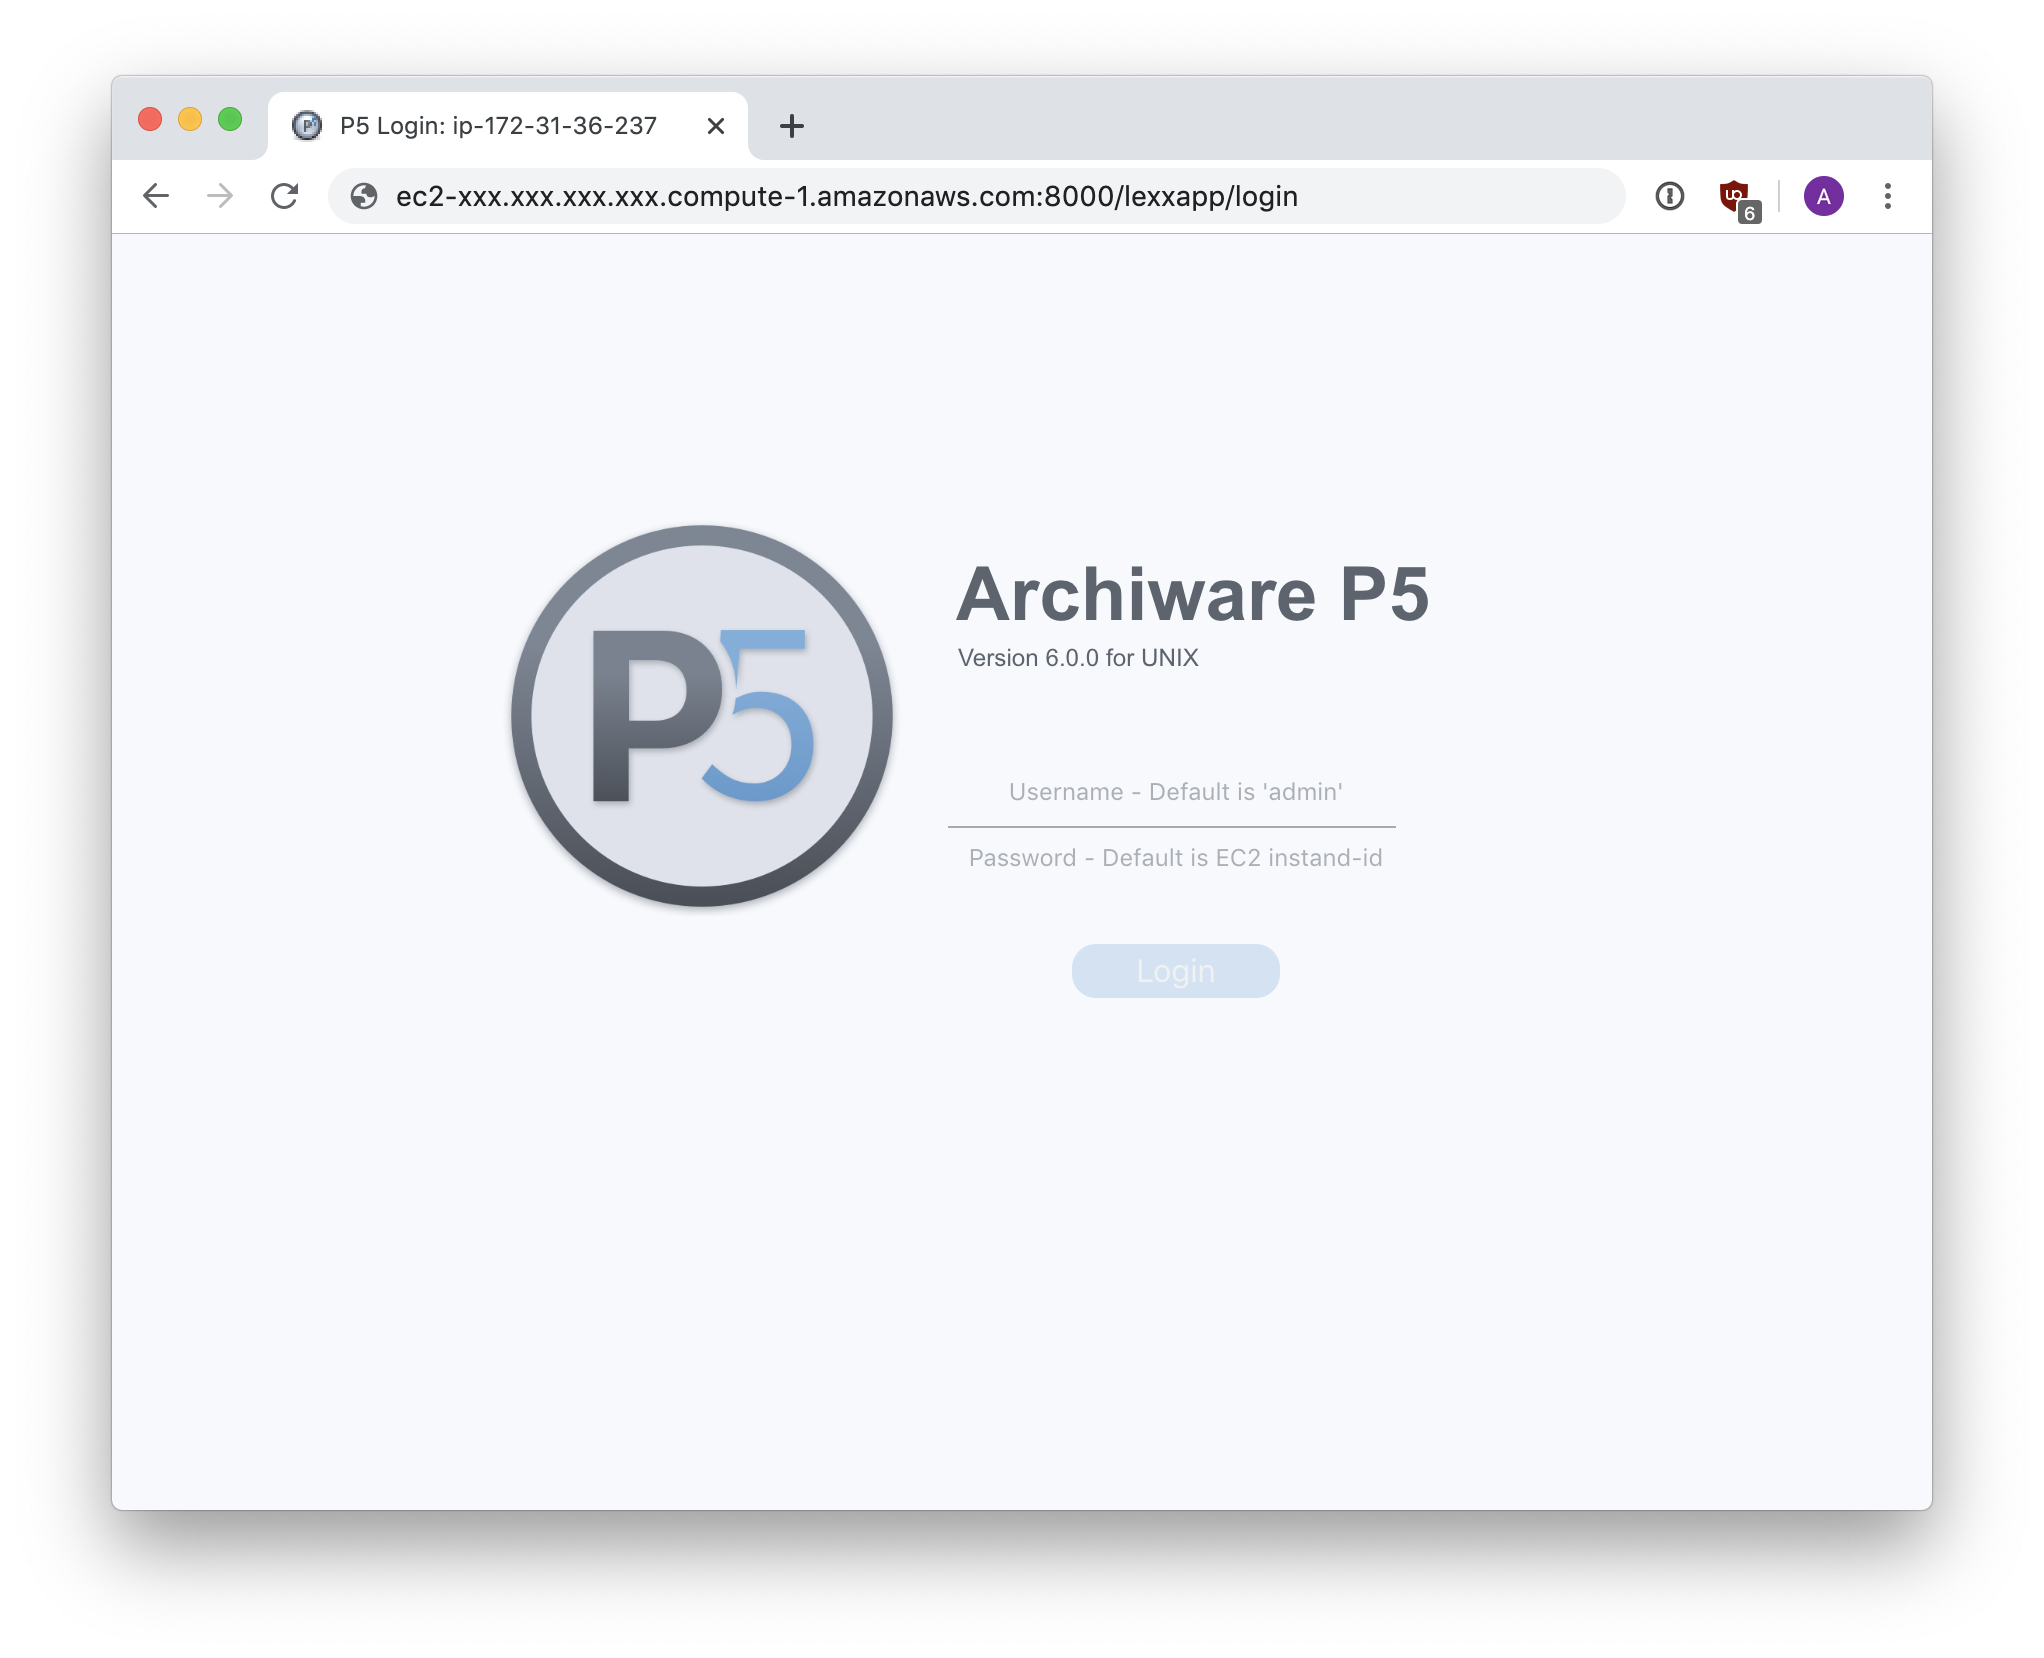
Authenticate using ‘admin’ as the username and the AWS EC2 Instance ID as the password. The Instance ID is created when the instance starts and visible in the AWS Console. Once logged in, you’ll be prompted to enter a license to activate the software. Without either a purchased or evaluation/demo license, you’ll not be able to configure P5.
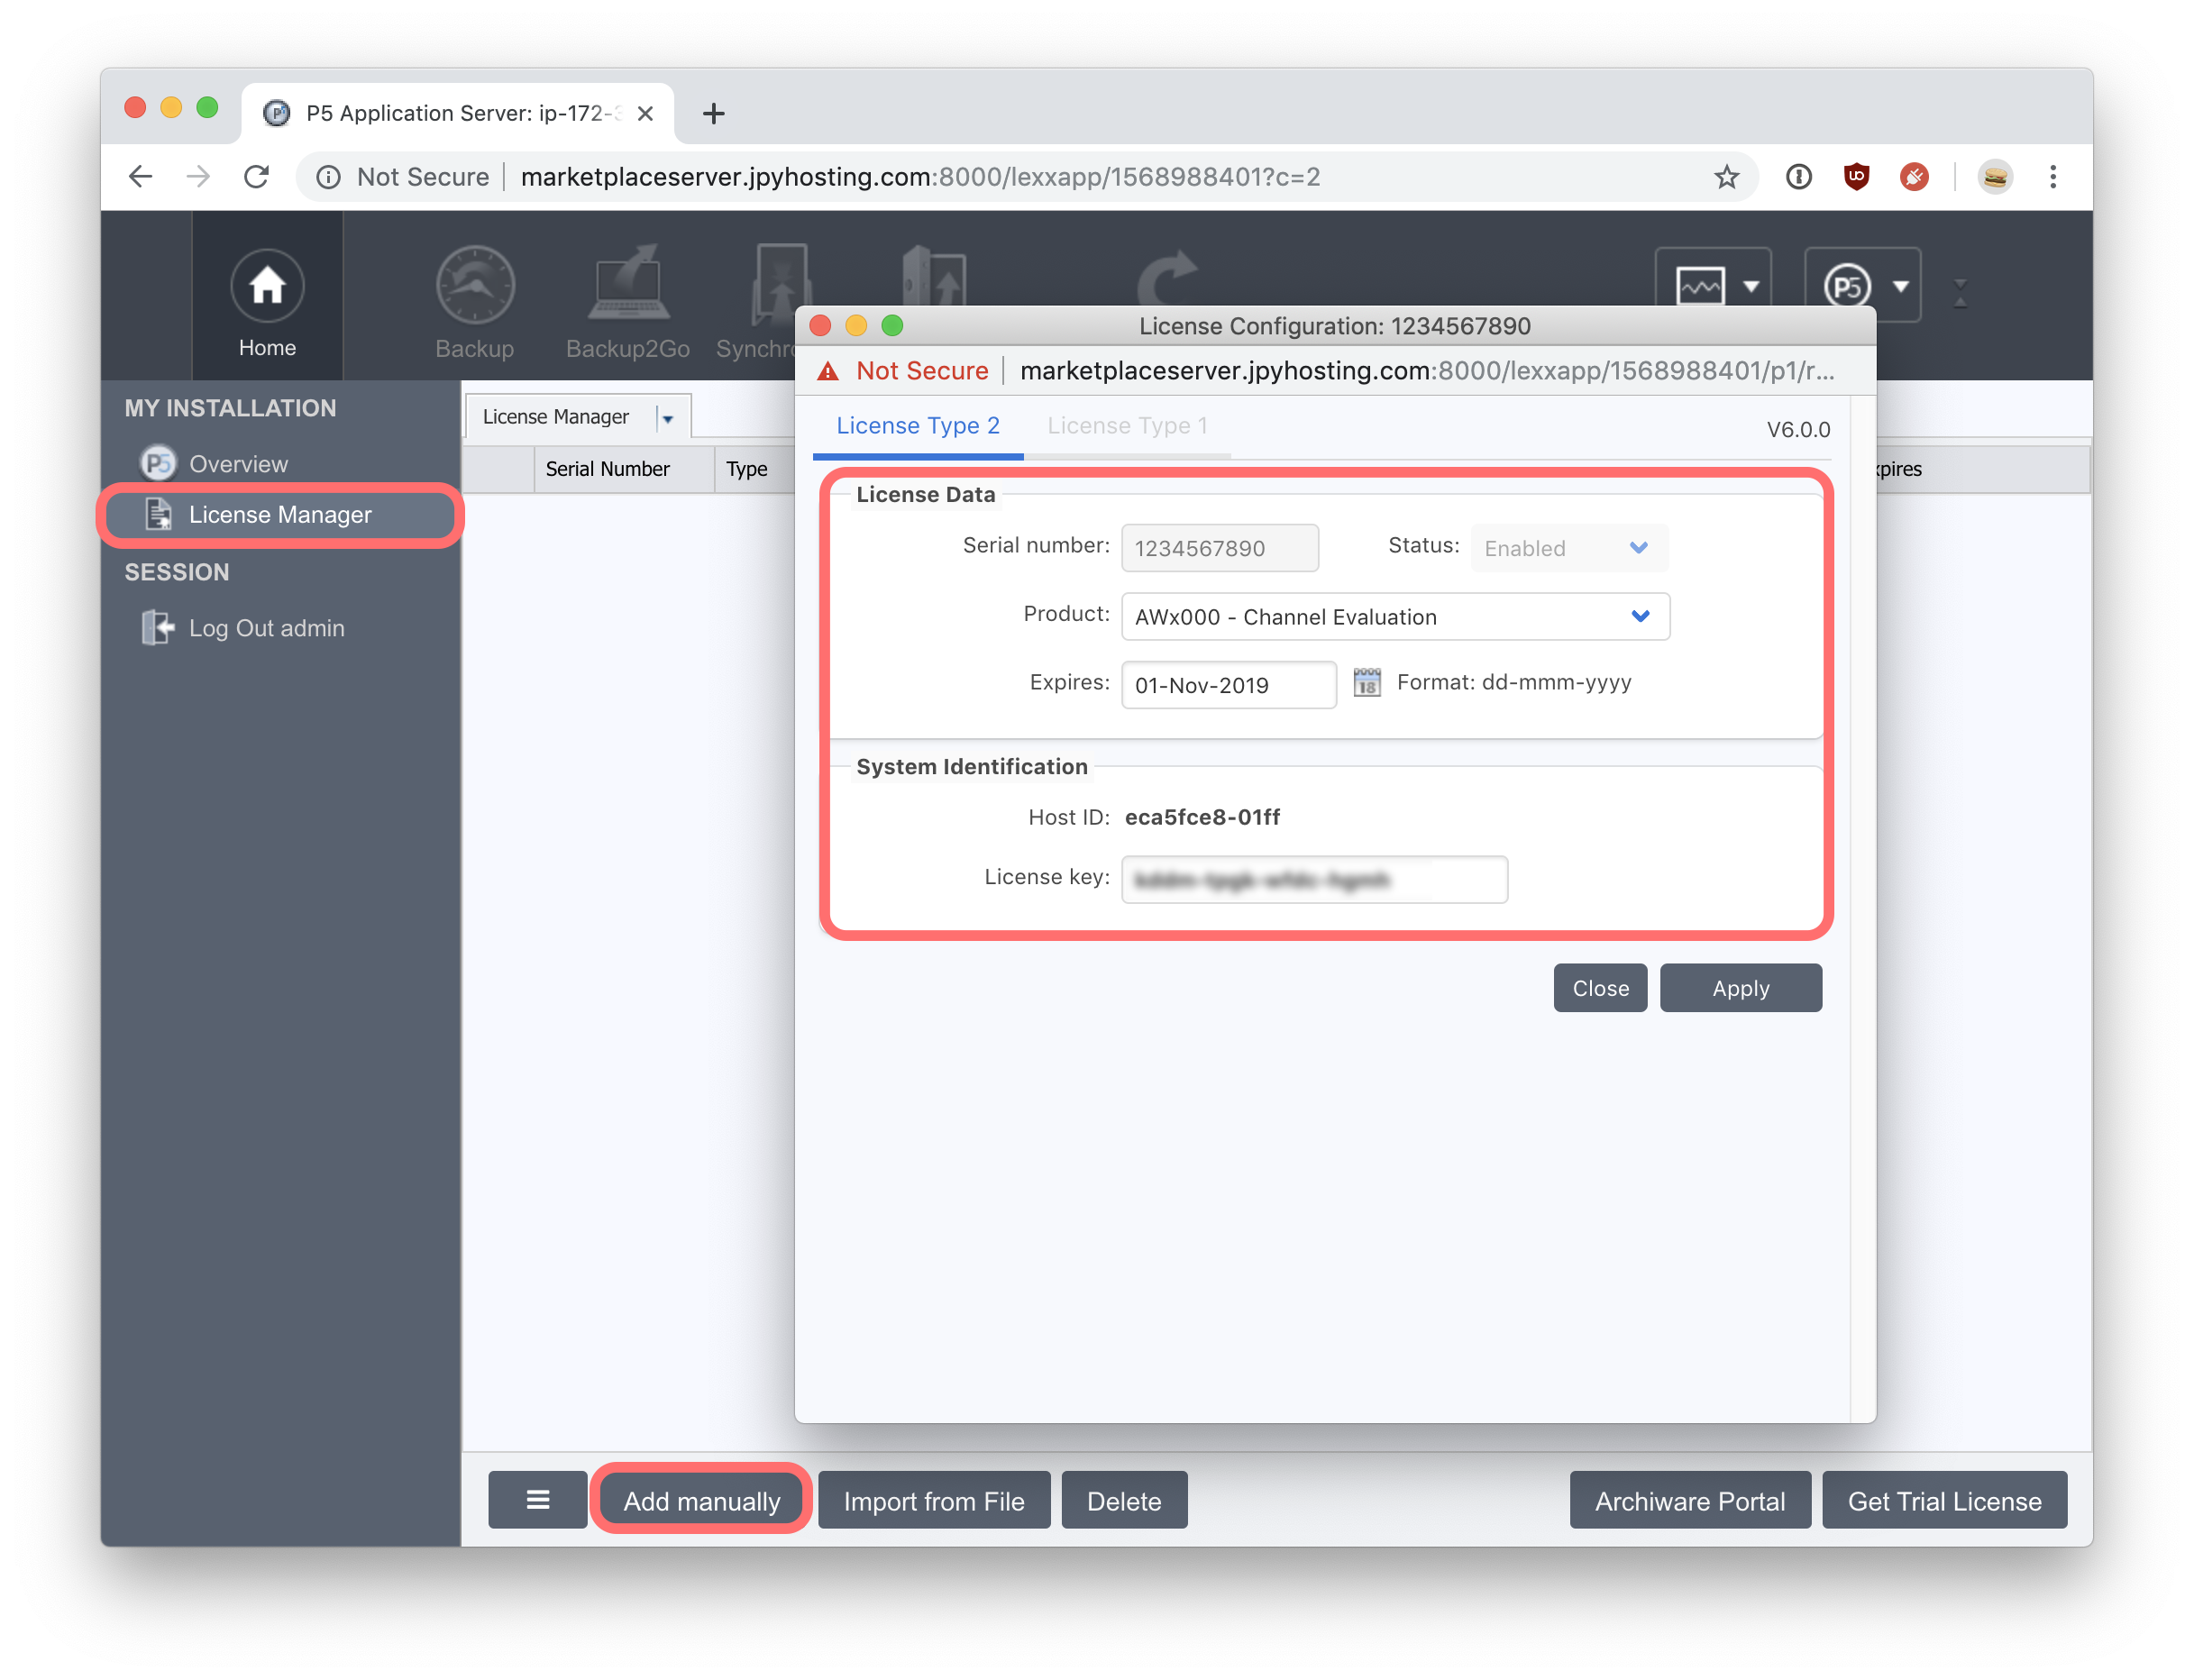
Click the ‘Add manually’ button to enter a new license. Begin by selecting the type of license you intend to use from the ‘Product’ drop-down menu in the license window. For evaluation licenses, enter the expiry date and the license key. For purchased licenses, enter the serial number, maintenance expiry date and license key. Click ‘Apply’ to validate the license, Click ‘Close’ to continue.
Configure cloud storage for archiving
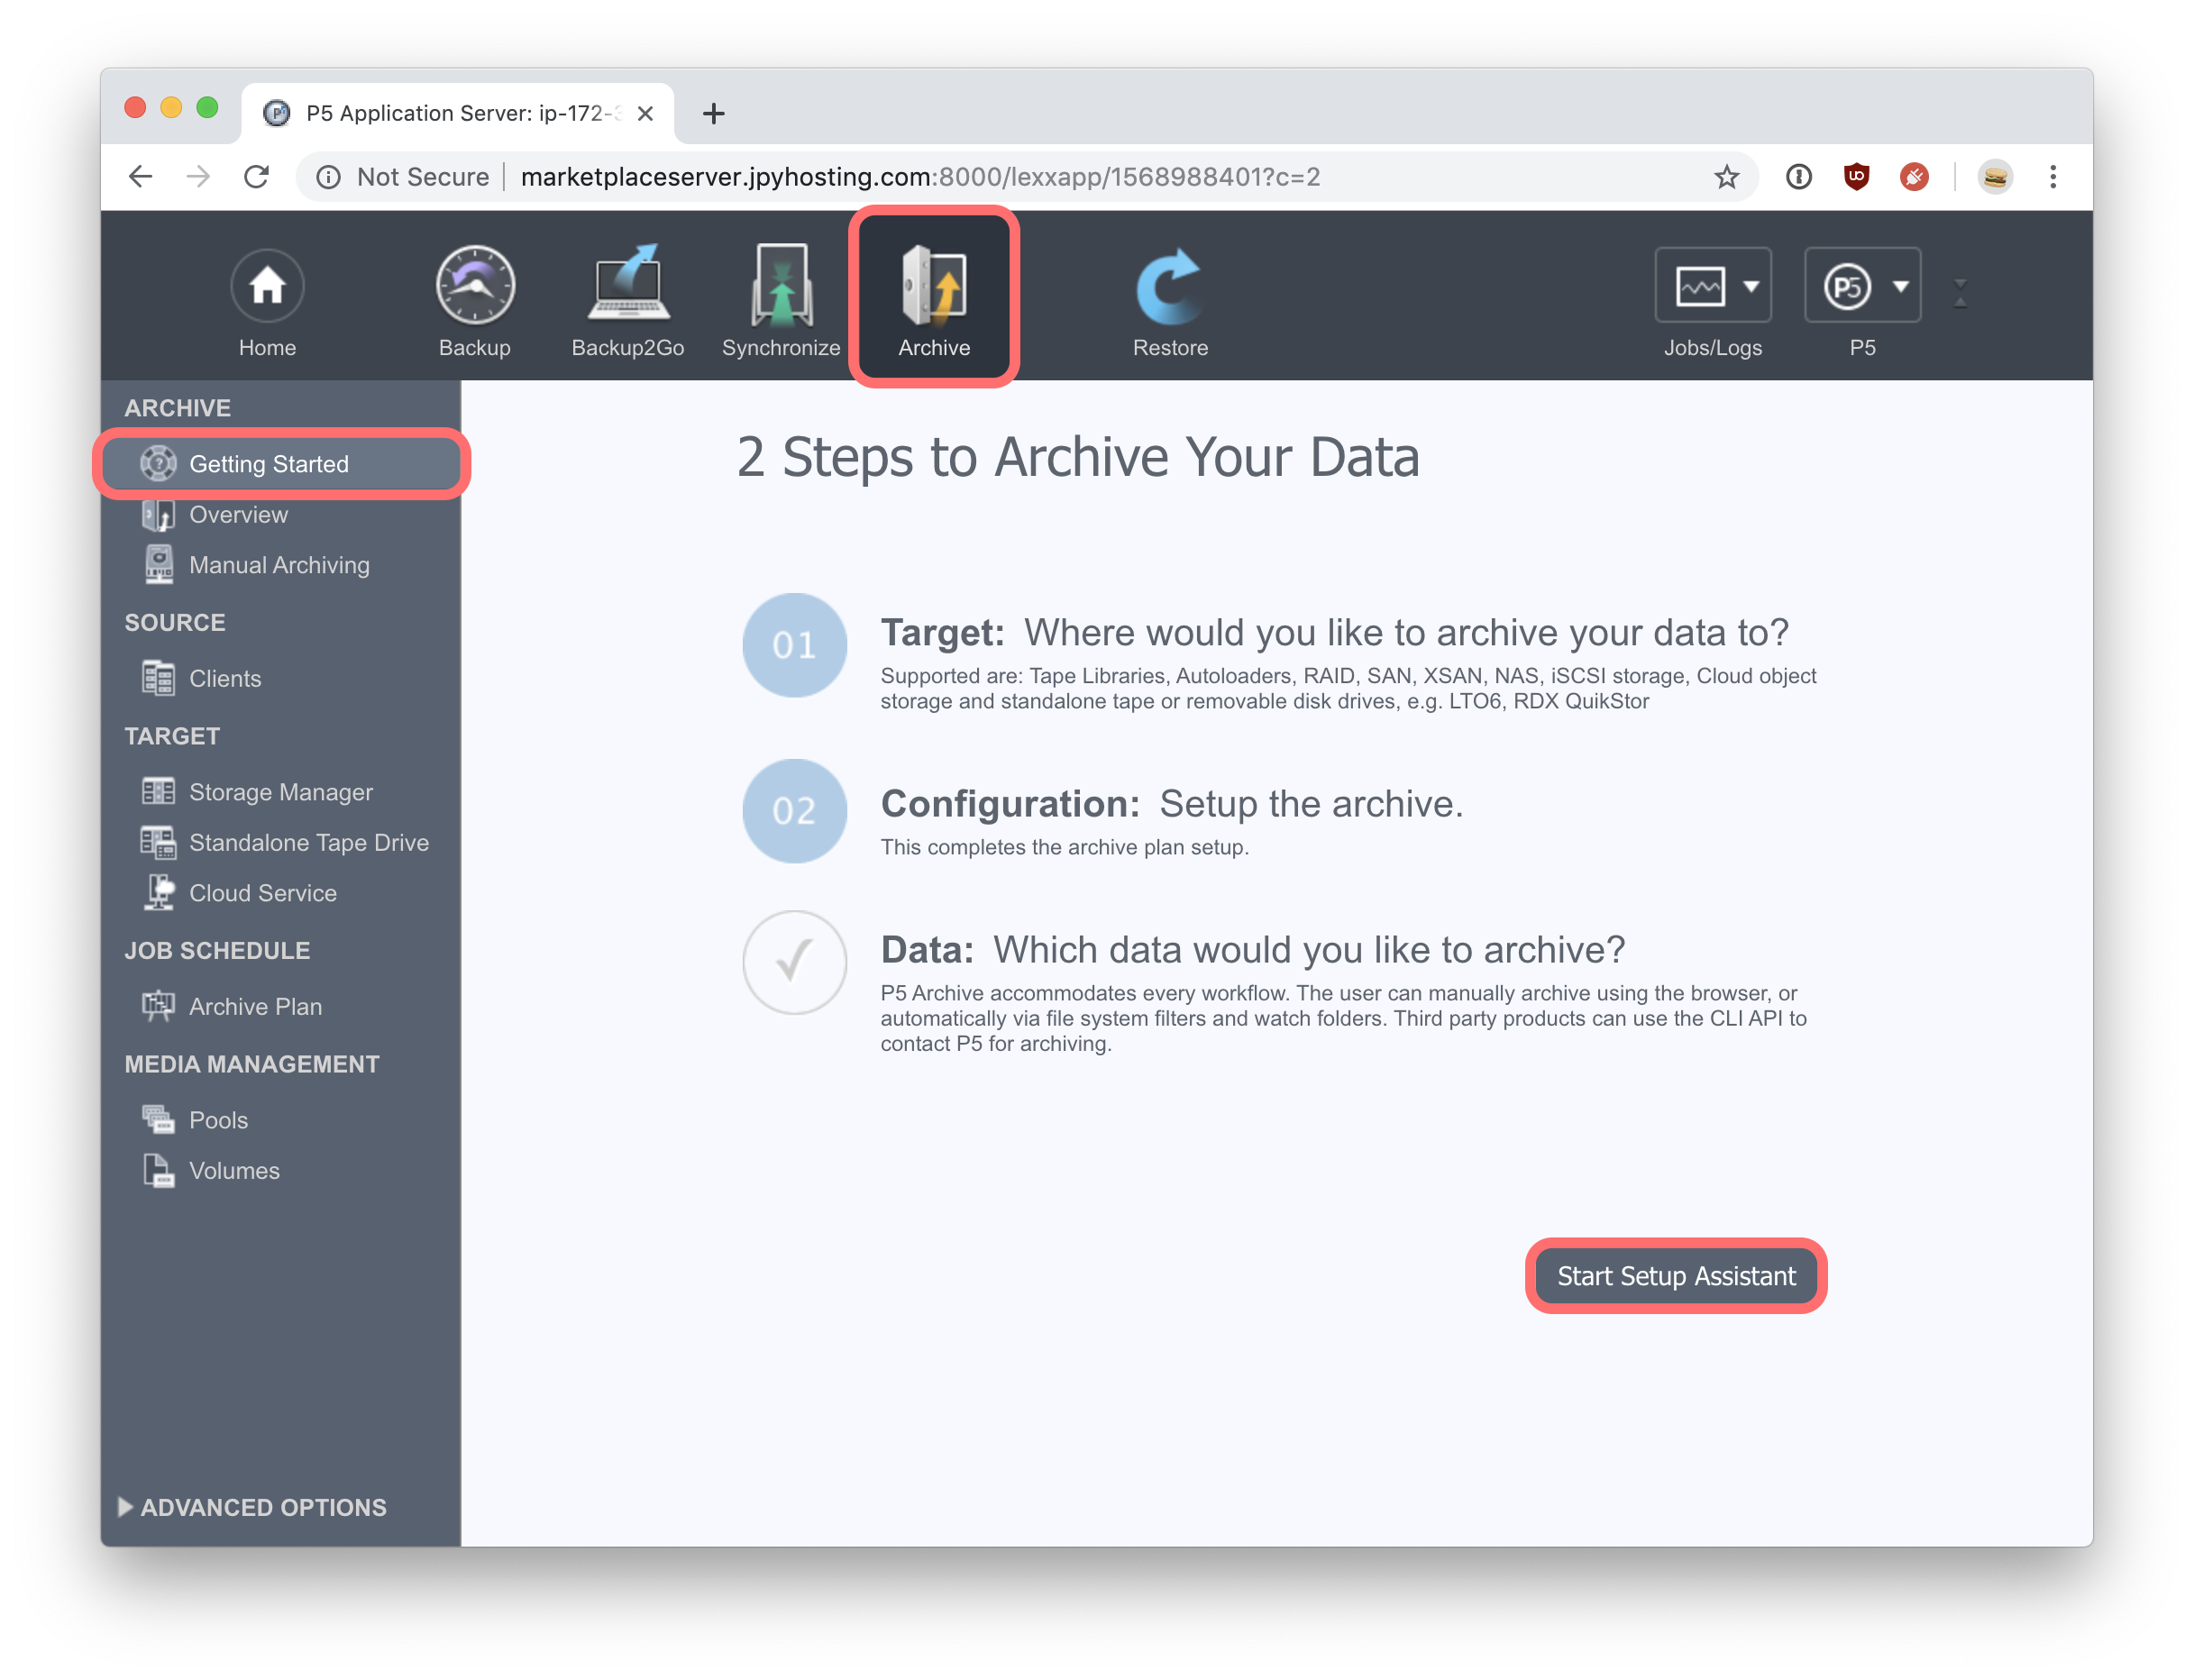
Next we’ll use an AWS S3 bucket (or Glacier archive) to configure storage for P5. Click on the ‘Archive’ tab at the top of the main window. The ‘Getting Started’ section includes an assistant that guides through the steps required to connect to your AWS storage container, and configure storage for Archive use in P5.
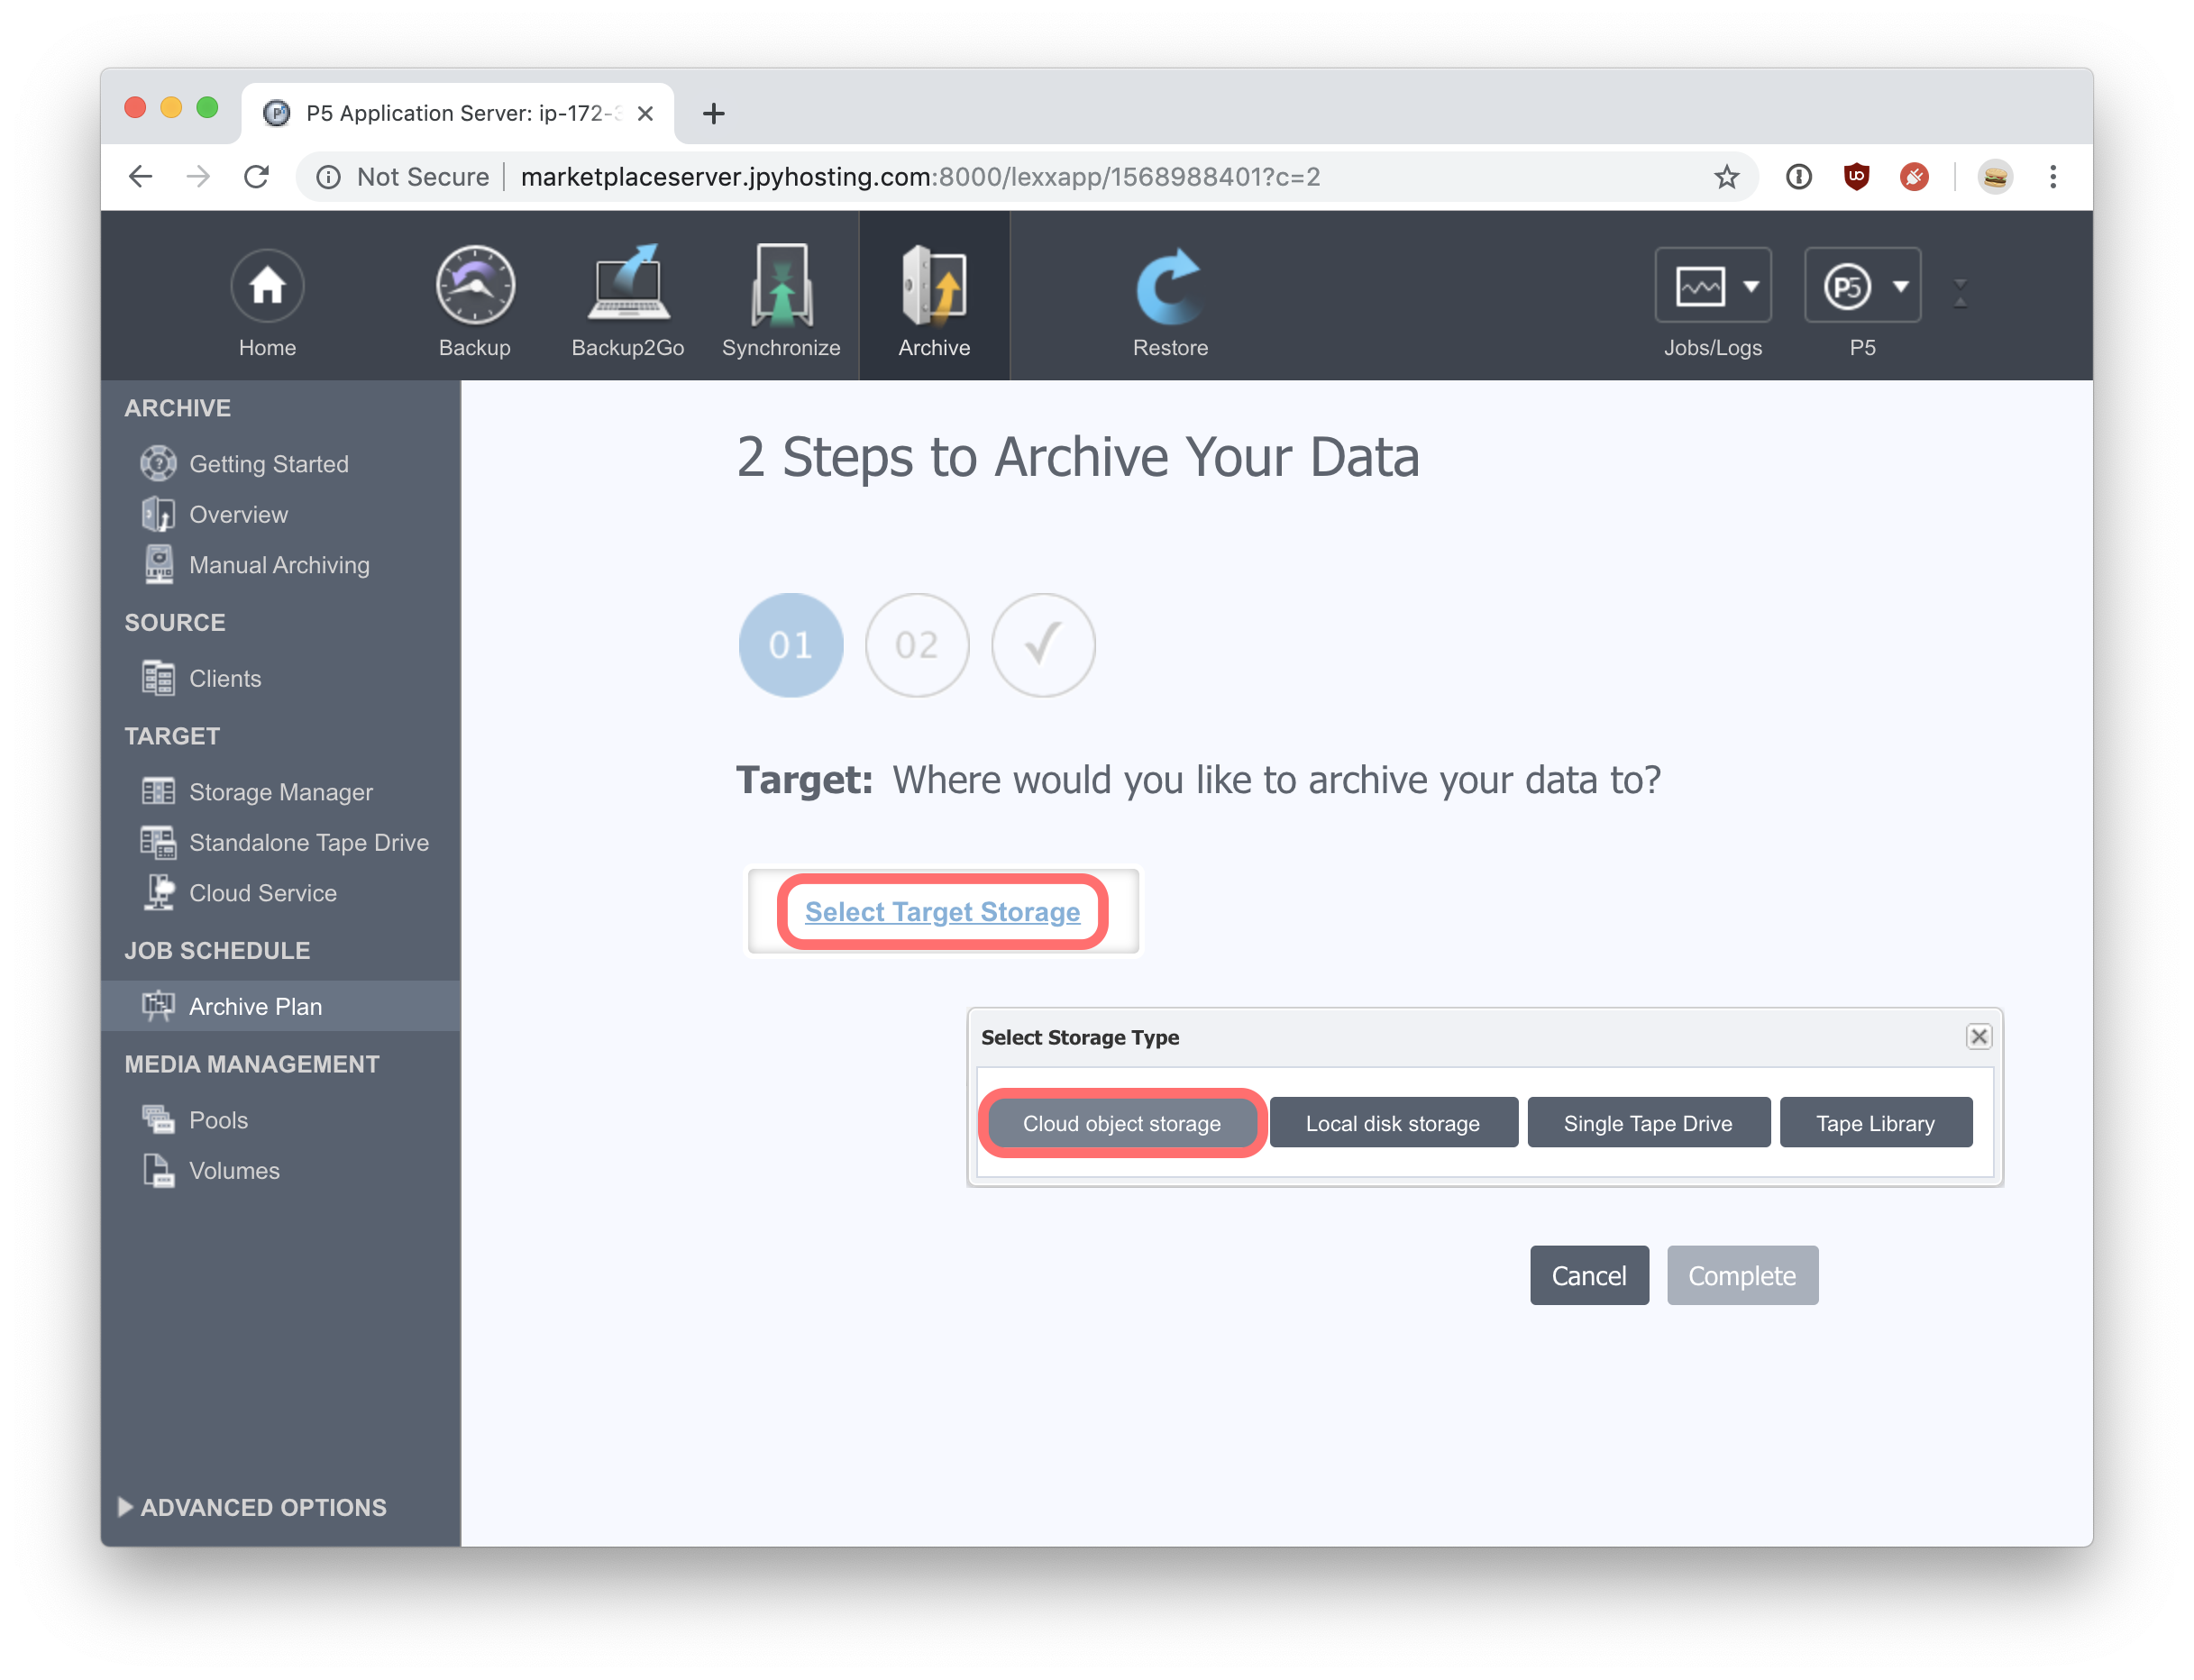
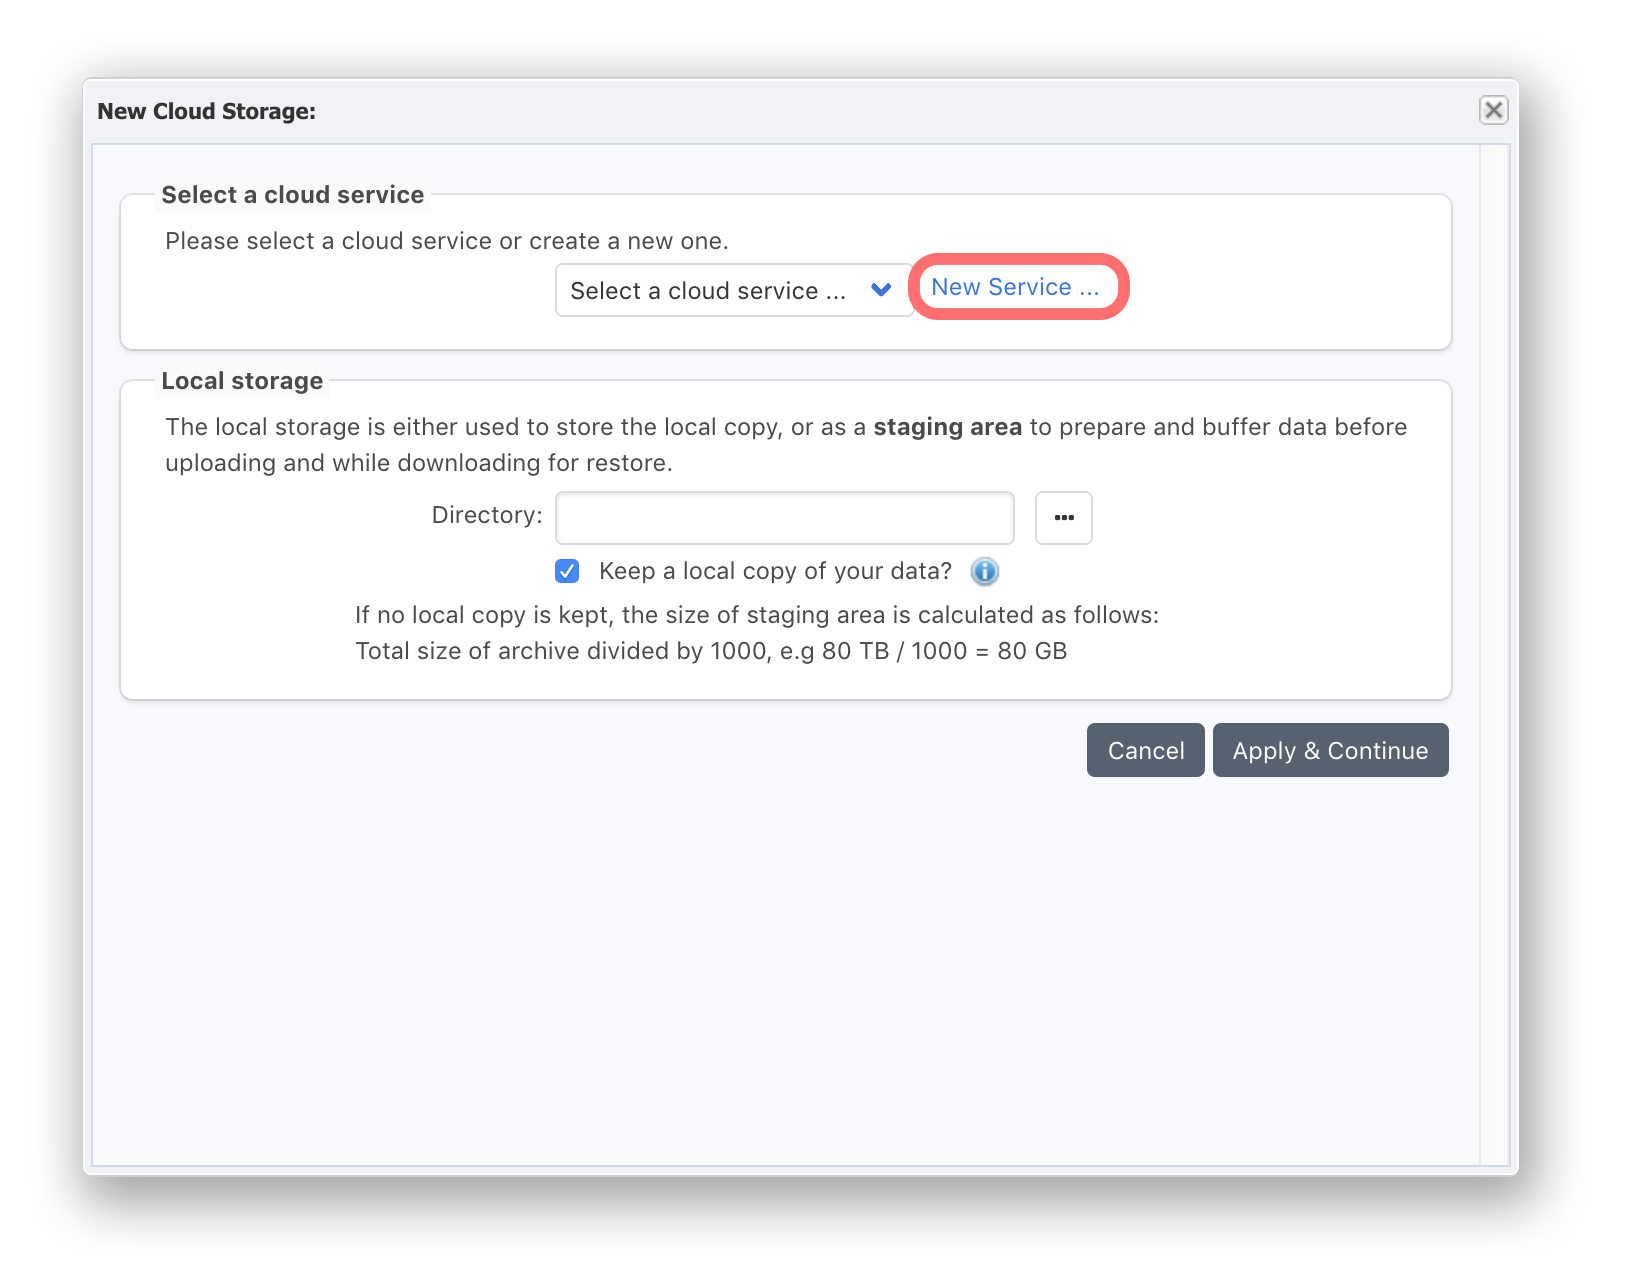
Click on ‘Start Setup Assistant’ to begin. Next click ‘Select Target Storage’ followed by a click on the ‘Cloud Object Storage’ button. A ‘New Cloud Storage’ window will open, where you create and add a cloud service, followed by selecting a local directory on this Linux machine, where P5 will write archive data in preparation for uploading to cloud storage and then deleting locally. Thus, the local directory is used as a cache for data being written to the cloud.
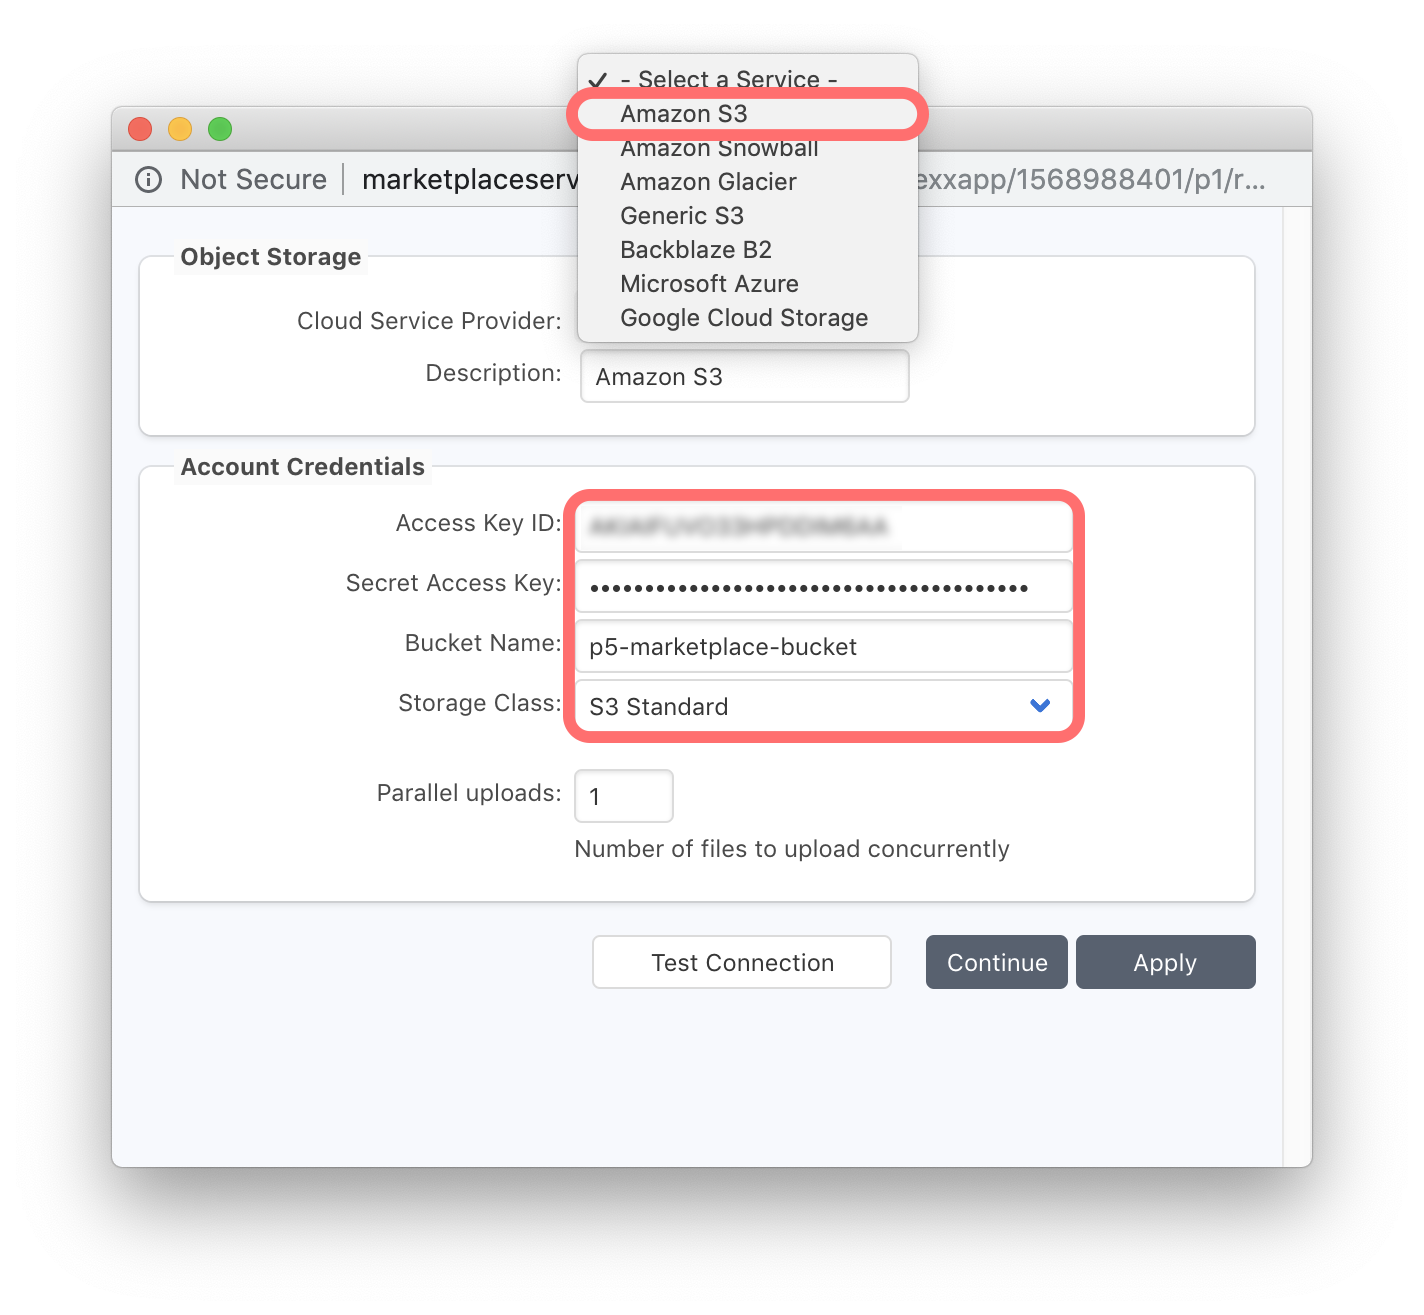
Begin by clicking ‘New Service’. Select the type of cloud storage you wish to use. Note that additional storage options are available when selecting either S3 or Glacier storage, consistent with the different variants offered by AWS. Enter your AWS credentials that provide access to the storage selected, including the ‘Bucket Name’. Once all the details are entered, use the ‘Test Connection’ button to confirm that P5 can connect to the cloud service, using the information you have provided.

Click ‘Continue’ in the Cloud Service window to return to the ‘New Cloud Storage’ window. Now we move to the ‘Local Storage’ section of this window. P5 required some local storage for caching. The Linux host deployed from the AWS Marketplace has a 20GB partition for this purpose, mounted into the /p5_data folder. Click the ‘…’ ellipsis button to browse local filesystems and choose this directory for P5 to use as cache storage.
Clicking ‘Select’ with a directory highlighted, will fill out the path in the ‘Directory’ field.
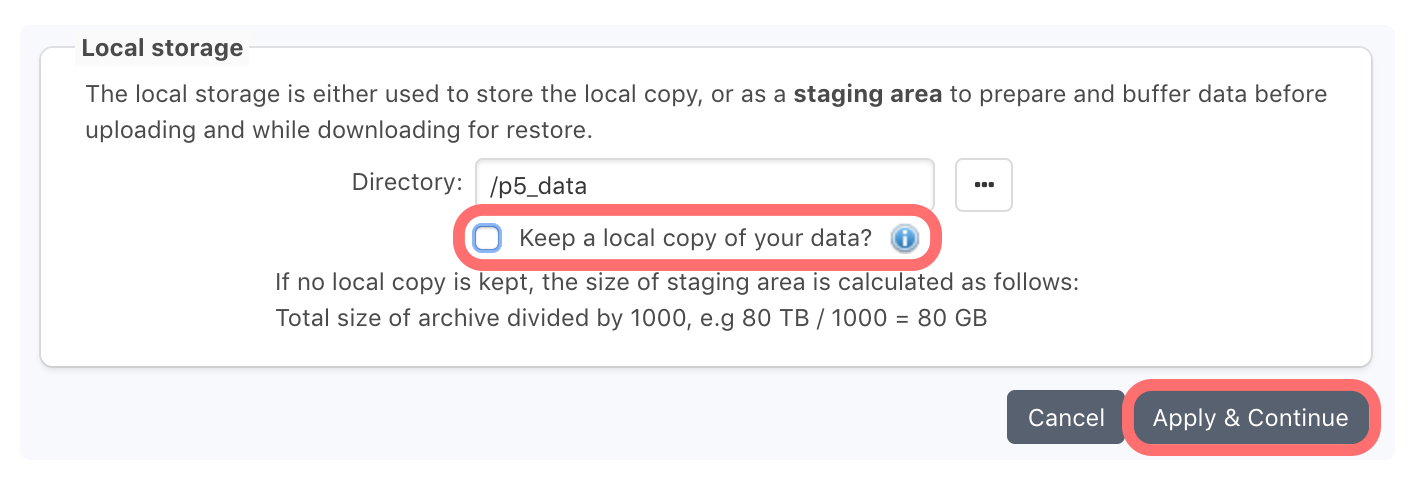
Uncheck the checkbox labelled ‘Keep a local copy of your data?’. Keeping this box checked would result in all archive data to be written both to this local filesystem and the cloud storage. This would require provision of enough local storage via a mounted filesystem to accommodate all your archive data. This can be achieved, if required, by adding a disk in the AWS console and attaching it to the Linux host machine.

Click ‘Apply and Continue’ to return to the setup assistant. Your chosen cloud service is now configured and selected. Click ‘Continue’ to move to the last step of this setup assistant. A background task will now run to configure the cloud storage for use with P5. This involves creating a Pool and 100 storage containers called Volumes within P5. Each of these volumes can store up to 1TB of data. This storage can be expanded later if needed. Each volume exists as a folder in the local storage directory at /p5_data and also as a folder within the cloud storage.
In the final step you’ll be prompted to ‘Select Data to Archive’. Skip this step because we first need to add our remote P5 client machine(s) so that we can archive data from a remote source.

Section 2. Install P5 as an ‘agent’ on a remote host
In this example workflow, we will archive data from a remote location, e.g. an office where the source of data to be archive sits behind a firewall. To do this we must install Archiware P5 on the host where the data that we wish to archive is attached. We then connect this P5 host to the hosted P5 server in AWS, by using it’s IP address or DNS name if you have one assigned. The remote client machine will then keep an open TCP/IP connection to the remote server. Archive tasks can be triggered by using the web-admin interface provided by the hosted P5 installation.

Begin by installing P5 on the remote host machine. Visit the Archiware download page where you’ll find installers for macOS, Windows, Linux OS’s plus installers for Synology, QNAP and Netgear NAS devices.
https://p5.archiware.com/download
Follow the installation instructions in the P5 Manual to get the product running on this host, up to the point where the web-admin interface can be accessed in your browser from this host computer. URL’s will be the same as in step 1, except the IP address will be different.
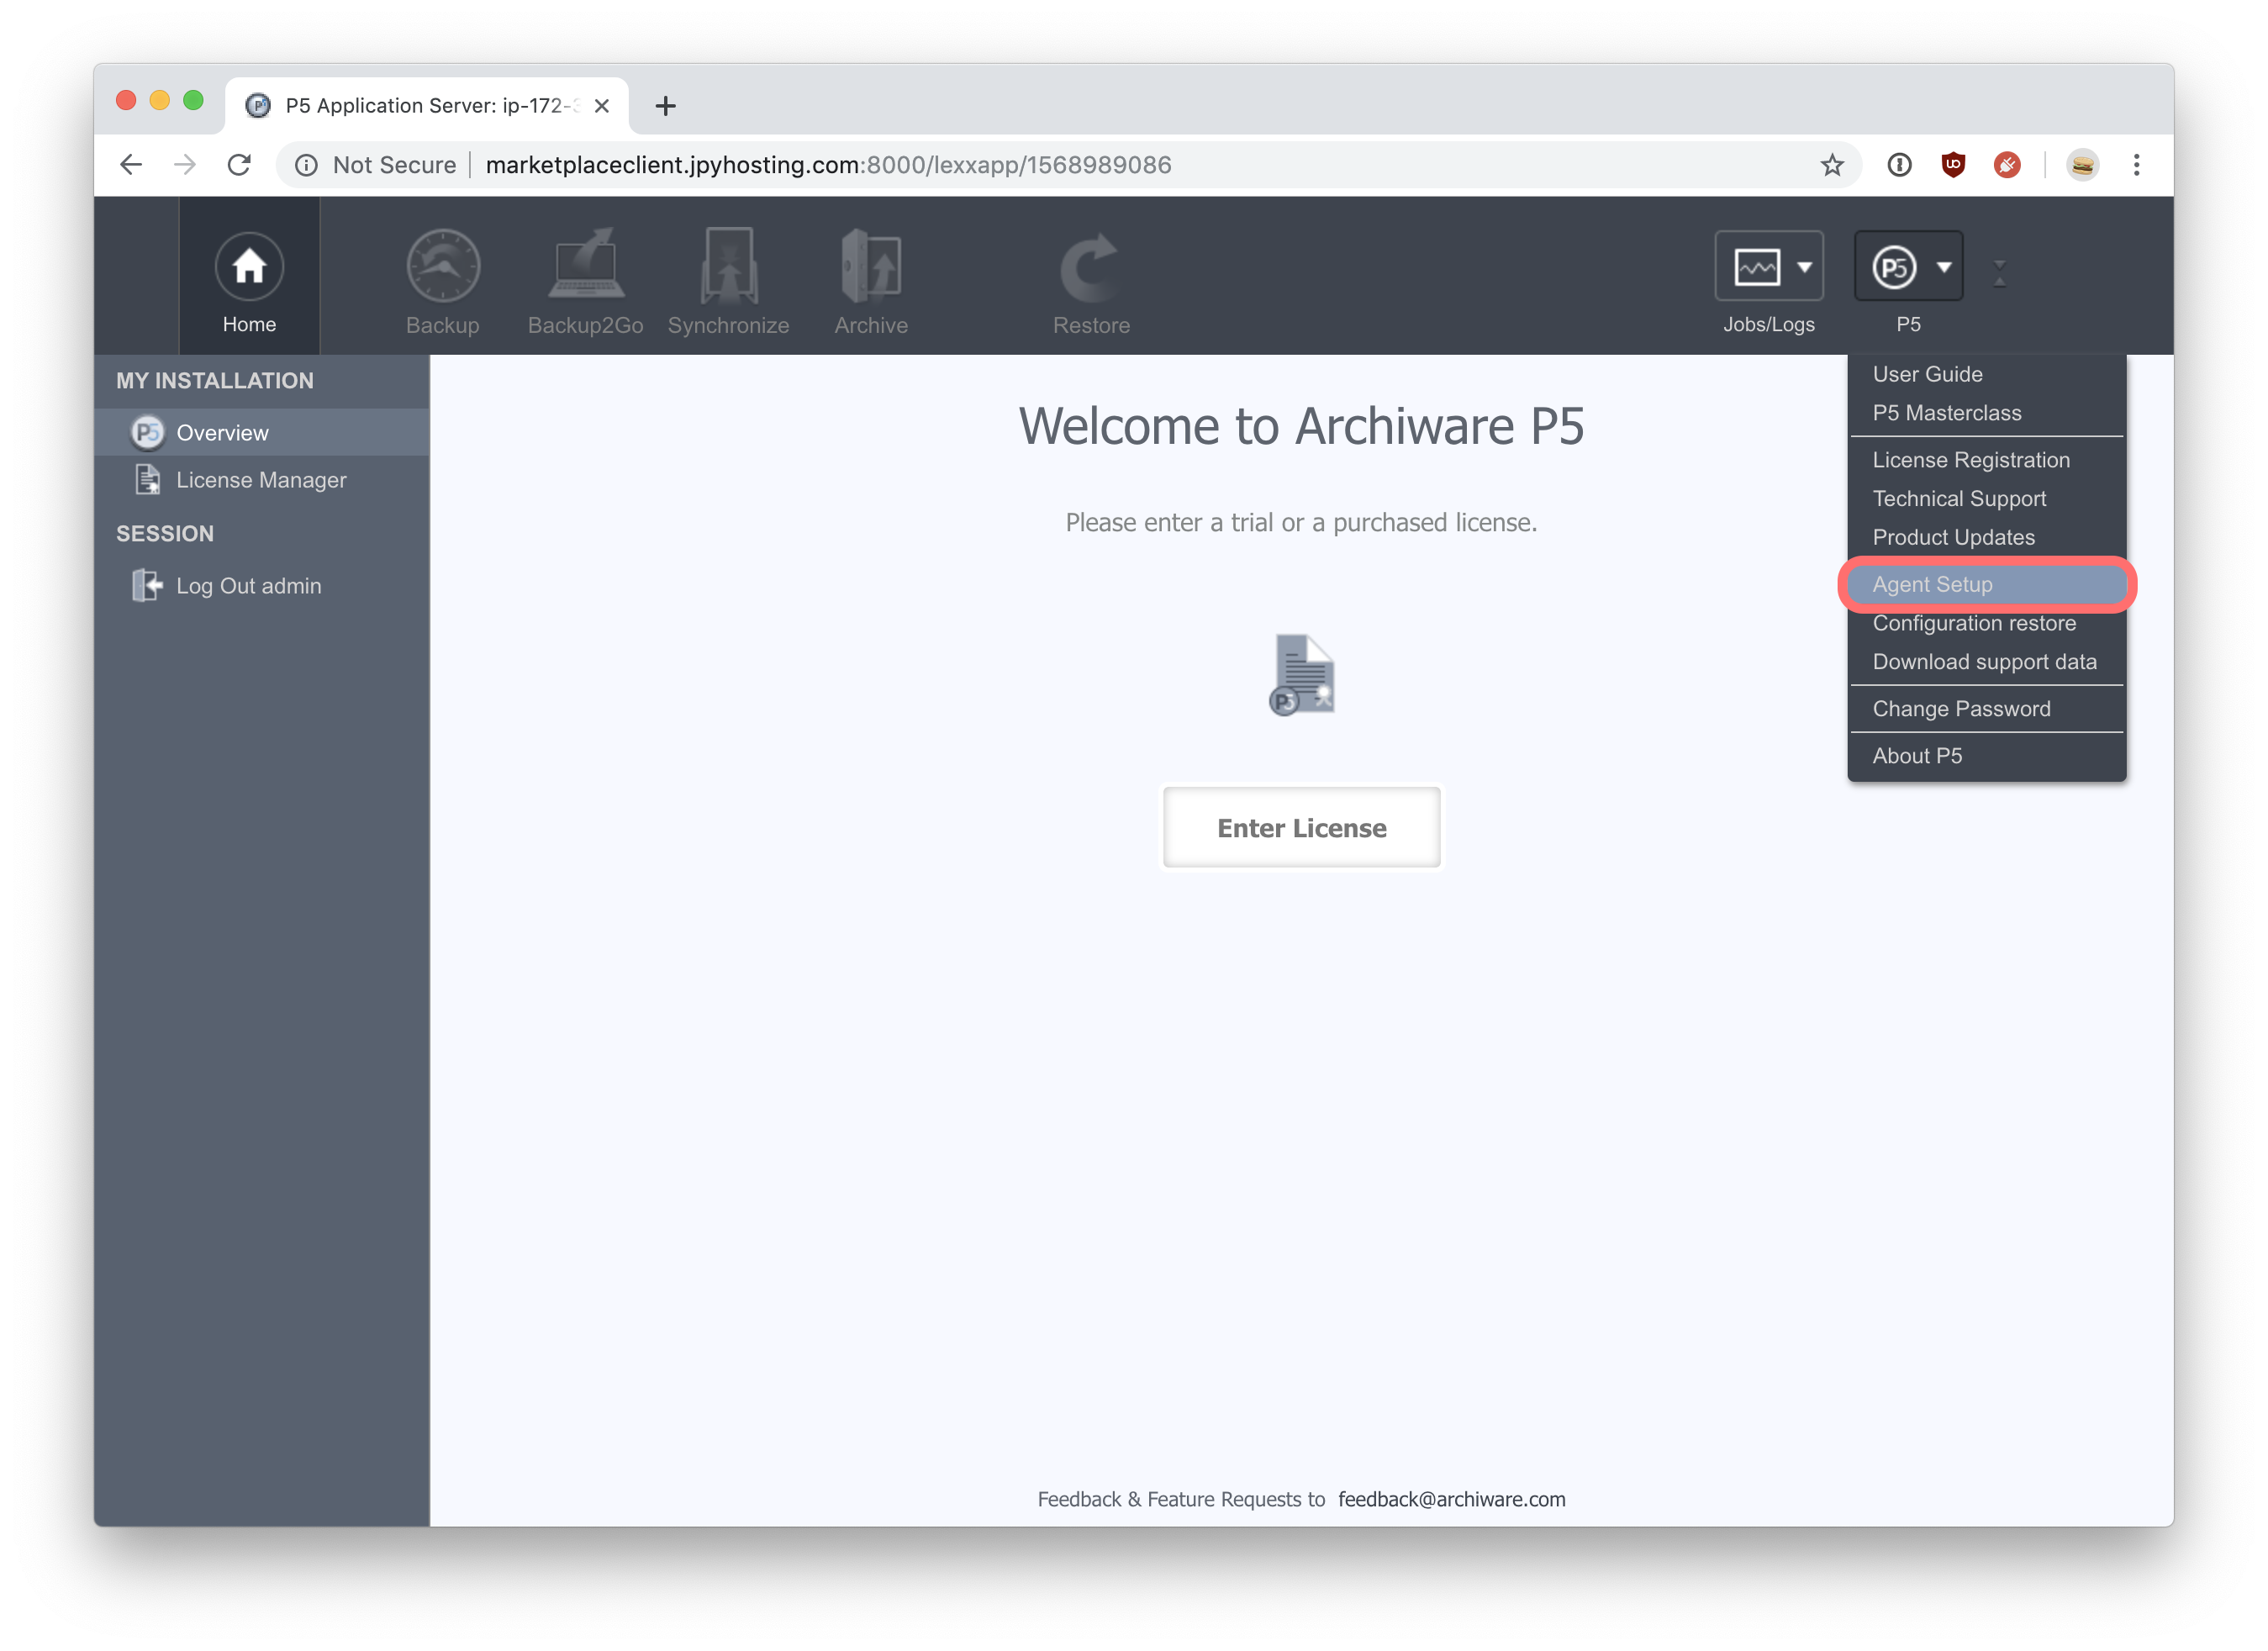
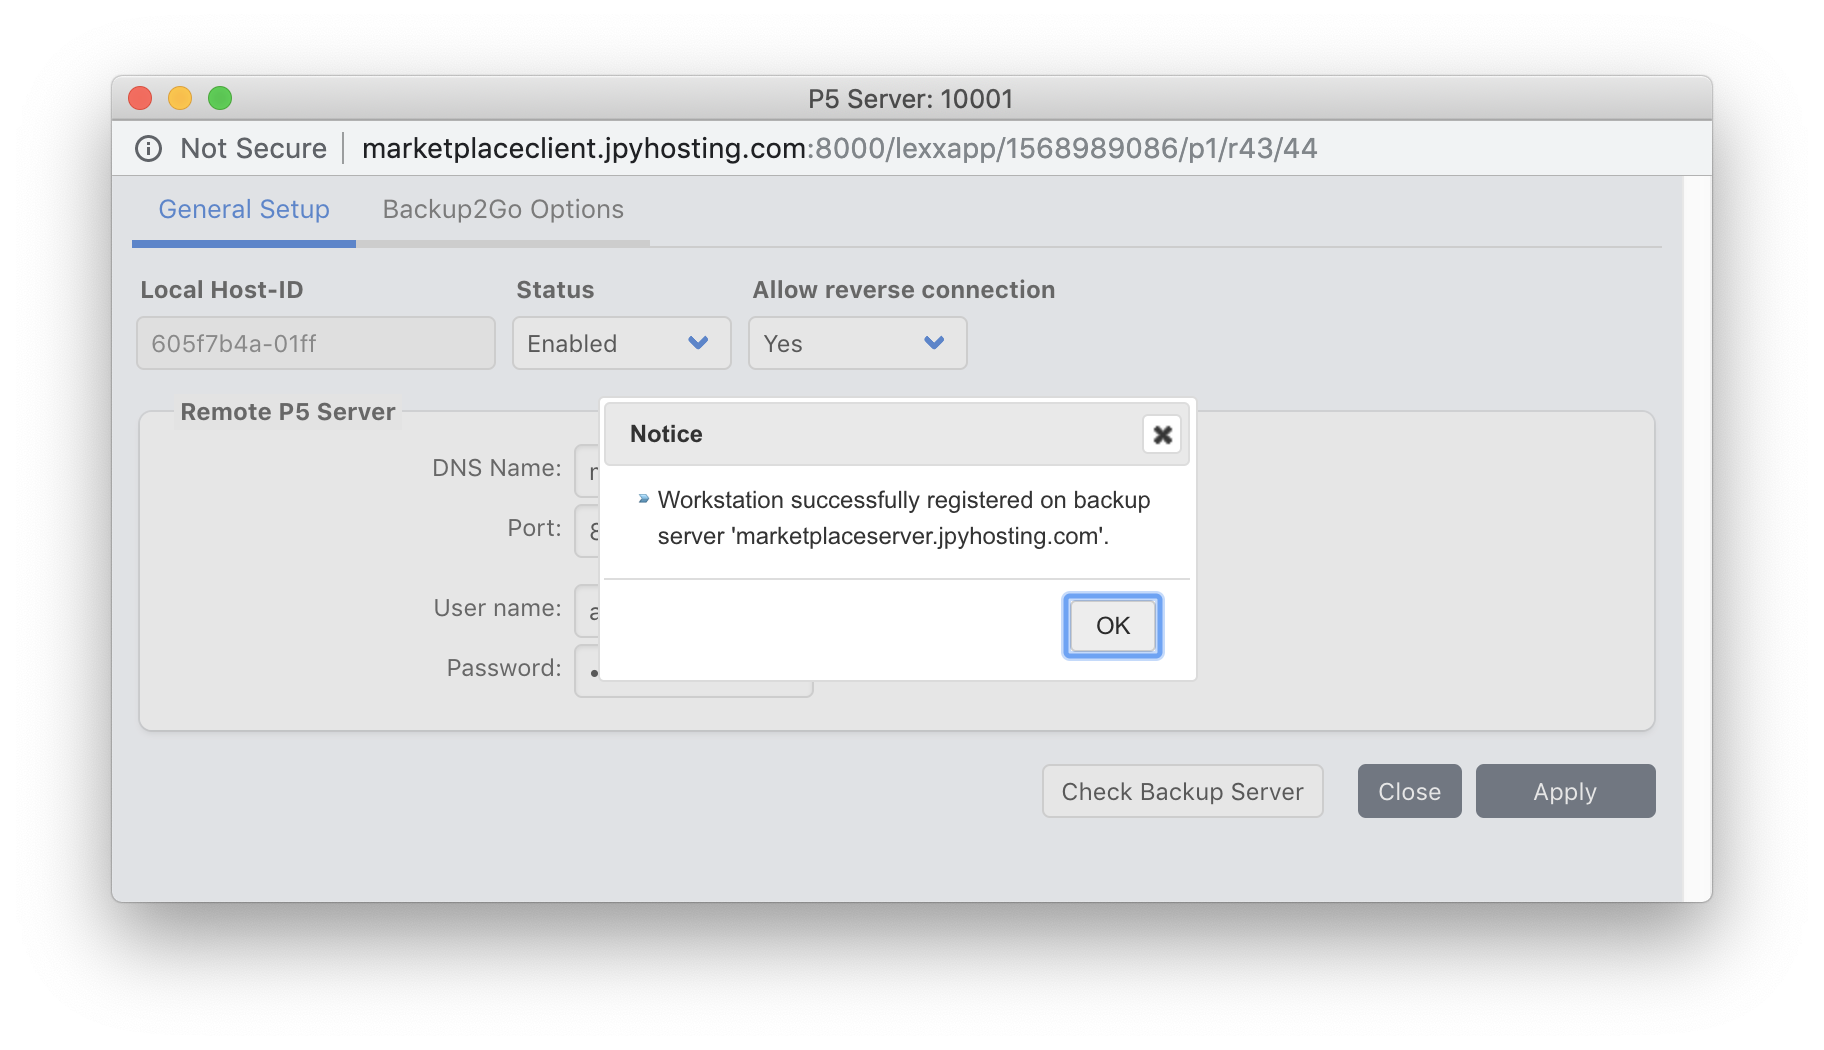
We’ll now configure the remote client to connect to the hosted P5 server. Ignore the prompt to enter a license, no license is required for this machine. The P5 server machine requires a license to activate remote clients. Begin by selecting ‘Agent Setup’ from the ‘P5’ menu, top right in the web-admin interface. On the left hand side of the main window, click ‘Remote P5 Server’ to display a list of configured remote servers, initially empty. Click ‘New’ to add a new remote client via a pop-up window.
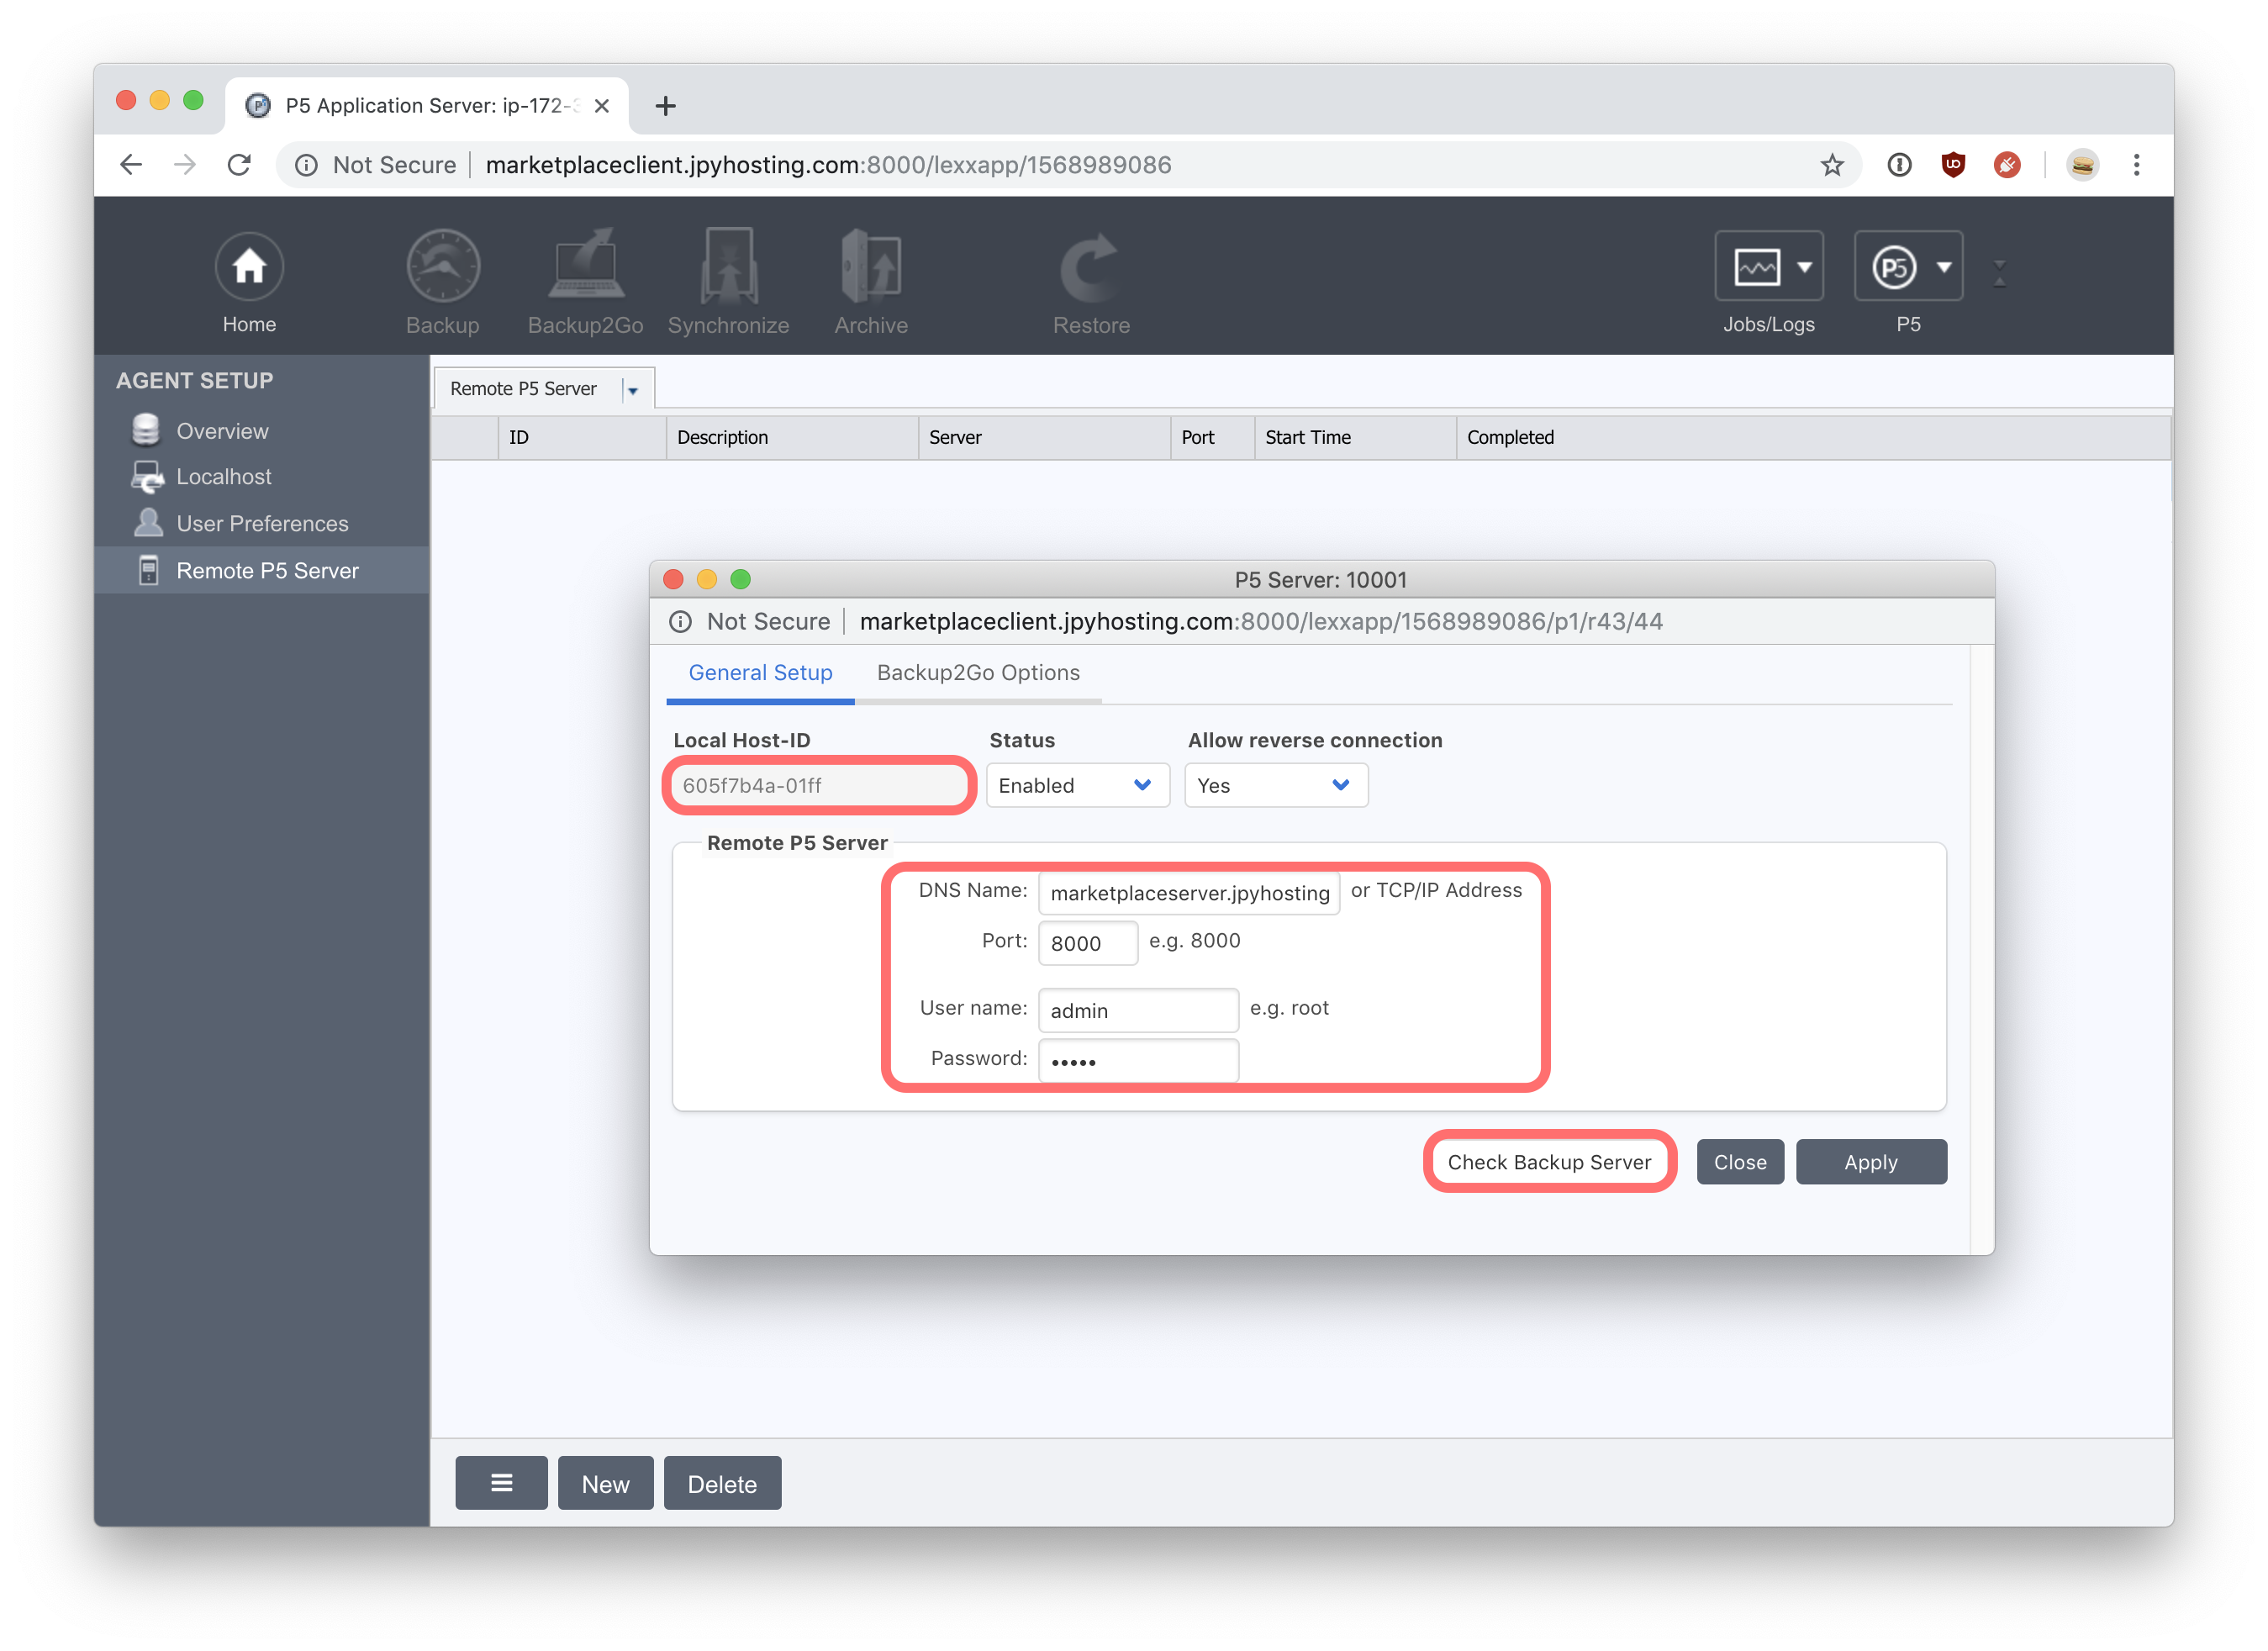
Take a note of the ‘Local Host-ID’ displayed in this window – you will need to add this ID to the server to complete the remote connection setup. In the ‘Remote P5 Server’ section of this window, enter the IP/DNS name for your hosted P5 server, plus a username/password to connect. The default IP port, 8000 can be changed to 8443 to make a secure SSL connection to the server. Set Status=enabled and Allow Reverse Connections=Yes. Then click the ‘Check Backup Server’ button to test that this host can successfully connect to the hosted backup server.
P5 is now running on the remote machine, you can now return to the web-admin interface on the hosted server P5 installation. Note that by installing P5 on this remote machine, it is automatically configured to startup as a background process/service when the machine boots.
Add remote P5 client to hosted P5 server
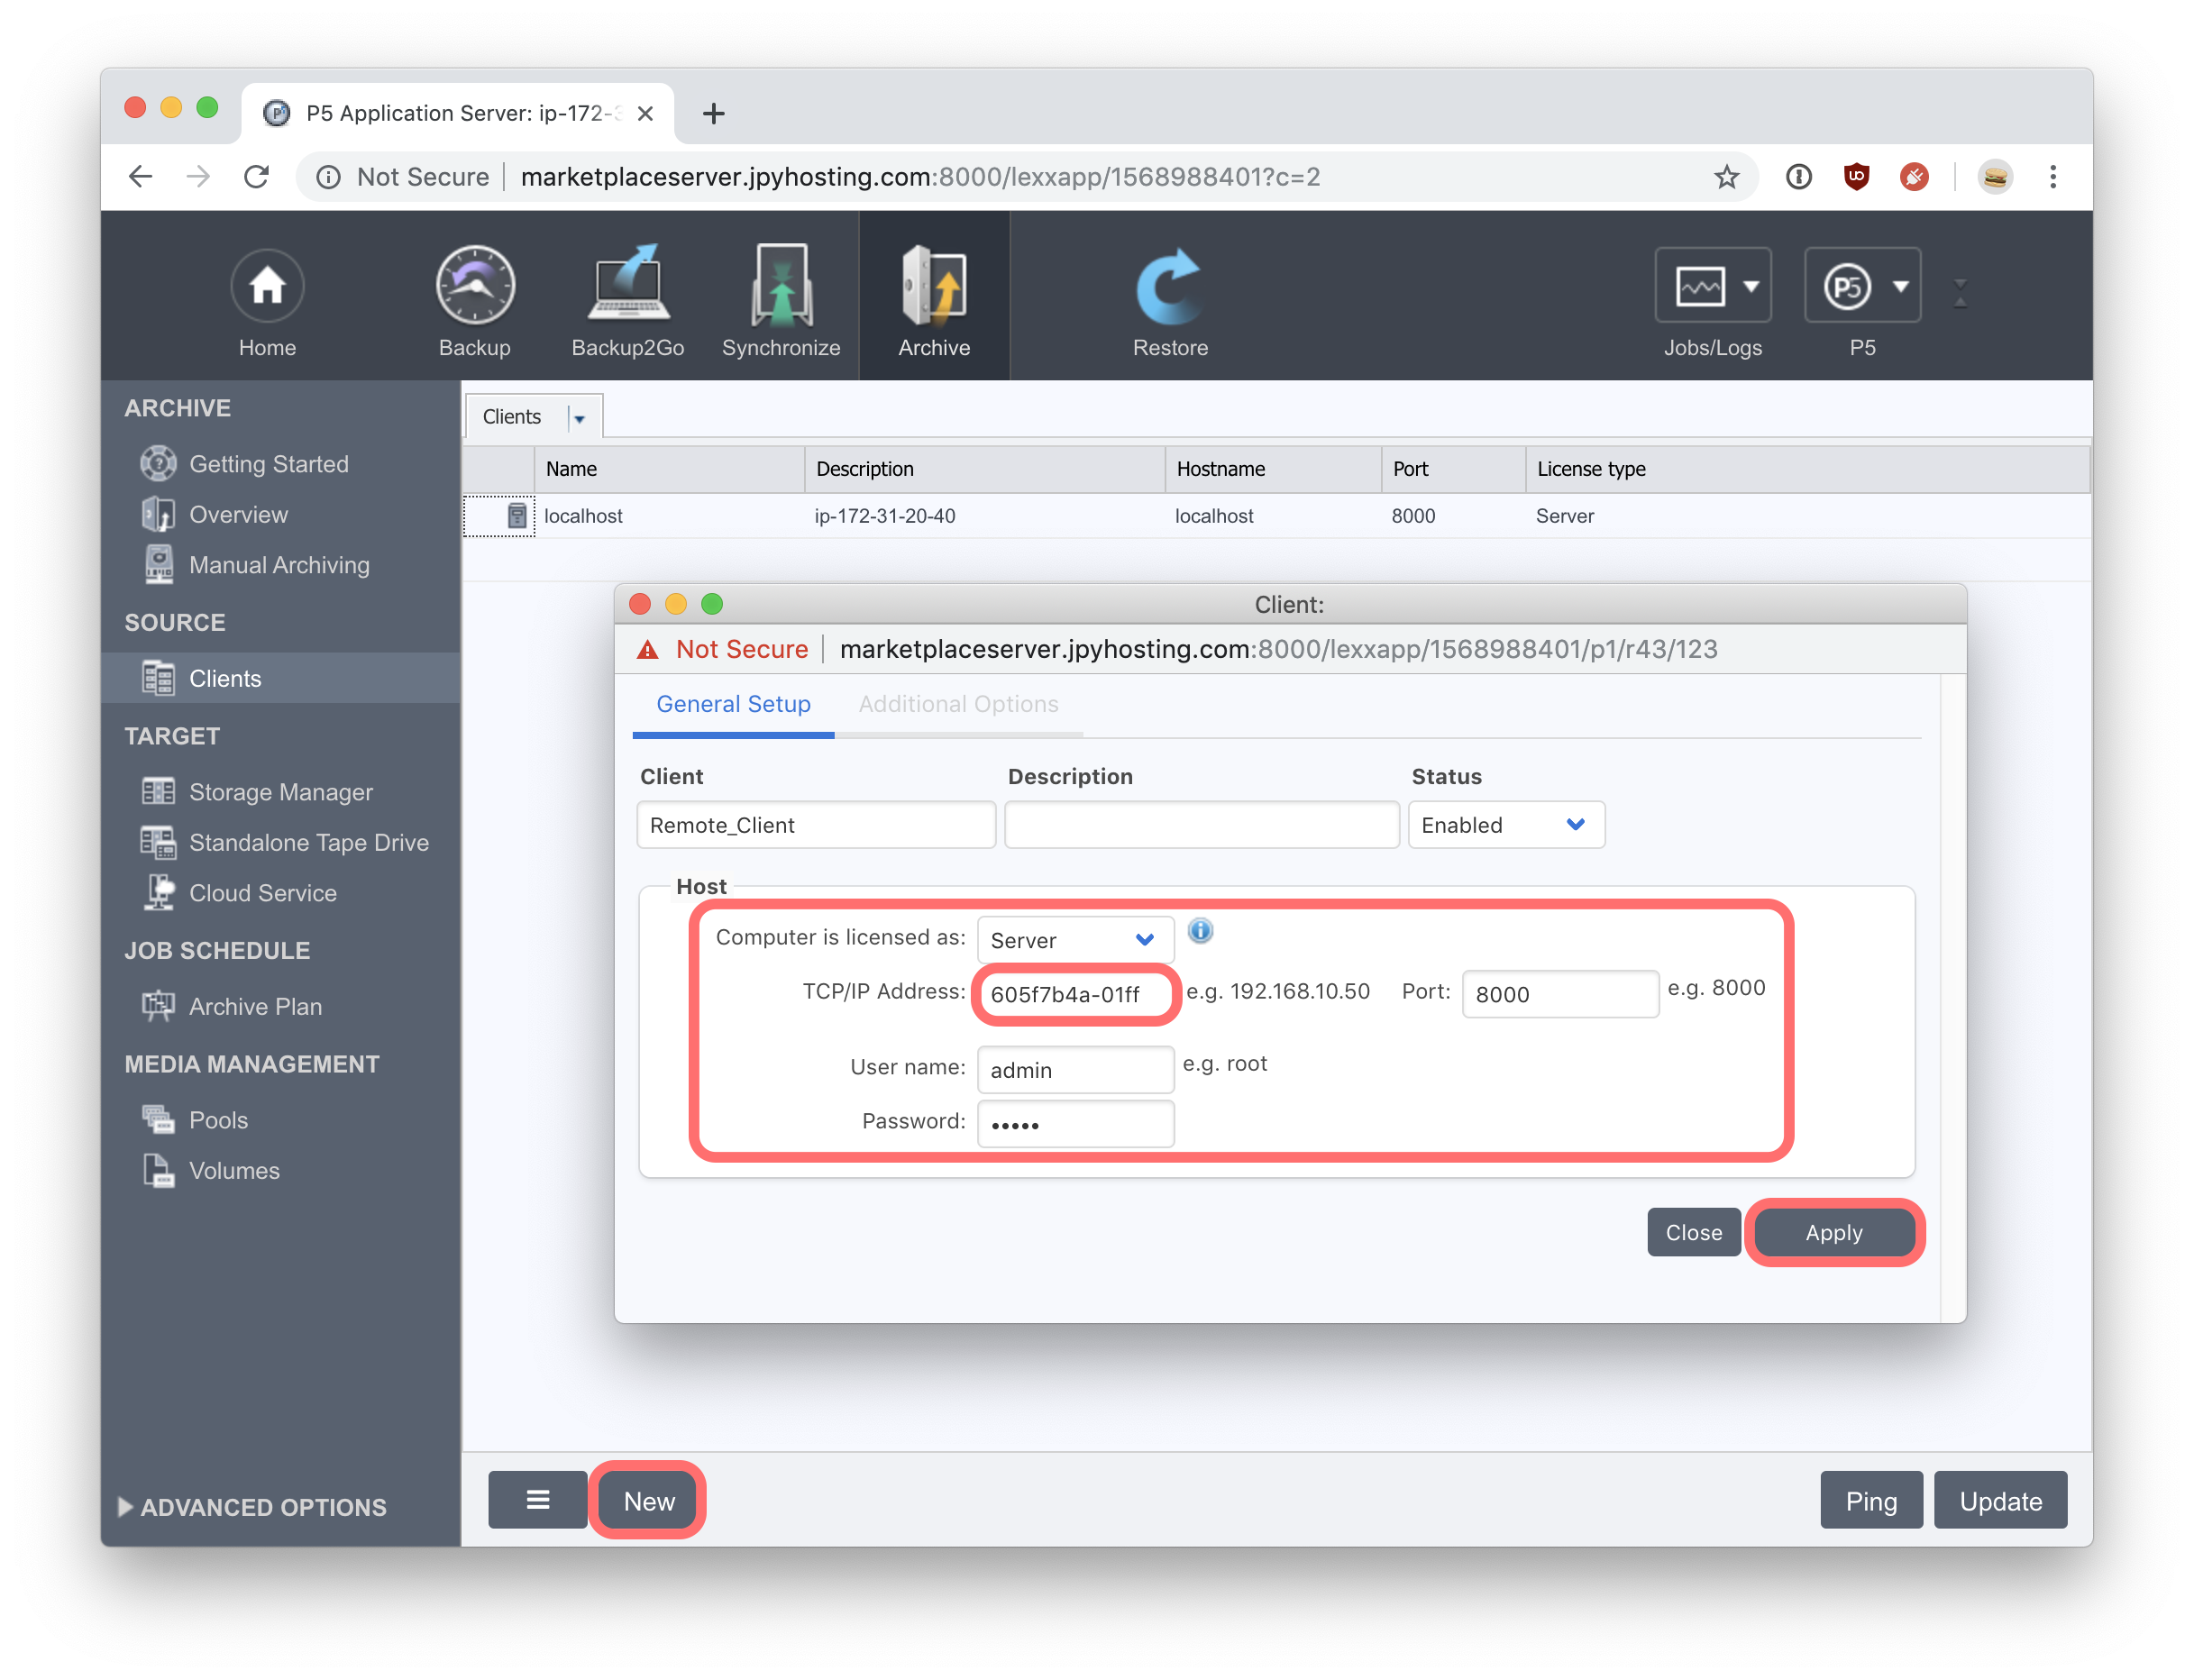
We now point our web browser back to the web-admin interface on the hosted P5 server in AWS. Since we wish to archive data from our remote client machine, we must now visit the ‘Clients’ section, under the ‘Archive’ tab, on the hosted P5 server machine. Here we click on the ‘New’ button and enter the details of the remote client into the pop-up window. The remote client is maintaining a permanent connection back to our P5 server, so rather than provide the IP address in the ‘TCP/IP Address’ field, we use the Host-ID that we noted down while configuring the remote client connection in the previous step. Also enter the authentication information for the remote client. Provide a name for the remote client, in the ‘Client’ field, and click Apply to complete.
Section 3: Select archive data run an archive job and restore data
Select files/folders from remote client for archive
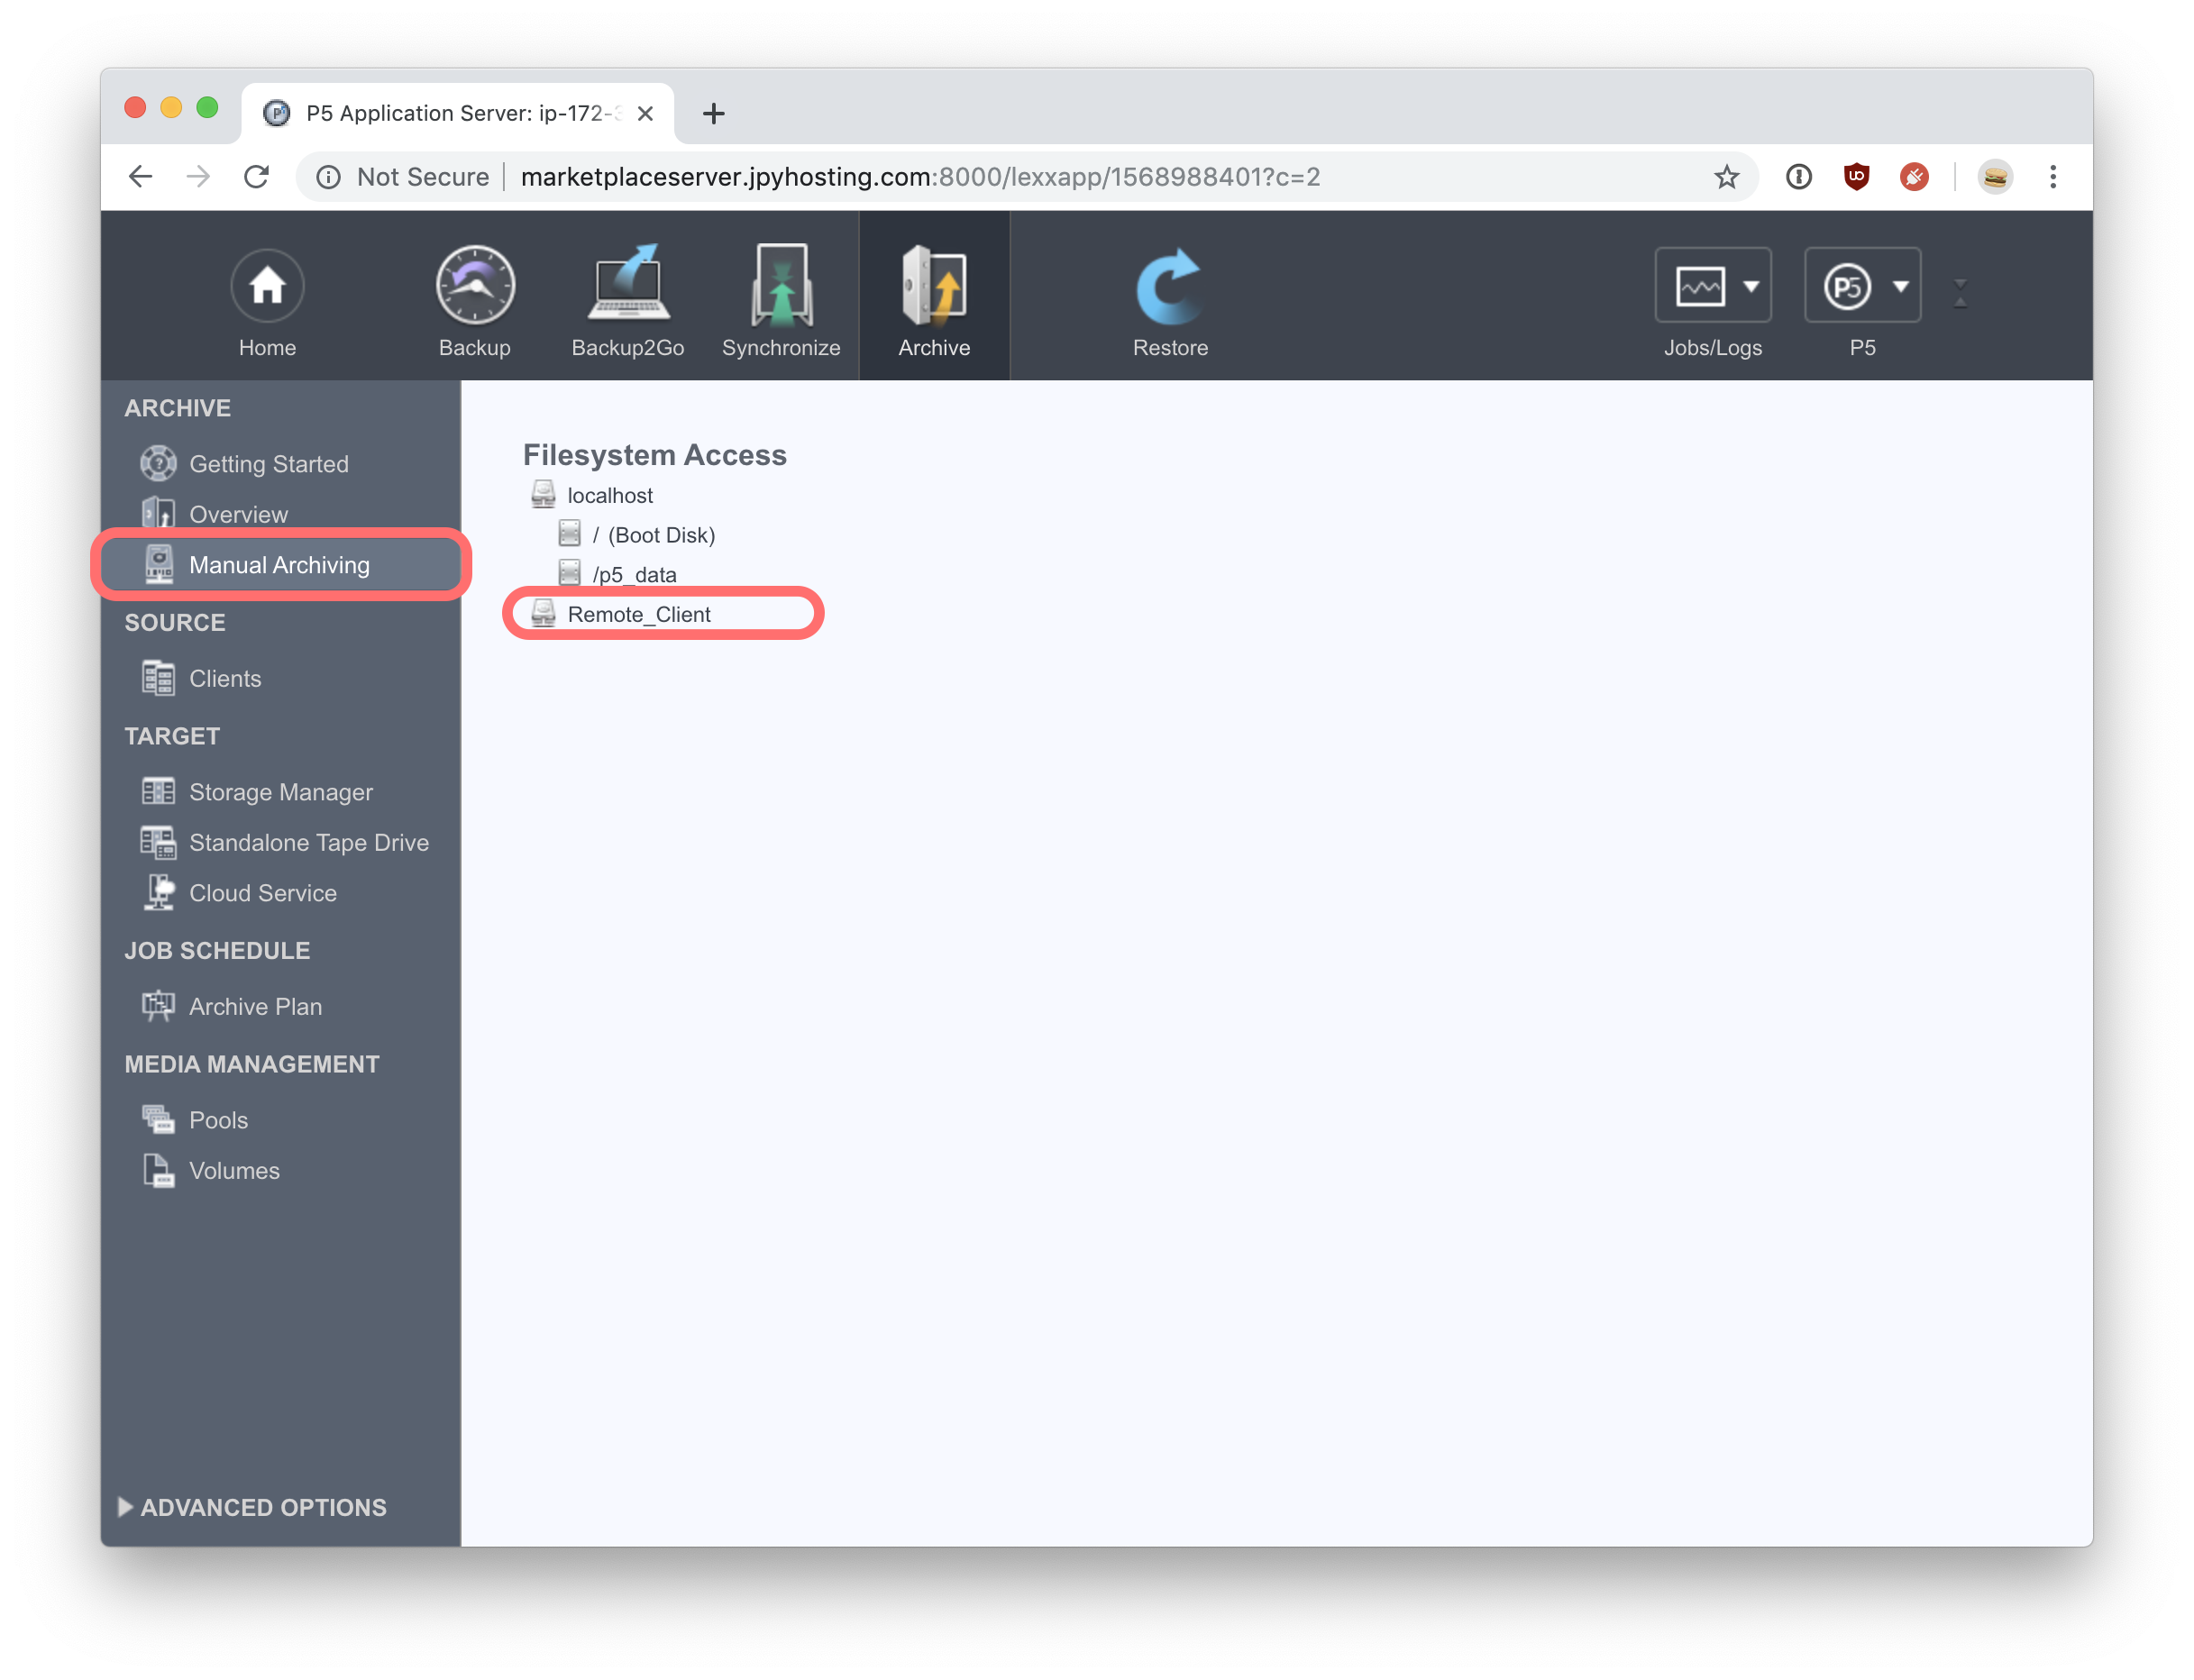
Still in the ‘Archive’ tab, click on ‘Manual Archiving’ to show filesystems connected to both the local machine, and the remote client. Clicking on the Remote Client (or whatever you named your client) will show the root level of the filesystem. From here browse the filesystem and locate files/folders that you wish to archive, highlight them and click on ‘Add to Archive Selection’.
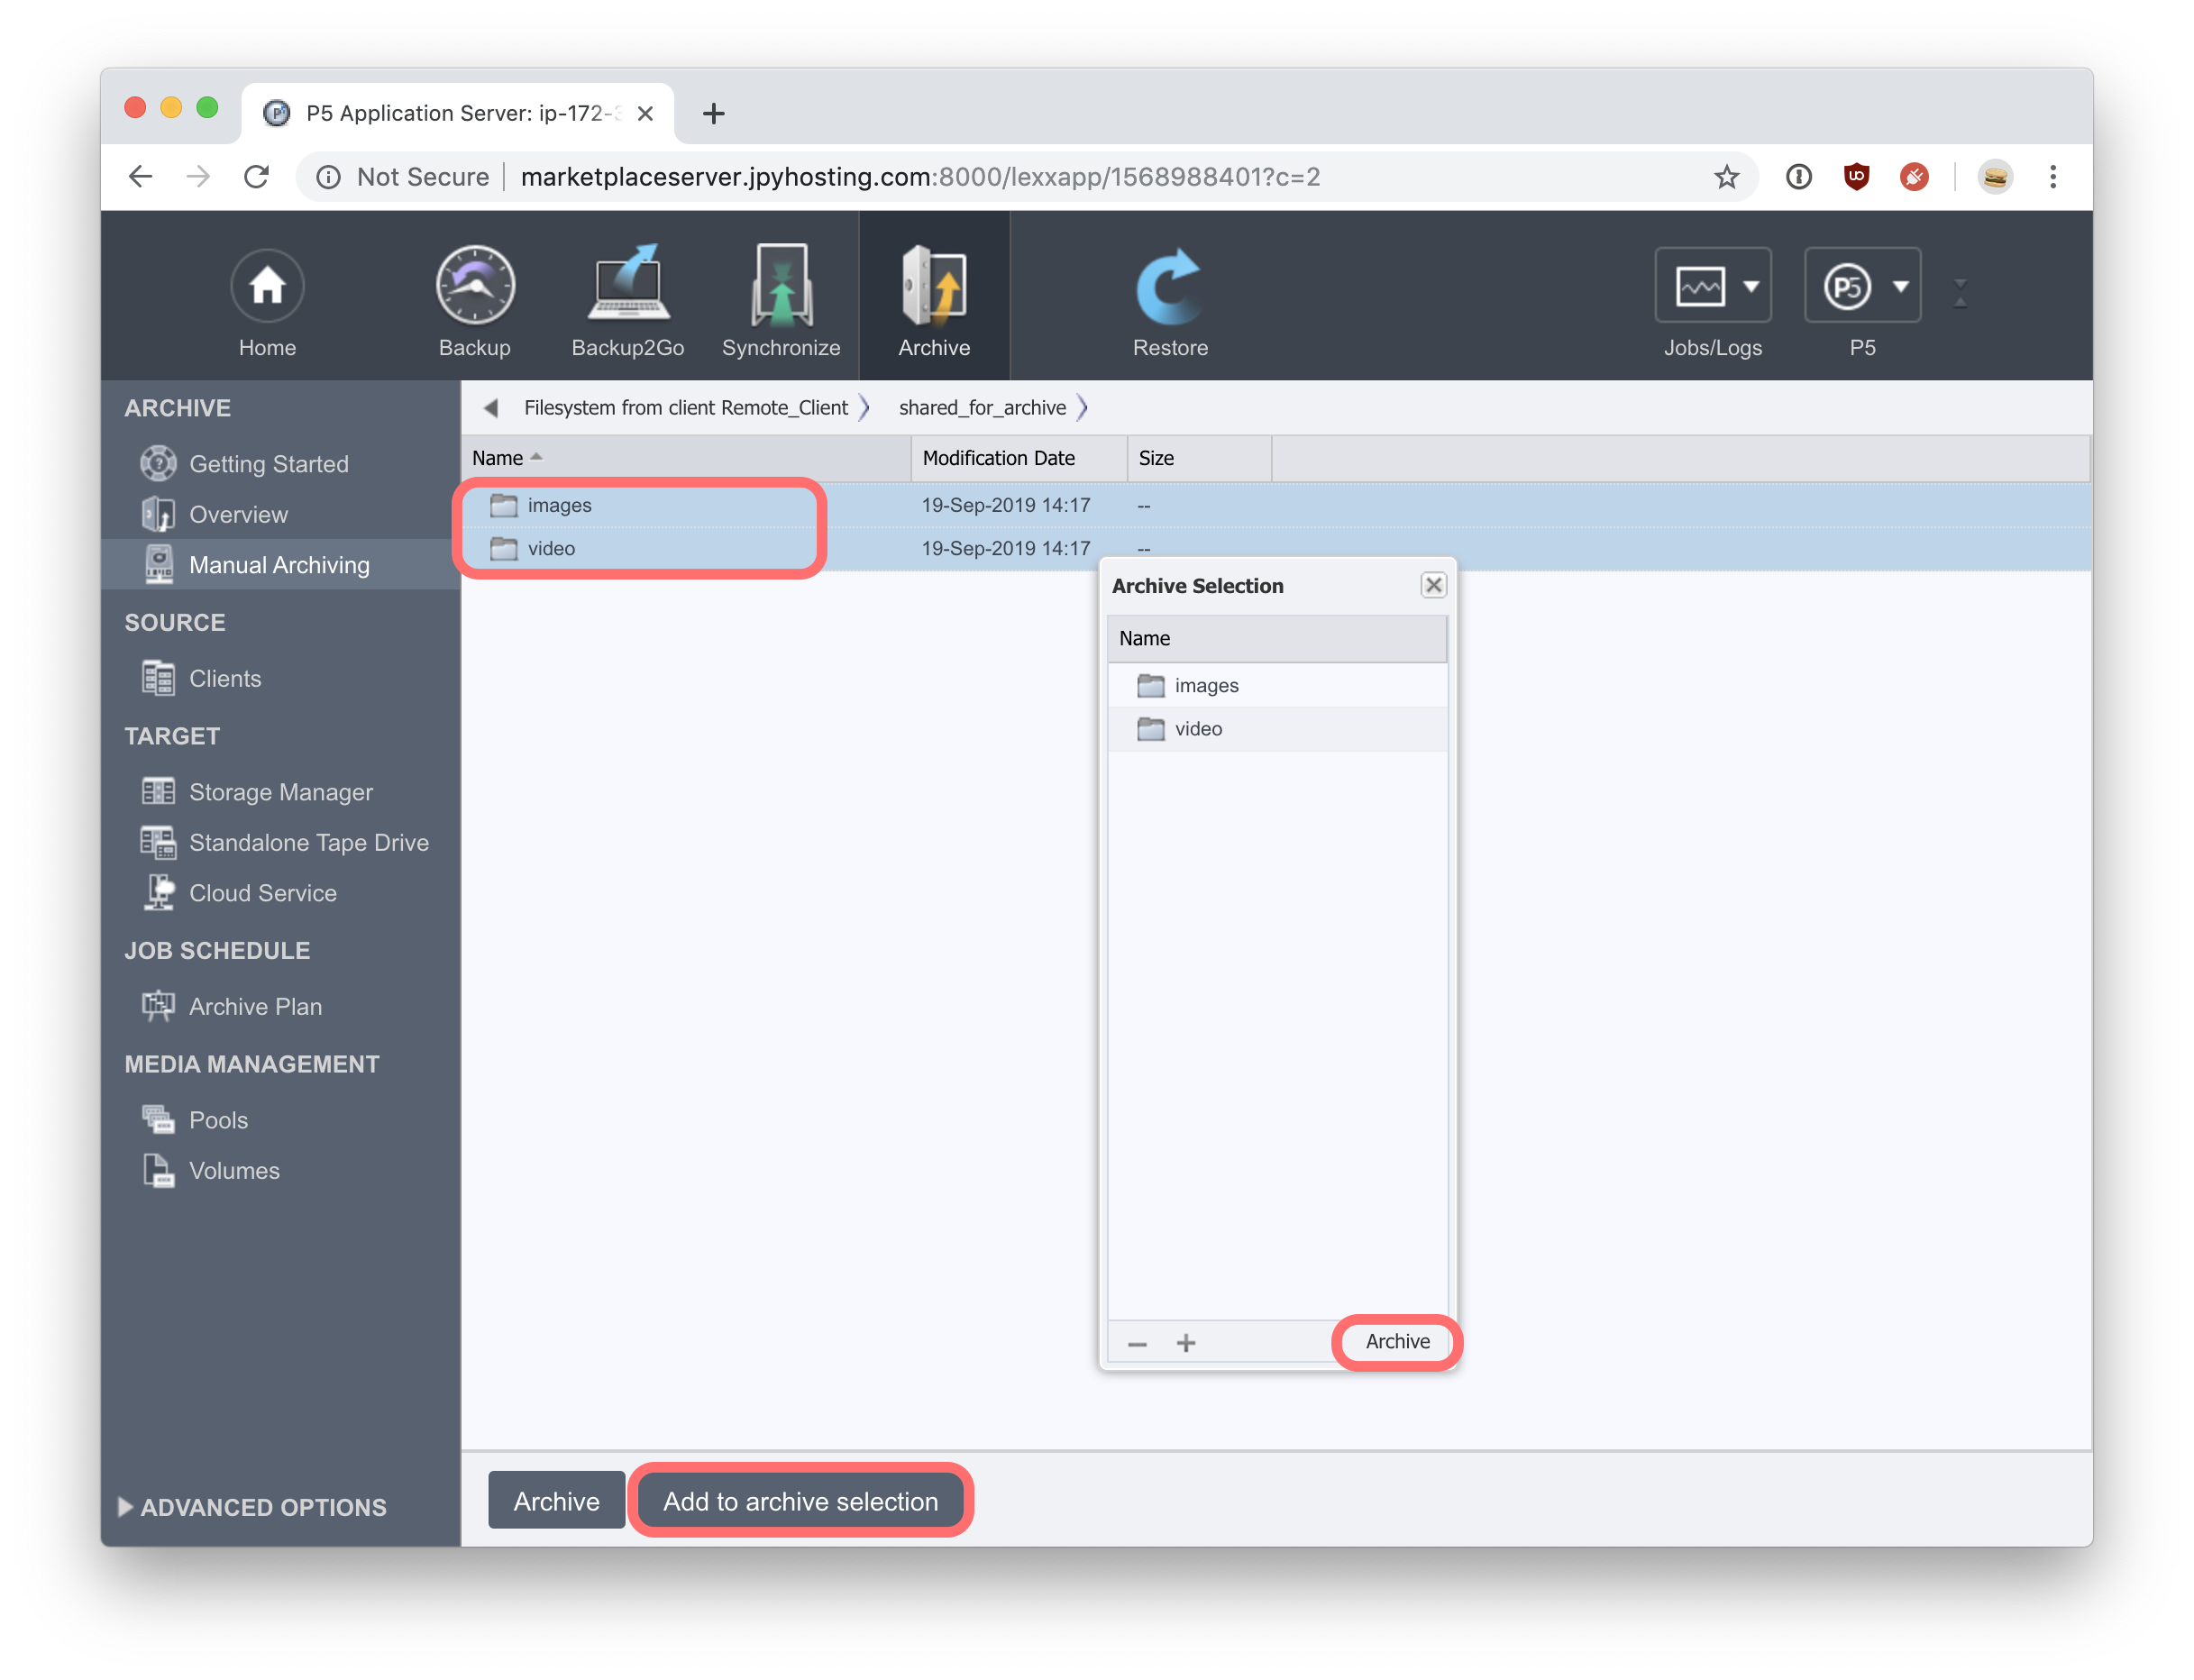
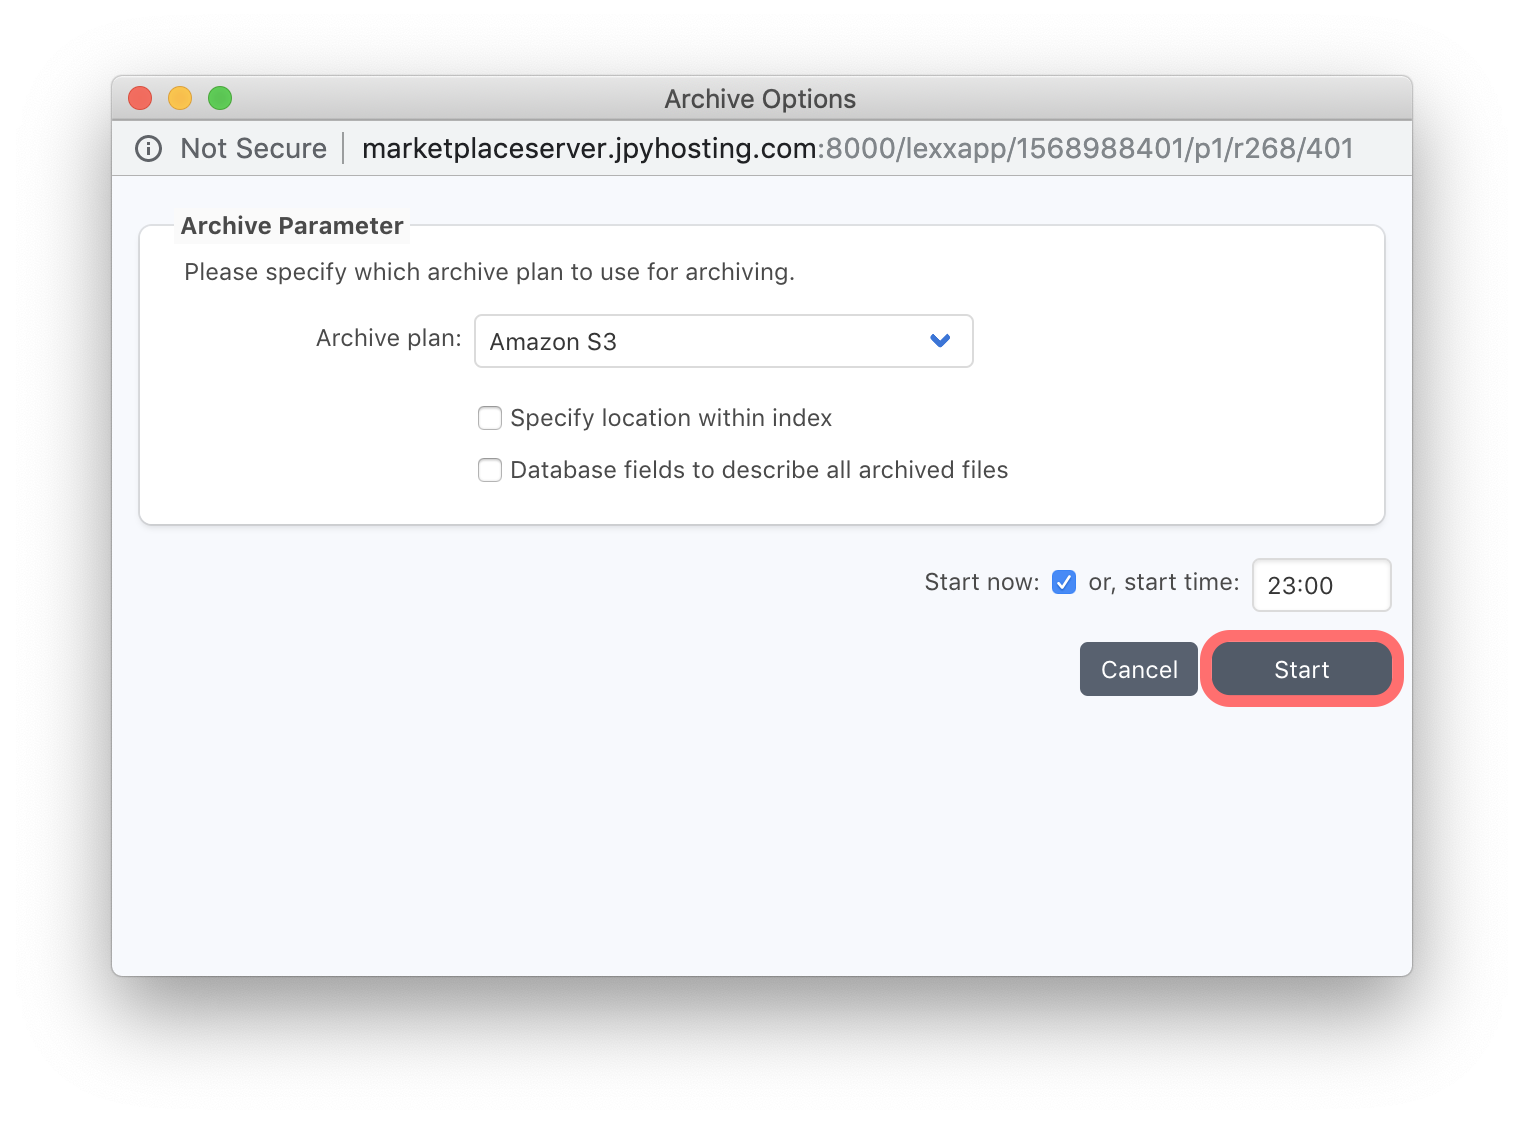
A pallet window will list your selections of files/folders for archive. You can continue browsing and use the ‘Add to Archive Selection’ button to add more to the list. When you’re ready to run the archive job, click the ‘Archive’ button at the bottom of the ‘Archive Selection’. Another window will prompt you for the ‘Archive Plan’ you wish to use to perform this archive job. Our previous setup will have created a single Archive Plan that will already be selected. Additional different archive workflows can be created manually at a later stage, if required. Click on the ‘Start’ button to create an archive job that will run in the background. Note that the ‘Start’ button changes to ‘Monitor’. Clicking this button will open the Job Monitor window, where you view the running jobs progress, and check it’s status when it completes.
Your selected data is now archived to the cloud storage you configured. In the next step, we’ll recover the same archived data to a new folder.
Restoring data from the archive
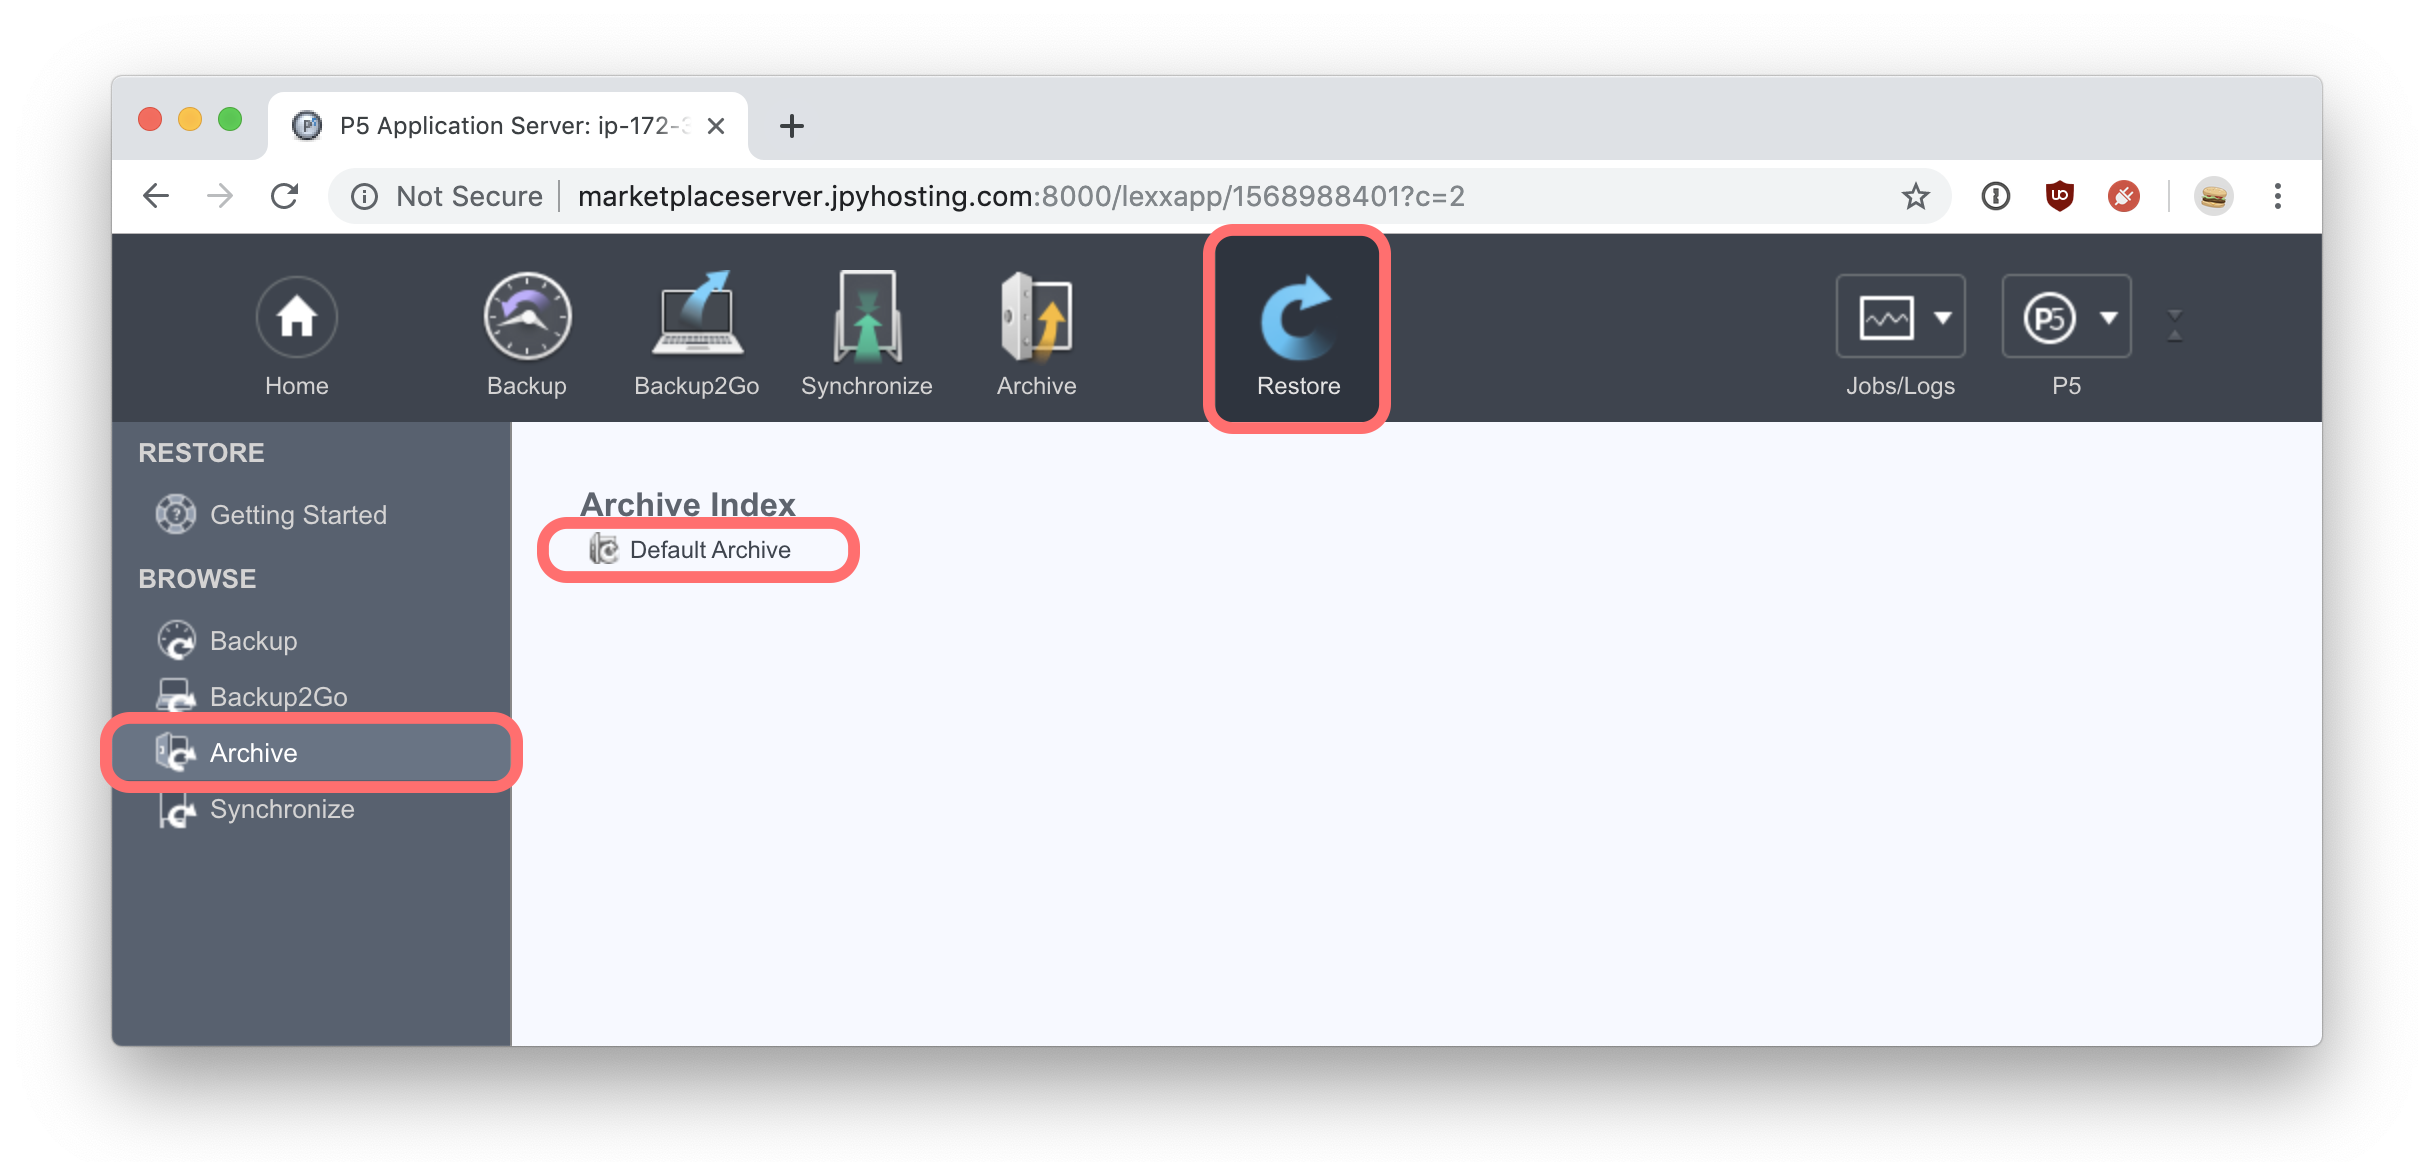
The ‘Restore’ tab allows access to the index (database) where all archived data is available to browse and restore. Click on this tab and then on ‘Archive’ to reveal the ‘Default Archive’ index. This index is created upon installation and used by default. Other indexes can be created to create separated, independent archive indexes if required. Click on the ‘Default Archive’ index to browse it’s contents. Inside the index, we’ll find the files and folders that we archived.
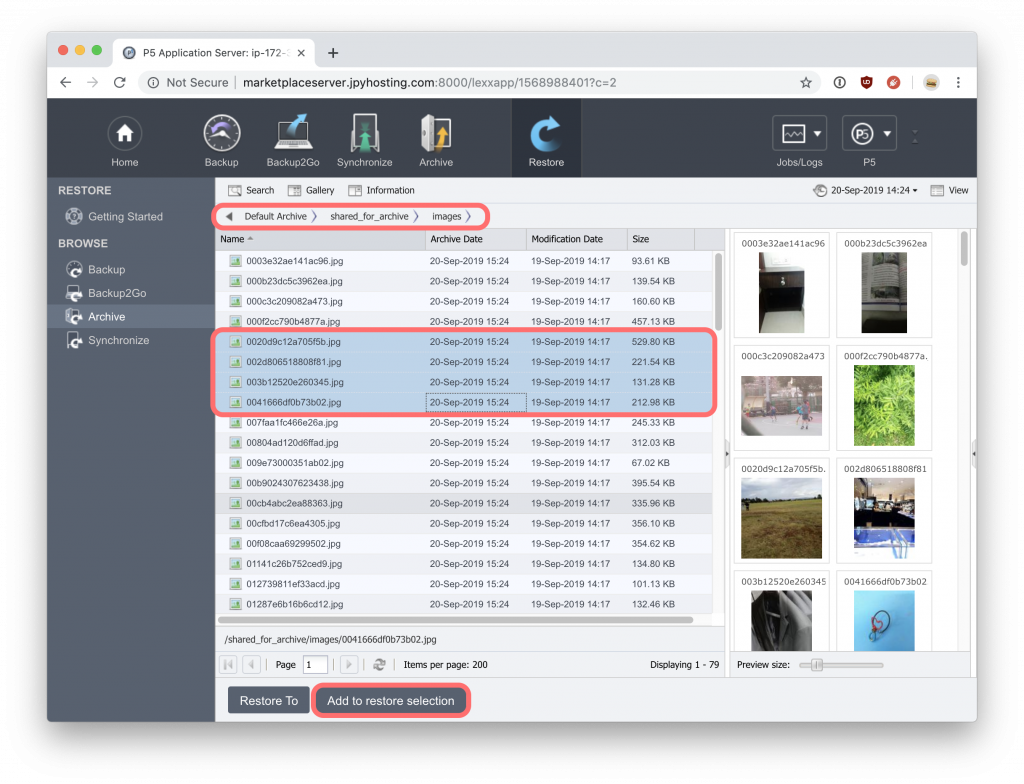
In the above view of the archive index, we see a folder containing images being displayed. At the top we see a ‘breadcrumb trail’, indicating the path within the index that we’re currently viewing. Below this is the list of files at this location, showing filenames and other information. To the right we see thumbnails, generated at the time of archive, and stored within the index, to allow easy selection of archived data by having a visual preview.
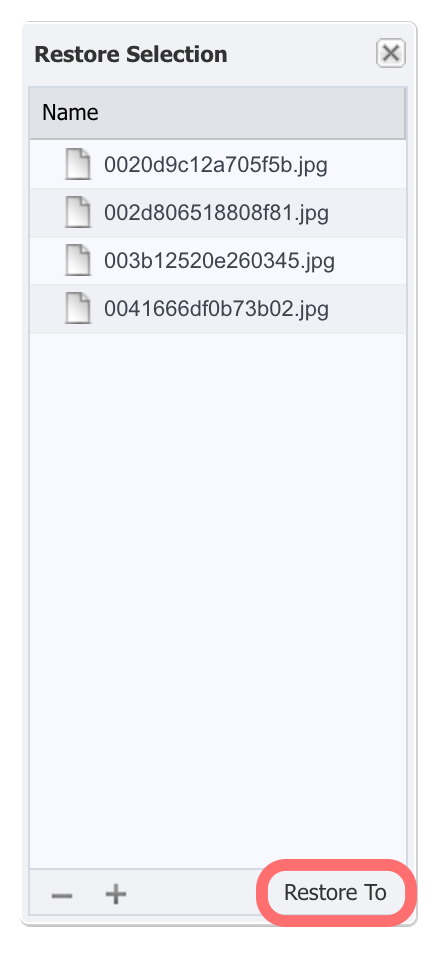
Highlight one or more files from the index and click ‘Add to Restore Selection’ to open a pop-over pallet window where we can collect some number of files and folders ready for recovery. In the same way that we did when selecting files for archive. Click on the ‘Restore To’ button to trigger the restore.
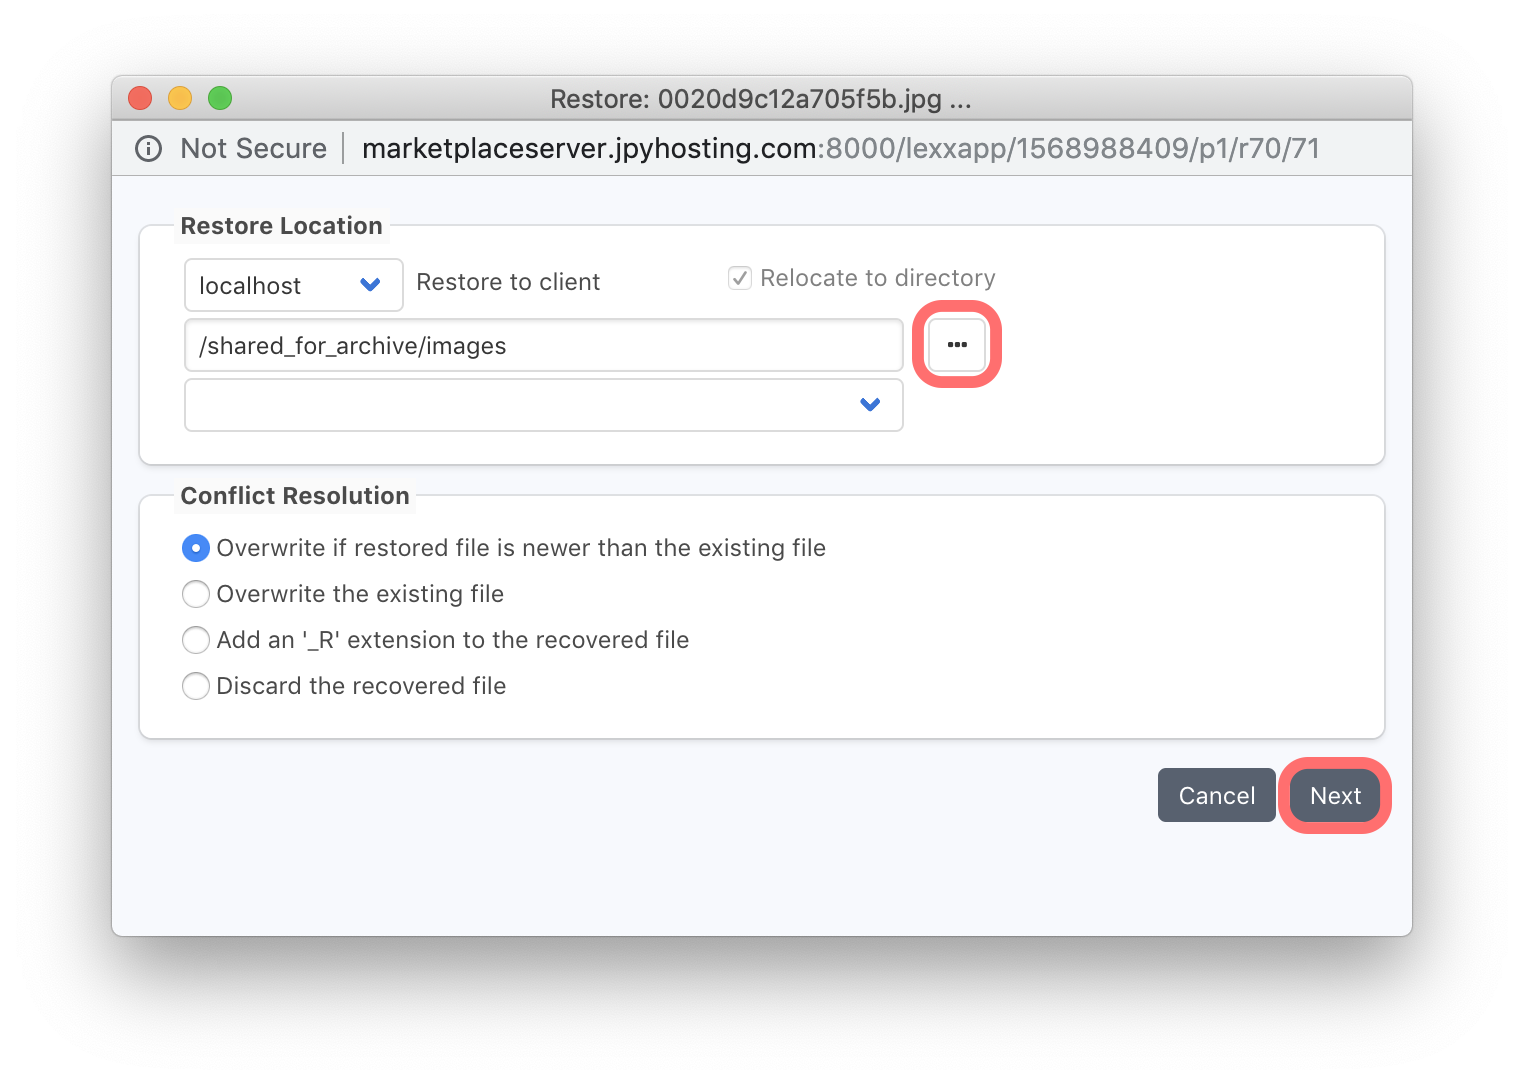
The next window allows selection of a folder into which the data will be restored. Use the ‘…’ (ellipsis) button to browse filesystems from either the remote of local client, to select a folder to restore into. The default restore location will be the folder the files were originally located. The ‘Conflict Resolution’ options in this window provide various options regarding how to deal with the situation where a file being restored will overwrite an existing file at the same location.
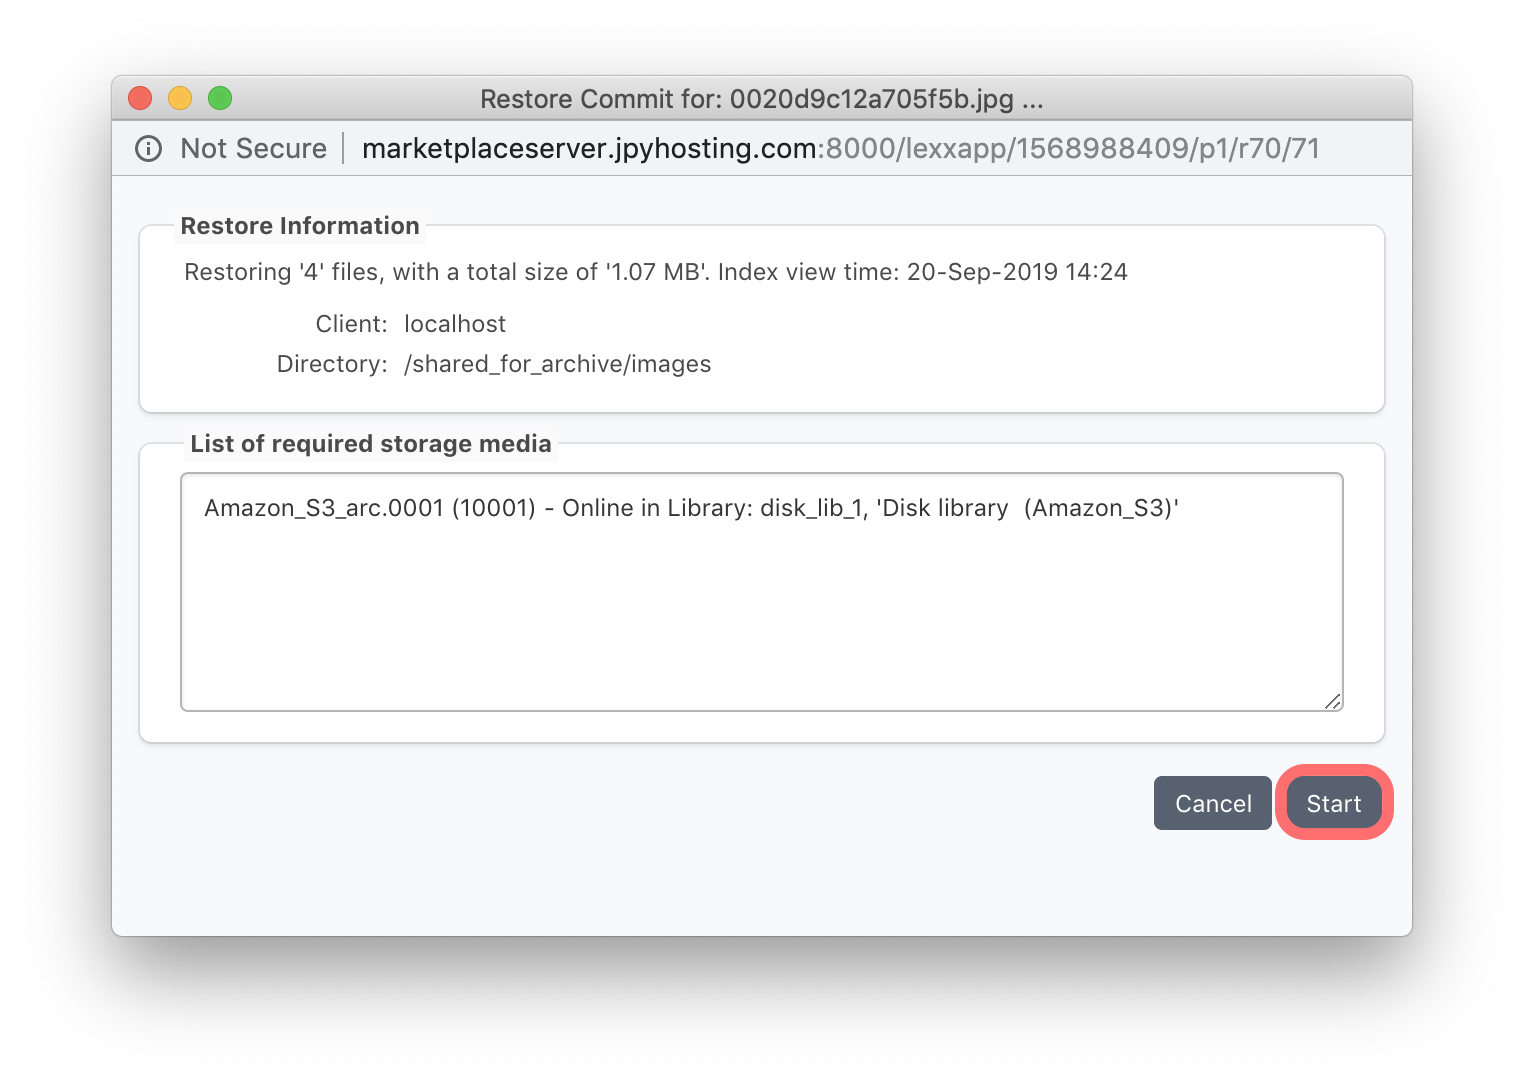
The final step before the data is restored, is to show the total size of the data to be restored, the number of files, and the virtual tapes, or ‘volumes’ that will be required for the restore. Click ‘Start’ to begin the restore job which can also be monitored in the ‘Job Monitor’ window.